Here is another design in a series of beam "unmodified" hobby servo
controllers.
The uSERVO3 uses just one 74HC14 chip to impliment microcore with diodePNC
and two PWM controllers driving the front and rear servos.
The active Nv sets the CW and CCW pulsewidth of the PWM generator to
move
the motor back and forth. Between active Nvs, the PWM generator is
turned
off which holds the last position. Because of a disturbance in first
and
last pulse width in each CW and CCW pulse train, a slight jerkiness
results.
I will fix this in the next version.
This is getting closer to an optimal solution and there is still turning
and reversing to be done. I hope this can be added while tossing out
a few
more surplus parts.
From: Wilf Rigter <wilf.rigter@p...>
Date: Fri Apr 21, 2000 7:51 pm
Subject: re: silence bot
Active silence (wide band sound cancelation) is not as simple as you
think.
There are only a few applications that I am aware of using this technique.
Active cancelation headphones reject all external sound allowing
listing to
your favourite CD in very noisy environments. Mics on the headphone
cups
pick up the external noise, amplify and invert it, and add it to the
audio
stream.
Another application is an active acoustic muffler for automotive engines.A
special DSP is used which shifts every frequency by 180 degrees. This
drives
a "speaker" at a junction in the exhaust pipe precisely canceling the
exhaust noise. Altenatively a muffler can be "tuned" for that signature
sound. The demo of this is scary to hear : A Harley chopper with a
sound
on/off switch or a Moped on steroids.
wilf
William Cox wrote:
> Hey all,
> I been thinking about noise cancellation. This might be an interesting
From: Wilf Rigter <wilf.rigter@p...>
Date: Thu Apr 20, 2000 10:20 pm
Subject: RE: Servo Controler
Sure a 74HC14 is fine, after all it's basically a 2Nv grounded bicore
circuit. It may require slightly different caps if you run out of timing
adjustment. A 4069 hex inverter (metal gate CMOS) would probably work
fine
too. Here is an even simpler solution with the 139 output pin functions
changed so that the A and B inputs can be hooked straight to a microcore.
Note the use of the 139 output 3 for the "hold" position function.
regards
wilf
From: Wilf Rigter <wilf.rigter@p...>
Date: Thu Apr 20, 2000 5:11 pm
Subject: RE: Solarizing
Hi Jim,
This is the venerable D1 circuit but the diode has been replaced with
a
2N3904 transistor. It can be used just like the D1 but turn-on is not
so
mushy and it switches rapidly when the light drops just a little.
The 1M
resistor across the solar cell can be changed to a smaller value
(ie 100K)
to adjust sensitivity and make it turn on even faster.
regards
wilf
From: Wilf Rigter <wilf.rigter@p...>
Date: Thu Apr 20, 2000 3:31 pm
Subject: RE: Servo Controler
Try this for less parts
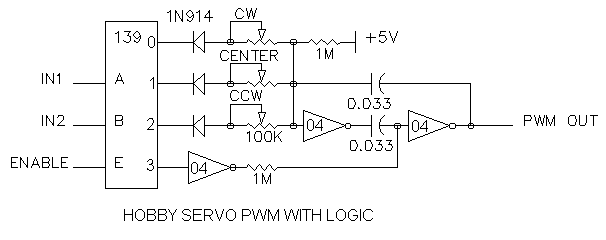
The binary inputs IN1 and IN2 control the PWM as follows.
0 0 = CW
1 0 = CENTER
0 1 = CCW
1 1 = HOLD
The HOLD function forces the PWM output low and the servo will remain
in
it's present position for a short while.
Raising the ENABLE line high forces the PWM output high and is probably
not
very useful.
wilf
From: Wilf Rigter <wilf.rigter@p...>
Date: Wed Apr 19, 2000 5:17 pm
Subject: RE: Dummy Walker
Hi Ben,
nice progress report!
My uCrawler turns very nicely towards a light source, with a bright
light on
one side it turns with a 18 inch radius small light difference cause
slower
turning.
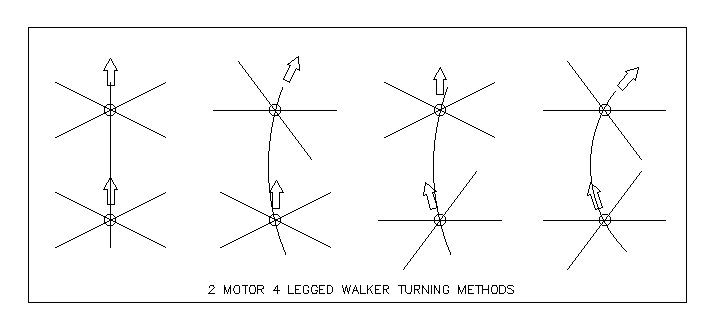
Turning should be easy with a 2 motor walker. If the walker has the
front
motor at 90 degrees (up down leg motion), it's only the rear legs impart
forward motion and determine the direction. It is the vector of the
center
(midway point) of the horizontal stride that determine the direction.
If the
front motor is at 45 degree, it also contributes to the forward motion
and
can be used together with the rear legs to decrease turning radius
as shown
in the attached:
Reversing a Dummy Walker is a little tricky since the two pattern generators
interact. It requires that the middle motor driver outputs are separated
at
the common point of the motors (use the 2 spare drivers) and then a
conventional XOR reverser can be inserted at the inputs of the rear
servo
motor drivers.
Also consider using and AC240/241/244 as a reversing motor driver. Only
one
buffer is active per motor connection but should provide the same
performance with higher drive current available from the 74AC logic.
regards
wilf
From: Wilf Rigter <wilf.rigter@p...>
Date: Tue Apr 18, 2000 5:42 pm
Subject: RE: Is Tricky-Dick BEAM?
It's BEAM!
There is an element of appropriate technology to BEAM that applies at
many
levels.
1. entry level technology - easy to learn, inexpensive, quick and
interesting results.
2. simple problems require simple inexpensive solutions.
3. simple designs can be deeply understood (unlike Intel/windoze).
4. simple systems with complex behaviour: complexity theories, emergent
properties, economics, riots
5. connections with art, technology, math, science: biology, physiology,
psychology, natural philosophy
6. design ideas based on natural systems
7. a breeding ground of ideas, discovery and invention
8. unspoiled by commercialism but
9. potentially profitable (one million "buy-me" solar
spinners/pendulums/pummers at $10 a pop can't be wrong)
and on and on ....
wilf
From: Wilf Rigter <wilf.rigter@p...>
Date: Sun Apr 16, 2000 5:40 pm
Subject: PIR detectors - was Re: A reply to Zoz ... and a challenge
for advanced/bored BEAMers.
Some thoughts on PIR:
deep infrared (PIR) of body heat is close to microwave radiation in
wavelength. The PIR detectors use piezo type sensor devices that are
sensitive only to variations or changes of IR (heat) projected on the
detector surface. All detectors include some form of output buffering
to
interface with other circuits. The most common detectors used in household
PIR motion detectors are simple devices with a slow response time and
only
small variations in output (+/- 10-100mV) signals which must
be amplified.
Some IR detectors have build in gain, filters, and level detector and
generate a logic level output. (
http://www.acroname.com/robotics/parts/R3-PYRO1.html ) Simple
detectors use
only one sensor but newer PIR detectors use twin sensors to reject
variations in background IR and/or small targets (animals) using a
differential sensing method. Some PIR detectors use as many as
4 sensors to
reduce erroneous outputs.
The detector sensitivity is greatly enhanced by adding a special freznel
lens which increases the field of vision but more importantly breaks
the
image into multiple copies or zones projected on the detector surface.
You
can easily observe these multiple projected images by holding
a PIR freznel
lens in front of a white surface with a small circle representing the
detector. When an PIR source moves across the field of vision, the
freznel
lens causes it's image to move in and out of zones, and even a slow
moving
PIR source effectively becomes amplitude modulated (a rapidly pulsating
PIR
source) on the sensor. Since the detector is sensitive to change,
moving
the detector itself in front of a stationary PIR source has the same
effect
as a moving PIR source. If the IR target to be detected is a very bright
broad spectrum IR source (ie a candle, fire) in contrast with a much
cooler
background and then the bot can roam or scan for such IR sources. Additional
IR filtering may be required to desensitize the detector to reject
background PIR objects. Alternatively, a simple PIR detector can be
used on
a bot for detecting PIR motion but not while the bot is moving. The
bot must
be stopped while it takes readings from the PIR detector. Much of the
art in
PIR detectors is the design of the freznel lens to concentrate sensitivity
in a zone of vision most likely to contain intruder motion, to accentuate
motion in one plane, and to reject peripheral PIR changes caused by
headlights or small animals.
Special lenses, a tracking head or stereo PIR vision may be a way to
sense
PIR motion while the bot itself is moving by canceling changes in background
PIR caused by the moving bot.
wilf
From: Wilf Rigter <wilf.rigter@p...>
Date: Sun Apr 16, 2000 4:19 pm
Subject: RE: You guys disappoint me
"Old pond... a frog leaps in water's sound." - Matsuo Basho
<sumie/bashoimg.html>.
Just can't stand people for calling a few words poetry, eh?
wilf
Hi Ben,
I love it! The basic principle of your design is a clear case of parallel
evolution when compared to my "earlyBEAMservo1" circuit but your arrangement
of using the three 74HC14 inverters to generate the right phase relationship
between the legs is unique.
When I look back at the basic design, I made the same observation of
"no
feedback/no time out/hanging up" of the legs when hitting an obstacle.
There
are lots of possibilities using reversers, switches and timeout elements
and
the one that evolved for me is shown in the "earlyBEAMservo2" design
which
combines a photo bridge, the basic R/C timing of an oscillator, a centering
pot with feedback from the servo pot to center the gait without springs
while allowing the legs to reverse when hitting an obstacle. The final
evolution of these servo pot feedback designs was the "uCrawler"
- light
seeking - one motor/2 legged "walker" which works very well but ironically
only on short fiber carpets. The same servo pot feedback principle
can
evolve to 2 and 3 motor walkers but I haven't (as yet) followed up
on that.
There were some other points described in the uCrawler article but
you'll
have to drag it out of the archive to find out.
regards
wilf

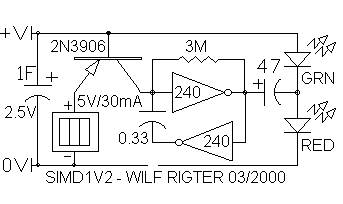
Hi Roy,
>
> Since we looked at solving your SIM1D1 problems in my earlier post,
I
> wondered if the design could be made any simpler. Lo and behold SIMD1V2
> which uses one less component and doesn't require very dark conditions
to
> turn on. The two 1N914 diodes in the earlier SIMD1 design can
be replaced
> with a single transistor (ie the two diode junctions) but in
the process,
> this revision it has really enhanced the behaviour. The PNP, which
is any
> high gain transistor including the 2N3906, is ON during charging
as the
> solar cell pumps current into the storage cap through the base emitter
> junction. The transistor collector clamps the input of the typical
> oscillator shown to +V until the solar cell output drops below the
voltage
> of the cap. In my prototype, the cap is a 1F 2.5V gold cap charged
with a
> simulated 5.5V solar cell and the transistor will turn off when the
> charging voltage drops below the fully charged cap voltage (~2.4V).
Since
> the PNP operates as a common base amplifier, the voltage gain at
the
> collector will cause a rapid voltage transition through the linear
region
> of the HC240. When the PNP turns off, the oscillator starts and causes
the
> two LEDs at the output to alternately flash. The way the 47uf cap
> discharges through each LED produces a small light explosion and
after
> image quite pleasing to the eye. The SIMD1V2 design can also replace
the
> two diodes of the original 74HC14 design or control a whole HC240
chip if
> the collector has a 1M pull down resistor to 0V and is connected
to the
> tristate enable pins. The SIMD1V2 prototype shown was actively flashing
> the 2 LEDS at a 2Hz rate for over 4 hours on a fully charged (2.4V)
cap.
>
> regards
>
> wilf
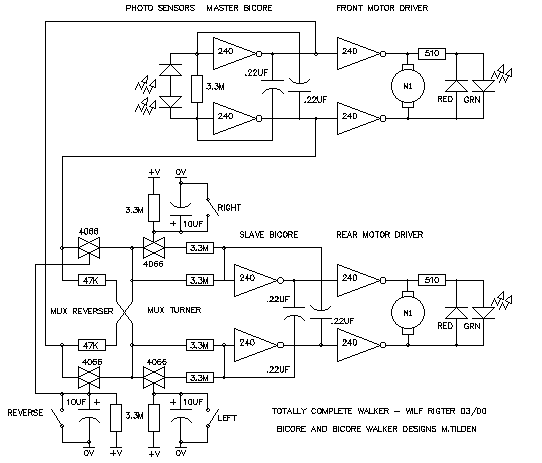
From: Wilf Rigter <Wilf.Rigter@p...>
Date: Sun Mar 26, 2000 8:34 pm
Subject: [alt-beam] TO MUX OR XOR ,THAT IS THE QUESTION was :
Reverser circuit drawn wrong??
The "reversed" reverser is one of many little conundrums people run
into
when learning about these circuits.
The reverser layout drawing on Ian's site, is of a 240 chip laying on
its
back with pins mirror image compared to the data sheet. The layout
drawing
contains TWO reverser circuits on one 240 chip. This is useful for
"three or
more" motor walkers and other applications. In case of 2 motor
walkers you
will only need one of those reversers and the remaining 4 inverters
can be
used for other things like the master/slave bicore or motor drivers.
So when
experimenting with this reverser on a breadboard, use just one half
of the
240 chip wired up as one reverser. As always GROUND UNUSED INPUT PINS
to
avoid unexplained problems.
The reverser circuit works by letting the control pin determine if input
signals are to be inverted or not at the ouputs and this function makes
this
design a XOR reverser as distinct from a MUX reverser.
<<IANSREVERSER.gif>>
The first figure shows a small part of Ian's XOR reverser
with the
resistor connected across an 240 inverter between pin 2 (input) and
pin 18
(output). This is one of four inverters controlled by tristate enable
pin 1.
When pin 1 is 0V, the inverter "inverts" signals from input to output
ie a
0V signal at the input pin produces a +V signal at the output pin and
conversely a 0V signal produces a +V output.
When pin 1 is positive (+V) , then the inverter output is an open circuit
or
floating pin. A signal connected to the input pin 2 passes through
the 47K
resistor unchanged to the output pin 18 when the inverter output is
open
circuit ie V input = V output. Unlike the inverter output, in the
noninvering mode, the 47K resistor can only drive very small loads.
This
restricts the use of this reverser to driving output loads like a slave
bicore or a HC139 type h-bridge but NOT a 4 or 6 transistor h-bridge
input!
Ian's almost complete walker is an example of this XOR reverser used
between
the master bicore outputs and the slave bicore inputs.
The reverser works by inverting or not inverting 2 inputs connected
to
bicore or microcore outputs. For a bicore whose output signals are
always
complementary polarities, this inverting or non-inverting of signals
is
equal to swapping outputs. When used with a microcore the result is
the same
although not strictly speaking by swapping microcore outputs but rather
by
changing the polarity of the rest state at motor driver inputs (motor
not
running) and using an inverted polarity for the active state motor
state.
In fact, this type of XOR reverser can be much more easily made with
a
74AC86 XOR gate, in which small motors can be driven directly
from the
output pins without additional buffers or h-bridges and which I posted
many
moons ago.
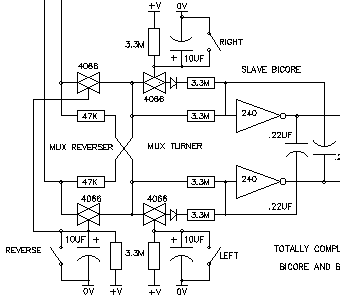
The other type of reverser is a MUX or multiplexer which consists of
a set
of switches that are controlled to connect outputs to different inputs.
The
4016/4066 and HC4066 are the simplest of this type. There are many
beam
designs by Mark and others that used the 4016 or 4066 quad bilateral
(analog) switch which the equivalent to four switch or relay contacts
that
can be individually switched on or off.
These older designs used a whole 4016 chip and an extra inverter for
one MUX
reverser which made this design less popular than the XOR reverser.
But a
new 4066 MUX WALKER design is much more efficient and in addition provides
left/right turning circuit as well as small motor drivers in this simple
2
chip circuit.
<<MUXWALKER.gif>>
Each of the 4016/4066 sections is not actually a mux with only 1 input
to 1
output selection (1 to 1) but several sections can be wired in different
configurations to make up a N input to 1 output mux . The 4051, 4052
and
4053 chips are other versions offering single 8 to 1, quad 2
to 1 and
triple 3 to 1 mux decoding respectively. Just to show you how versatile
these chips are check out Steven Bolt's designs or my own 4053 voltage
doubler design.
A relay with Double Pole Double Throw (DPDT) contacts is a good example
of
an electromechanical MUX reverser is capable of switching amps of motor
current and is very popular with other robotics groups. The same relay
is
also used as an H-bridge. However there is a penalty for using relays:
power
and size. Relays are bigger than equivalent semiconductor h-bridges
and the
coil of a relay may require 50 ma of wasted power to turn on. Lastly
rated
minimum coil voltage is 5V and many beam project run at 2-3V
On the plus
side, the motor is efficiently connected, with very low losses through
metallic contacts, to the power source and you are less likely to smoke
a
relay compared to an h-bridge.
enjoy
wilf

From: Wilf Rigter <Wilf.Rigter@p...>
Date: Sun Mar 26, 2000 1:23 am
Subject: [alt-beam] Re: LEDs to indicate Bicore operation
As an alternative, use a Bicolor LED from Radio Shack in series
with a
current limiting resistor (~1K). The Bicolor LED must be the
2 pin version
(generally for AC indication) : the 3 pin bicolor LEDs won't work.
A BiLED
is constructed by placing RED and GREEN LED chips side by side and
connected
in parallel, in a single package such that when the polarity between
the
pins is one way, the RED LED lights and when the polarity is reversed,
the
GREEN LED lights.
The BiLED method works for both Bicores or microcores. Connect the BiLED
in
series with a 1K resistor across the motor terminals. The RED and GREEN
indicate the presence and polarity of the voltage across the motor.
With
bicores, the BiLED is either RED or GREEN but with a microcore the
normal
sequence is RED,OFF,GREEN,OFF and when a microcore saturates the BiLED
remains OFF (no voltage across the motor).
When used with the higher frequency output of a Bicore HEAD, the BiLED
is a
yellowish white color when the HEAD is not moving but the motor voltage
is
rapidly reversing polarity (AC voltage and current!) and changes to
a RED or
GREEN hue when the head starts turning left or right. This is true
also for
a PS head, but the LED is OFF when the head is not moving, indicating
the
motor is not using power, and bright GREEN or RED when moving left
or right.
regards
wilf
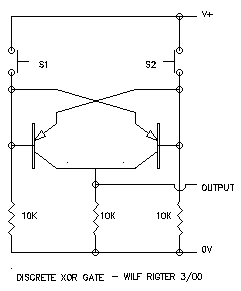
So I tested those cute little XOR circuits and they work!
The active low NPN version should be called a XNOR (eXclusive Not OR)
gate
while the active high PNP version is a true XOR gate.
They can be readily adapted for use with logic levels instead of switches
and so two XOR gates can be used to make a discrete reverser As shown
in the
attached (att'n Dave H.).
Ofcourse with just a few more parts I can make an h-bridge with a reverse
control input out of this design, a sweet contribution to beam tech
by any
standard and which I will post tomorrow (unless Ben beats me to it!)
enjoy
wilf

From: Wilf Rigter <Wilf.Rigter@p...>
Date: Fri Mar 24, 2000 3:31 am
Subject: [alt-beam] Re: A more efficient Solar PowerSmart Head
It is a good idea to cut power to the sensor bridge during charging
for a
solar powered SP head. As shown below, enable the PS head with an active
low
signal from an SE or voltage trigger connected to the 0V side
of the
sensor bridge and on pin 1 - assuming you're use the 4 inverters with
pins
2,4,6, and 8 as inputs for the SP head. This is the suggested solution
also
shown in the PS head tutorial. You use the other half of the 240 for
something useful like motor drivers to buffer the PS head circuit from
motor
noise.
<<PSH-question.gif>>
enjoy
wilf
Hey Steve,
Since LEDs require a minimum of 1.6V to barely turn on, using a single
1.5V
AA cell can be done but is a challenge. I don't want to steal your
thunder
but give you a starting point, I recommend using a circuit like the
attached
LED driver which you can hang from any pair of complementary HC outputs,
as
shown here from the bicore outputs. Note that the tripler circuit itself
only requires the 2 caps and 2 resistors. The bicore part of the circuit
represents any oscillator which has a true and inverted output. The
components shown generate a brilliant flash about once every 2 seconds.
For
higher frequencies decrease the 10K resistor value until the brightness
no
longer increases. This LED driver effectively triples the available
LED
voltage and works with a supply voltage down to less than 1V. In addition,
it shapes the LED current into a short high current pulse which is
highly
visible and saves power. As our friend Steven Bolt has tirelessly pointed
out to us in the past, the power required to run a HC oscillator drops
dramatically at 1.5V and a single AA cell can probably run a bicore
for a
year. Adjusting the size of the caps (10-100uf) changes the brightness
and
total current but even the 100uf caps will probably run a LED blinker
thingy
for a couple of months.
have fun
wilf
 From: Wilf Rigter
<Wilf.Rigter@p...>
From: Wilf Rigter
<Wilf.Rigter@p...>
Date: Tue Mar 21, 2000 12:52 am
Subject: [alt-beam] Re: The 240 microcore - with corrected drawings
- was ....yet ag ain.....
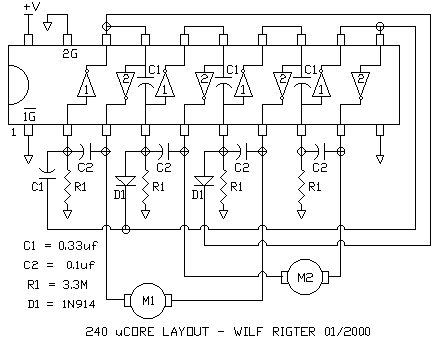
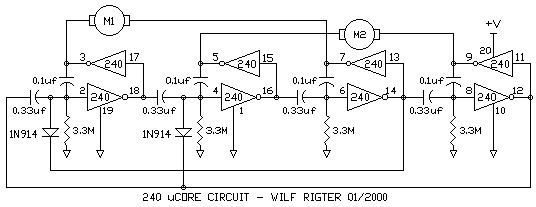
Here is a tested 74HC240 microcore (no, it's not a bicore) circuit first
posted and discussed 2/1/00 including the corrected drawings and a
few more
comments.
It behaves just like a 74HC14 type microcore and motor driver combined.
I
have bench tested the circuit with small lens motors and VCR ejector
motors.
Stalling the motors by hand produces a slightly shorter pulse duration
but
otherwise the circuit just keeps on ticking. The motion of the motors
is the
characteristic non-overlapping microcore sequence. The circuit
is similar
to the "quasi microcore" design I reported some time ago.
HOW TO READ THE DRAWINGS
For those not familiar with my schematic drawings, I use arrows on pins
1,
10, 19 and on one side of resistors R1 indicating connections to a
common
ground bus to the 0V (or - terminal) of the powersupply. The +V connected
on
pin 20 is the positive terminal of the powersupply. Not shown
on the
drawings are the powersupply/battery itself and any supply filter components
which typically include a 0.1uF capacitor across pin 10 and pin
20 of the
240 chip. The layout drawing tries to show the physical arrangement
of
external components with relation to the chip pins as well as the inverter
sections inside the chip. The inverters marked 1 are normally controlled
with pin 1G (1) and inverters marked 2 are controlled by pin 2G (19).
In
this application pins 1G and 2G are connected to 0V making all inverters
active all the time. The C1 caps, apparently shown inside the 240 chip,
are
actually external components mounted between the IC pins.
HOW IT WORKS
The new 240 uCore circuit is similar to a microcore but uses normal
HC240
inverters instead of Schmitt triggers. Such a linear microcore circuit
normally would not work but this problem is overcome by adding positive
feedback from the non-inverted motor driver outputs using a capacitor.
This
positive feedback speeds up the transition through the linear region
using
what I call AC hysteresis. Assuming a switching threshold of 1/2Vdd,
the
ratio of C1/C2 must be greater than 2 and the time constant will be
proportional to R*(C1+C2) since the bias point input voltage will clamp
at
Vdd (+V supply) on the positive edge of the input signal. The
two diodes
(which can be any type 1N914/1N4448 etc) provide an automatic PNC function,
far simpler and easier to use than the old Nu type PNC circuit. The
layout
of this circuit would appear to lend itself very well to freeforming.
I am
still trying to add a reverser function with minimal extra components
and I
have some ideas which should work and which post shortly after I test
them.
enjoy
wilf
From: Wilf Rigter <Wilf.Rigter@p...>
Date: Wed Feb 2, 2000 3:45 am
Subject: [alt-beam] Re: The 240 microcore - was Bicore question
And they said it couldn't be done!
Here is a tested 74HC240 microcore (no not a bicore) circuit which behaves
just like a 74HC14 type microcore and motor driver combined. I have
bench
tested the circuit with small lens motors and VCR ejector motors. Stalling
the motors by hand produces a slightly shorter pulse duration but otherwise
the circuit just keeps on ticking. The motion of the motors is the
characteristic non-overlapping microcore sequence. The circuit
is similar
to the "quasi microcore" design I reported some time ago.
The new 240 uCore circuit is similar to a microcore but uses normal
HC240
inverters instead of Schmitt triggers. Such a linear microcore circuit
normally would not work but this problem is overcome by adding positive
feedback from the non-inverted motor driver outputs using a capacitor.
This
positive feedback speeds up the transition through the linear region
using
what I call AC hysteresis. Assuming a switching threshold of 1/2Vdd,
the
ratio of C1/C2 must be greater than 2 and the time constant will be
proportional to R*(C1+C2) since the bias point input voltage will clamp
at
Vdd on the positive edge of the input signal. Note the location of
the C1
caps, some of which are mounted between pins on the solder side of
the chip.
The two diodes (which can be any type 1N914/1N4448 etc) provide an
automatic
PNC function, far simpler and easier to use than the old Nu type PNC
circuit. The layout of this circuit would appear to lend itself very
well to
freeforming. If possible, I will try to incorporate a reverser
function to
this circuit without adding (many) more parts unless someone beats
me to it
of course.
enjoy
From: Wilf Rigter <Wilf.Rigter@p...>
Date: Tue Mar 21, 2000 12:52 am
Subject: [alt-beam] Re: The 240 microcore - with corrected drawings
- was ....yet ag ain.....
Here is a tested 74HC240 microcore (no, it's not a bicore) circuit first
posted and discussed 2/1/00 including the corrected drawings and a
few more
comments.
It behaves just like a 74HC14 type microcore and motor driver combined.
I
have bench tested the circuit with small lens motors and VCR ejector
motors.
Stalling the motors by hand produces a slightly shorter pulse duration
but
otherwise the circuit just keeps on ticking. The motion of the motors
is the
characteristic non-overlapping microcore sequence. The circuit
is similar
to the "quasi microcore" design I reported some time ago.
HOW TO READ THE DRAWINGS
For those not familiar with my schematic drawings, I use arrows on pins
1,
10, 19 and on one side of resistors R1 indicating connections to a
common
ground bus to the 0V (or - terminal) of the powersupply. The +V connected
on
pin 20 is the positive terminal of the powersupply. Not shown
on the
drawings are the powersupply/battery itself and any supply filter components
which typically include a 0.1uF capacitor across pin 10 and pin
20 of the
240 chip. The layout drawing tries to show the physical arrangement
of
external components with relation to the chip pins as well as the inverter
sections inside the chip. The inverters marked 1 are normally controlled
with pin 1G (1) and inverters marked 2 are controlled by pin 2G (19).
In
this application pins 1G and 2G are connected to 0V making all inverters
active all the time. The C1 caps, apparently shown inside the 240 chip,
are
actually external components mounted between the IC pins.
HOW IT WORKS
The new 240 uCore circuit is similar to a microcore but uses normal
HC240
inverters instead of Schmitt triggers. Such a linear microcore circuit
normally would not work but this problem is overcome by adding positive
feedback from the non-inverted motor driver outputs using a capacitor.
This
positive feedback speeds up the transition through the linear region
using
what I call AC hysteresis. Assuming a switching threshold of 1/2Vdd,
the
ratio of C1/C2 must be greater than 2 and the time constant will be
proportional to R*(C1+C2) since the bias point input voltage will clamp
at
Vdd (+V supply) on the positive edge of the input signal. The
two diodes
(which can be any type 1N914/1N4448 etc) provide an automatic PNC function,
far simpler and easier to use than the old Nu type PNC circuit. The
layout
of this circuit would appear to lend itself very well to freeforming.
I am
still trying to add a reverser function with minimal extra components
and I
have some ideas which should work and which post shortly after I test
them.
enjoy
wilf
From: Wilf Rigter <Wilf.Rigter@p...>
Date: Sat Mar 11, 2000 8:43 pm
Subject: [alt-beam] Re: Diodes in microcores
Hi Jeff,
Welcome and a pleasure to read about your Nv circuit observations.
If you use LEDs to indicate the active low output state of each process,
you
probably noticed that the 4Nv microcore starts up saturated with 2
active
processes shown by the following LED sequence:
1 0 1 0 (On Off On Off)
0 1 0 1
1 0 1 0
etc
and a micro core with PNC starts as:
1 0 1 0
1 0 0 1
1 0 0 0
stop
until the PNC times out and continues:
0 1 0 0
0 0 1 0
0 0 0 1
1 0 0 0
0 1 0 0
etc
If you have motors connected to the microcore perhaps using a 245 buffer
or
h-bridges, then the motor connected to the PNC controlled Nv will be
turning
in one direction until the PNC times out. The usual solution is to
add a
connection from the PNC to the 245 chip enable pin to tristate the
buffer
and disable the motors until the PNC times out. H-bridges are more
difficult
and some will self destruct if both inputs are active! Microcores are
now
probably less popular because of the unpleasant experiences of smoking
h-bridges. The 2 diode PNC free solution eliminates that problem altogether
and who knows how Beam would have evolved if that solution had be been
found
early on.
I like your analogy of energy states of neural networks and I must think
more deeply about that one. But I wonder if the saturation isn't the
lower
state and a single process, the higher state. I say this because the
number
of different output patterns generated with one process is 4 but with
2
processes (saturation) the number of different output patterns is only
2.
In fact, if the motors are connected in the normal way from the output
of Nv
1 to 3 and Nv 2 to 4, when saturation occurs, the motors do nothing
and no
motor current flows because the levels on each the motor terminal are
always
the same polarity.
So reading your observations made me curious since the behaviour you
described is a bit different from what I expected but hey, I am happiest
when I make a counter-intuitive discovery and you never know what new
ideas
may pop up next.
regards
wilf
BTW I'm too fumble-fingered for freeforming any but the simplest circuits
myself but others have perfected it to a fine art!
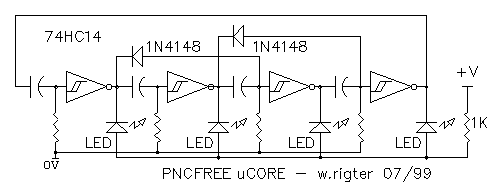
From: Wilf Rigter <Wilf.Rigter@p...>
Date: Tue Mar 7, 2000 3:26 pm
Subject: [alt-beam] Re: MicroCore vs. BiCore
If damn PNCs are you only concern, you can add 2 diodes to any microcore
to
make it PNCless.
The (recycled) PNCFREE microcore starts instantly and is always on alert
to
automatically neutralize saturation.
Also note the simplified LED circuit: Since only one LED is on at one
time,
the 4 LEDs can share one resistor.
wilf
From: Wilf Rigter <Wilf.Rigter@p...>
Date: Wed Mar 1, 2000 5:26 am
Subject: [alt-beam] Re: mini walker
Hi Ben,
Here is a blast from the past (June 99) : the LIGHT WALKER 1.0
design as
shown in the attached schematic. In this design the SE function has
been put
inside the microcore loop. From another perspective this is a pentacore
design. The 1381 acts like a combination Nu, PNC and SE trigger.
Note that
the 74HC14 and AC240 are powered up all the time. Normally the 4Nv
outputs
will all be high, the motors will be stopped and no current will flow.
The
solar panel will charge up the main cap and also the memory cap of
the 1381.
The memory cap ensures that the 1381 input voltage will not drop during
the
first process interval when the motor current starts to pull down the
main
capacitor voltage. When the 1381 fires it "injects" a process into
the first
Nv with a rising edge. This process ripples through the other Nvs and
when
the process reaches the last Nv it resets the memory cap of the
1381. This
sequence is a 4Nv process cycle which causes the bot to advance by
one step
on each leg. Next the solar panel charges the main capacitor and the
1381
memory cap back up and when fully charged the 1381 triggers the next
process
cycle. If there is enough charge on the main cap the SE fires almost
immediately and the walker continues uninterrupted. This embedded SE
design
can be extended to 6Nv or 8Nv designs as well.
The reverser circuit is quite a nice solution to the problem of early
reverser time out when the LIGHT WALKER only walks intermittently.
To avoid
this problem, the reverser memory capacitor is discharged in steps,
one
process cycle at time, with about 7 or 8 cycles required to return
to
forward motion regardless of the time between steps. In addition
the
reverser circuit switching is synchronized with the start of each cycle
to
avoid the typical gait recovery time associated with asynchronous reverser
circuit switching. This synchronous reverser idea can be applied to
many
walker designs and imho is a nice contribution to the state of
the art of
BEAM tech.
The LIGHT WALKER still needs tactile inputs. Perhaps it can be left
as an
exercise for the reader to complete the full LIGHT WALKER design.
enjoy
Wilf Rigter mailto:wilf.rigter@p...
tel: (604)590-7493
fax: (604)590-3411
From: Wilf Rigter <rigter@c...>
Date: Sun Feb 27, 2000 9:19 pm
Subject: [alt-beam] Re: Solar Cell tests
Very clear and simple analysis!
regards
wilf
CyberBug wrote:
> Hi there,
>
> I saw your tests and I was curious about your results, so I did some
> calculations and this are the results (or explanations of your results):
>
> 1. When charging a capacitor the solarcell works like a baterie and
resistor
> in series, so to make the calculations we need to now the solarcell's
> resistance, and that would be:
>
> A: 3.5v @ 6 mA
>
> Ra = 3.5 v / 6 mA
> Ra = 583 ohms aprox.
>
> B: 2.7v @ 16 mA
>
> Rb = 2.7 v / 16 mA
> Rb = 169 ohms aprox.
>
> 2. Now we test for parallel configuration. As you can see in the
schematic,
> you have a net formed by V1, V2, V3 and V4.
> According to Kirkchof's law the algebraic sum of all the voltages
in the net
> must equal 0. So:
>
> 0 = V1 + V2 + V3 + V4
>
> We know V3 and V4 (the solarcell's voltage), but since they are not
equal
> they have to compensate through the resistors, so we now have to
calculate
> the real output voltage. First we have to indicate de polarities
of each of
> the voltages, in a CCW fashion you get the polarities noted (based
on the
> known voltages), then we can solve for the know voltages:
>
> V2 + V3 = V1 + V4
> V2 + V3 = 3.5v + (-2.7v)
> V2 + V3 = 0.8v
>
> Now we know that resistors Ra + Rb hold a voltage of 0.8v. The real
output
> voltage is taken between the Ra and Rb therefore resulting a voltage
divider
> between the two. Keeping this in mind we know calculate the voltage
presente
> at Rb:
>
> Ra = 583 ohms
> Rb = 169 ohms
> Ra + Rb = 752 ohms
>
> V3 = 0.8v x (Rb / (Ra + Rb))
> V3 = 0.8v x (169 / 752)
> V3 = 0.8v x 0.211
> V3 = 0.179v
>
> Now for V2:
>
> V2 + V3 = 0.8v
> V2 = 0.8v - V3
> V2 = 0.620v
>
> Now V3 and V4 are in series and this is the real output voltage so:
>
> Vo = V3 + V4
> Vo = 0.179v + 2.7v
> Vo = 2.879v
>
> The real output voltage represents the voltage that you would have
if it was
> only one solarcell. The output current I is the sum of both solarcell's
> current:
>
> I = 6 mA + 16 mA
> I = 22 mA
>
> The resulting solarcell is 2.8v @ 22 mA (hence faster charging, more
on this
> later)
>
> 3. Now we test series configuration. Again, as you can see in the
schematic,
> this is much simpler. We now have two voltages V1 and V2, they are
in series
> and the resulting output voltage Vo is:
>
> Vo = V1 + V2
> Vo = 3.5v + 2.7v
> Vo = 6.2v
>
> But now, we have the same problem we had with the voltages in parallel
but
> with the current. We have two different currents, but not to worry,
we
> already know the resistance of each solarcell, so:
>
> Rt = Ra + Rb
> Rt = 583 + 169
> Rt = 752
>
> Applying Ohm's Law:
>
> I = Vo/Rt
> I = 6.2v / 752
> I = 8.2 mA
>
> The resulting solarcell is 6.2v @ 8.2 mA (slower than A + B in parallerl
but
> faster than A alone).
>
> So now we have:
>
> A: 3.5v @ 6 mA (11.5 sec)
> A + B series: 6.2 @ 8.2 mA (6 sec)
> B: 2.7v @ 16 mA (3.5 sec)
> A + B parallel: 2.8v @ 22 mA (2.5 sec)
>
> What can you guess from above?
> Right, the larger current charges faster, even though voltage is
smaller.
>
> But then again, all of the above results are theoretical, in practice
they
> vary. You were suposed to have 2.8v total, but in practice you had
2.4v,
> although it did charged faster because of the current enhancement.
>
> Now for the charging times, if you could see voltage vs. time in
a graph you
> would see that a charging curve, as you get closer to the maximum
voltage
> the voltage variations are smaller and much more longer in time.
You start
> charging very fast but it keeps getting slower until you reach the
top
> voltage. If the charging time was linear you would see the same time
going
> from 1.1v to 1.2v than going from 1.4v to 1.5v.
>
> Hope this was useful, if you or anyone has any comments please let
me know.
> See ya.
>
> ----- Original Message -----
> From: FCO Enr. <fco@t...>
> To: <beam@s...>
> Sent: Thursday, February 24, 2000 3:35 PM
> Subject: Solar Cell tests
>
> > greetings,
> >
> > I did some tests with some various solar cell configurations
> > and here is some of the data I gathered as well as some questions
> > for those of you who can explain this phenomena.
> >
> > First off, I tried various combinations to find the most efficient
> > low light (my ambient light level) setup. The winner is surprising
> considering
> > even my Solarbotics catalogue seems to point in the wrong
direction.
> >
> > A - SC2422 (3.5v @ 6ma)
> > B - SC2433 ( 2.7v @ 16ma)
> > ( I also experimented with the SCPDs but I didn't write down and
time
> > the results so I won't include them).
> >
> > The goal was to see how fast the circuit could gain .01v in my
ambient
> > light. I did my best to avoid any movement of cells.
> >
> > A 11.5 seconds
> > A + B in series 6 seconds
> > A + B in parallel 2.5 seconds
> > B 3.5 seconds
> >
> > Now this is pretty odd considering it seems like wiring these
> > cells in parallel improved their low light capability (not by much
> > considering the space it takes up).
> >
> > WEIRD: When the voltage in the circuit reached 2.2 something volts
> > I noticed it was takin MUCH longer.. from 2.23v - 2.24 it took
> > 1 minute 7 seconds!!! I looked at my meter again and it hasn't
> > budged from the 2.24v mark in over 2 mins!!
> >
> > I also noticed the times I stated above were between 1.4 and
> > ` 1.58v. It seems like the charging between 1.1v and 1.2 is almost
two
> > times faster! Why does it vary depending on circuit voltage and
why
> > did the voltage sort of plateau at 2.24v?
> >
> > Now the light level hasn't changed AT all and I tried again when
it got
> > to 2+ volts the cycling was a LOT slower to get the same 0.01v
> > WHY? So this also means if I get the lowest rated trigger it would
> > improve low light capability DRASTICALLY!
> >
> > I would appreciate any feedback on this.
> >
From: Wilf Rigter <Wilf.Rigter@p...>
Date: Fri Feb 11, 2000 3:32 pm
Subject: [alt-beam] Hypersaturation, wavefront processors, -Nv/+Nv
et al
THE Nv WAVEFRONT PROCESSOR PARADIGM
Not to be confused with the much more complex Wavefront processor used
in
DSP arrays, Nvs are, in a very pure sense, logical wavefront processors
which transmit, inhibit, delay or generate wavefront transitions that
mark
the boundaries of processes.
The Nv waveform processor paradigm can help to explain all possible
process
states of an Nv loop including single, multiple, saturated and
hypersaturated states using the same terms of reference. To do this,
it is
necessary to consider the signals in a Nv loop as dynamical "process
wavefronts" rather than static "process states". In that sense, a process
wavefront (any Nv output transition) will propagate through the Nv
loop at
very high speed, changing the state of one or more Nv stages until
the
wavefront propagation is inhibited. Not surprising, a wavefront propagates
through successive Nv stages if the phase polarity of the wavefront
at the
Nv input is such that it causes a change of state in that Nv output.
Conversely, the wavefront is inhibited if the phase at the Nv input
re-enforces (is in phase with) the current state of the Nv. Before
giving
examples of wavefront processing in Nv loops, it is useful to describe
the
relationship between process states and patterns to the behaviour of
signals
in Nv loops.
SINGLE PROCESS STATE
With a single process in a Nv loop, a single Nv is active at a time
and each
Nv output produces a pulse in succession. The time constant (TC) of
the
active Nv is independent of the other Nv time constants. Propagation
of the
process from one Nv to the next is often described as "the end of one
process triggers the beginning of the next process". Simple and straight
forward in the single process case but that description is insufficient
when
multiple processes are active in the Nv loop.
TWO PROCESSES IN A 6Nv LOOP EXAMPLE
For example, in a 6Nv loop 2 processes can be active at one time as
long as
they are separated by at least one inactive Nv (exclusion principle).
There
are several patterns used which describe one step in a sequence, for
example
0,1,1,0,1,1. In that pattern the processes are completely independent
of
each other, however since the process durations are also independent,
the
next step may be 1,0,1,0,1,1 as Nv1 times out before Nv4 and triggers
Nv2.
Note that this intermediate pattern has a different order of active
and
inactive Nv and it's behaviour is quite different from other process
states
with the same pattern. In the first example, the two processes may
remain
independent. But this is not always the cases for example one that
starts
with pattern 0,1,0,1,1,1,1 and/or where Nv1 has a time constant that
is much
larger than the sum of the other Nv TCs. Then the sequence may progress
as:
0,1,0,1,1,1
0,1,1,0,1,1
0,1,1,1,0,1
1,0,1,1,1,0
In accordance with the exclusion principle, the long Nv1 time constant
will
be pre-empted. So in some cases two processes are independent and but
sometimes change in lockstep. In fact, 2 process pattern in a 6Nv loop
with
significant differences in Nv TC may have a very complex development
of
patterns or may simple converge on a lockstep pattern. Both the process
state or process pattern description are more or less useless to predict
the
behaviour of 2 processes in an 6Nv or greater loop.
3 PROCESS/6Nv LOOP
According to the nNv/2 saturation rule, 3 processes in a 6Nv loop begets
saturation ie the maximum number of processes. But what does this tell
us
about the behaviour of a saturated loop. No matter what significant
difference in Nv time constants, all Nv output pulses are in lockstep
because of the exclusion principle. The positive pulse width is set
by the
shortest TC of Nv1,Nv3,Nv5 and the negative pulsewidth is set by the
shortest TC of Nv2,Nv4,Nv6. Huh?
So the most significant aspect of saturation is not "maximum process
state"
but the loss of independent time constants. A bicore loop has only
two Nvs
and with the maximum of 1 process would be considered to be saturated
but
this process is completely independent as it propagates through each
Nv and
is therefore the exception to the rule that in "saturated" loops processes
are not independent.
HYPERSATURATION IN NV LOOPS
This is the bugaboo of all processes in Nv loops. For example, a
hypersaturated 6Nv loop was described by Mark T. as:
"What happens is you get two processes "on" diametrically opposite neurons,
and two others between transitions from one neuron to another.
The pattern
looks like this...
0.5, 0.5, 1, 0.5, 0.5, 1
The phase angles are tightly locked:
and
"Fortunately it can only happen with absolutely concurrent signal injection
during a transition step in a saturated 6Nv, so it's rare and hard
to get
to".
and it's usefulness seems restricted to cooking motor drivers.
Huh? Of course Mark just posted an abbreviated comment to the list but
while
the information is concise it is not particularly useful to help us
understand the phenomenon.
Nv LOOPS AS A WAVEFRONT PROCESSOR ARRAY
When viewing Nvs as wavefront processors, the behaviour of processes
including hypersaturation in a Nv loop becomes clear. For a Schmitt
inverter
ground referenced Nv loop,the following wavefront processing rule applies:
a wavefront propagates through an Nv, if the Nv output is the same polarity
as the wavefront polarity at the input, the propagation is inhibited
if the
Nv output state is the opposite polarity as the wavefront polarity
at the
input and a propagated wavefront is inverted at the output.
For example in a 6Nv loop with a single process state, the output state
at
step one is 0,1,1,1,1,1,1, so that the wavefront at the output
of Nv1 at
the end of step one goes positive and propagates through Nv2 whose
output
was high. The wavefront is transformed by the "invert" function
and then
propagates as a negative wavefront through the Nv2 output before being
inhibited at Nv3 whose output is high. (1,0,1,1,1,1,1). At the
end of the
active Nv2 process, a new positive wavefront is generated which will
propagate through Nv3 etc.
WAVEFRONT SATURATION
In the example of a 6Nv loop,"saturation" can be described as a condition
in
which all Nvs change state in rapid succession as a single wavefront
propagates around the loop. Half of the Nvs (ie Nv1, Nv3, Nv5) receive
positive input transitions and are triggered and the other Nvs (ie
Nv2, Nv4,
Nv6) are reset with a negative input transition. The triggered Nv (eg
Nv1)
with the shortest TC times out first and generates the next wavefront
which
propagates rapidly (50-100ns) around the loop resetting Nv3 and NV5
and
triggering Nv2,4,6 until it arrives "in phase" at the input of the
initiating Nv1 at which point the wavefront propagation is terminated.
So
you can see why Nv3 and Nv5 process TCs are no longer independent.
The next
wavefront is generated by one of the triggered Nv (eg Nv2) with the
shortest
time constant. So transitions are generated by Nvs with the shortest
time
constant in each of the odd/even numbered Nvs which sets the frequency
and
duty cycle of the Nv output pulses in the normal "saturated" state.
Note that the saturated state is the normal condition for a 2Nv grounded
bicore loop which has only one odd and one even Nv and therefore is
the
exception to the rule that "saturated" processes are not independent.
WAVEFRONT HYPERSATURATION
Hypersaturation can be introduced into even numbered Nv loops by injecting
a
second wavefront at a time when a normal "saturation" transition wavefront
has propagated halfway around the loop such that two out of phase wavefronts
are present, simultaneously propagating out of phase around the loop.
Wavefront transitions arrive at the Nv input with a polarity that changes
the current state of the Nv, causing the Nv output to change after
one gate
delay and continues inverted to propagate to the next Nv and so on
around
the loop.
In fact hypersaturation is not rare at all since it is the normal startup
state for _odd_ numbered Nv loops (ie 3Nv or 5Nv cores). In odd numbered
Nv
loops, the normal Nv/2 "saturation" state (ie 1.5 or 2.5 processes)
cannot
exist or rather it is equal to the hypersaturated state because the
propagating wavefront will never be inhibited since it will always
be 180
degree out of phase (the .5 process right?) when returning to the input
of
the initiating Nv. Therefore only one wavefront propagates around an
odd
numbered loop in the hypersaturated state. In fact, even numbered Nv
hypersaturated loops behave as a pair of odd numbered Nv loops in connected
series since the two uninhibited propagating wavefronts generate the
same
frequency (f) at the outputs as a hypersaturated odd numbered Nv loop
of
half the length ie f6Nv=f3Nv! (~12Mhz)
For a 1Nv loop (yes 1Nv), the hypersaturated state is the only possible
state and the output frequency is in the order of 30-40 Mhz depending
on
logic family, layout, stray capacitance. Nv loops up to 6Nv, I have
tested
all have hypersaturated frequencies in the megahertz range, much higher
than
the 100KHz reported for other Nv loops.
INITIATING HYPERSATURATION IN A 6NVCORE
To initiate hypersaturation in a 6Nv loop, configure it first as a 5Nv
loop
by bypassing one of the Nv stages, using a 1K in series with that stage
output for isolation. When powered up, the 5Nv core is in hypersaturation
and by removing the bypass, the hypersaturated state is transferred
to the
6Nvcore almost doubling in frequency in the process.
KILLING HYPERSATURATION
While 3Nv loops (tricores) can be very useful since they will revert
to a
single process state after suppressing the hypersaturated startup state.
Adding a 5K resistor between one Nv output and the coupling cap of the
next
Nv, delays the high frequency wavefront transitions in the odd numbered
Nvloop and the hypersaturated state in the 3Nv loop quickly reverts
to a
normal maximum one process (ie not saturated) waveform. The same suppression
can be achieved with a 1000pf capacitor from one Nv output to ground.
Both
methods are useful to eliminate odd numbered Nv loop hypersaturation.
WAVEFRONT PROCESSORS AND WAVEFRONT PROCESSORS
I suggested the Wavefront Processor as a model for Nv neurons but the
analogy is not precise. Waveform processors are generally used in
asynchronous parallel signal processor 2-dimensional arrays connected
in a
nearest neighbor topology. Data is processed by applying two terms
(x and y)
at the top and left side of the array which propagate unaltered from
top to
bottom and left to right of the array while leaving the result of the
processor function (m+xy) in each processor local memory. The two terms
applied ripple asynchronously through the array at high speed and drop
out
of the array at the bottom and right boundary cells. The result is
read
directly from the array elements and not from the boundary cells as
might be
expected.
I will post another article which will describe Nv arrays with some
more
interesting topology as shown in the attached gif.
But here is a paraphrased snippet of a discussion of MIT's CAM-8 cellular
automation processor applications for inspiration and a little humor:
wavefront calculations:
calculations that can be laid out in an n-dimensional space in such
a way
that we're only interested in the evolution of a wavefront through
the
space. This can be viewed as a way of performing calculations
that aren't
uniform in space or in time. A wavefront calculation is laid out in
n-dimensions so that the direction of dataflow is always positive along
one
of the dimensions, and then we simulate discrete steps by sweeping
the
signal wavefront through this dataflow-dimension once. Since the
dataflow-dimension is virtual, it can be thought of as holding the
time-dependance information for an n-1 dimensional spatial calculation,
and
so this is really just a generalization of static routing to arbitrary
space-time logic. duh?
wilf
From: Bruce Robinson <Bruce_Robinson@t...>
Date: Wed Feb 9, 2000 6:55 am
Subject: [alt-beam] Re: Wilf's thought experiment (part 1)
Wilf Rigter wrote:
>
> Here is a little thought experiment: in an open ended 6Nv
> (74HC14) chain with LED indicators, what is the maximum
> number of processes (output low pulses/LED on) that can be
> active at a time? ...
> ... Longer chains of n Nv should be capable of maximum n/2
> processes but no more before saturating. A bottom up tree-like
> Nv structure would see a process propagate down the trunk before
> radiating along the branches. ...
> ... What about a top down tree with processes propagating down
> the branches toward the central neural chain (trunk). Add some
> logic such that two processes must be counted or be present at
> a junction where branches meet before processes can propagate
> any further. ...
> ... How about some memory (Nu) at the junctions so that the
> junction remembers the last process and "sensitizes" the
> junction to lower the propagation threshold.
Wild and wonderful ideas. Here is how some of them relate to human (and
other mammal) biology.
Our muscles are composed of thousands of fibers which slide past each
other when triggered by an impulse from a neuron (technically, a motor
neuron). Each muscle fiber has it's own neuron, and the neurons are
bundled together into nerves, which find their way to our spinal cord,
which is an extension of our brain. The muscle fibers are encased in
connective tissue that bundles together into tendons, which attach
to
our bones.
Muscles can only pull (contract) and relax; they can't push. And a
muscle fiber will not remain contracted indefinitely. It needs to be
re-energized by pulses from the attached motor neuron (hundreds of
times
a second). So how can we exert a steady pull? How can we vary the
intensity of our muscular efforts? Our nervous system can simultaneously
activate a few or a great many muscle fibers at varying pulse rates.
The
effects average out to a smooth and variable pull.
So let's try to approximate this behaviour using BEAM type neurons:
nervous (Nv) and neural (Nu) to use the common BEAM terminology. Let's
begin with a simple pulse generator which produces a square wave. Say
1/10 second high and 1/10 second low. That's 5 complete high-low cycles
a second.
Now let's feed that pulse stream into a conventional Nv, causing it
to
fire five times a second. How long does the Nv stay "on"? Well we can
vary it with a sensor, such as a photocell, or noise detector, or heat
sensor. The longest delay (or "on" period) should be no more than the
pulse length -- in this example 1/5 second. It could be much shorter.
So
now we have a stream of "on" pulses of varying length, coming at the
rate of 5 per second. So what?
Let's feed the Nv output through a diode and into a Nu input. This will
slowly "charge" our Nu. The wider the pulses coming out of the Nv,
the
faster the Nu will build up a charge. Eventually the Nu will reach
the
trigger point and turn "on". Possibly we can use the Nu output to run
a
motor, or run it in one particular direction, or somehow cause a robot
to turn in one direction.
But there's a problem with this idea. So long as our pulse generator
is
running, we'll be feeding pulses, however small, into our Nu. Eventually
it is going to fire. What if we don't want it to fire if the incoming
pulses are very short? What if we only want the Nu to fire if the charge
is building up at a certain rate or higher? We can modify the Nu by
adding a large resistor that will slowly drain the charge from the
Nu.
This means it can only fire if the incoming pulses build up a charge
faster than it can drain away.
The variable width pulses coming in are approximately like the signals
sent to the muscle in our nervous system. The drain on the Nu
approximately represents the tendency of our muscles to relax when
not
activated. The Nu itself is an analog of a human motor neuron.
So what has this gained us? We've now got a circuit that uses a pulse
generator, a Nv, and a Nu, all to accompish what we normal do with
one
Nv. This is progress?
Hang on. Let's say we want to influence our robot not just with light,
but also with noise. We want the robot to turn toward light, AND turn
toward noise. The brighter and louder, the stronger the tendency to
turn. We can easily accomplish this with our new type of circuit. We
just add a second Nv, and feed it's output into the Nu that we already
have. We don't need a second pulse generator either -- we can use the
one we've got. So what exactly happens here?
Presumably we have two sets of circuits, one to make the robot turn
one
way, and one to make it turn the other way. Each circuit consists of
a
pair of Nv's feeding into a Nu. One Nv in a pair is influenced by light,
and one by sound. Only one pulse generator needed to drive the whole
works.
The effects of the two Nv's in a pair are additive. Sound and light
on
the same side of the robot make it respond more quickly. Sound on one
side and light on the other charge up the two opposing Nu's at about
the
same rate. By tuning the Nv's we can alter the relative effect that
sound and light will have.
But wait, there's more. A robot that turned toward sound and light would
have a short life in my house in the winter. A good deal of my heat
comes from a wood stove. It pops and ticks as it heats up (noise) and
has a transparent ceramic door, which emits light AND heat. The robot
turns toward the noise and the light, and gets melted by the heat!
So
what if I add a pair of heat sensors, simple temperature sensitive
resistors, each influencing a third Nv. These Nv's are INVERTED. They
produce an opposite output signal. So I can use these to DISCHARGE
my
Nu's. Too much heat, on one side, and this counteracts the light and
noise detectors. This is the exact equivalent of human INHIBITOR
neurons, neurons that interfere with the normal reception of signals.
The beauty of this system is that I can keep adding Nv outputs to my
Nu,
with only a diode to connect them. No need for AND gates and OR gates.
But I have one little problem. What happens if my hypothetical robot
is
hit from all sides by a series of camera flashes (it's a famous little
robot) and surrounded by noise. If I have a pair of Nu circuits, one
to
influence each side, they are both going to charge up at about the
same
rate, and they are both going to fire at roughly the same time. Kind
of
like trying to bend your arm and straighten it at the same time. Very
wasteful of energy. Very hard on H-bridges. Well, here's a little trick,
also taken from human physiology. When the Nu on one side fires, it
INHIBITS the Nu on the other side. So whichever one fires first, wins.
And if they both fire simultaneously, it's a tie and neither one wins.
They BOTH discharge.
And that is a more directed application of some of the ideas Wilf was
throwing at us. But wait, there's more ...
Up to this point, we used a typical Nu to accumulate charge from one
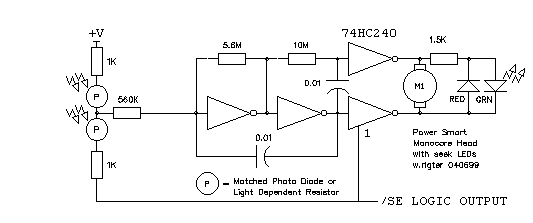
or
more Nv's (or lose the charge to one or more inverted Nv's). The Nu
has
a Schmitt inverter which "fires" when its threshold is reached. Let's
do
something a little radical. Let's remove the Schmitt inverter and
replace it with an op-amp, say an LM324, which has been configured
as a
voltage follower. What this means is that whatever voltage level appears
on the capacitor in the Nu circuit is reproduced at the output of the
op-amp (but without AFFECTING the charge on the capacitor). We can
use
the op-amp output to (say) drive an H-bridge, or some other analog
motor
driver. This means instead of the usual on-off output of the
conventional Nu, we get a variable output.
That's it for Part 1. Fairly advanced. Definitely something to try on
the breadboard first. Use Nv and Nu circuits to work a little more
like
the human nervous system. And yes, it does work. Not the noise part,
just heat and light so far. And not in a completed robot (not for a
while), but on the breadboard for sure. My problem (as always) is there
never seems to be enough breadboard to try out all these ideas.
To quote the master, enjoy.
Bruce
From: "Mark W. Tilden" <mwtilden@m...>
Date: Fri Feb 4, 2000 8:08 pm
Subject: [alt-beam] Re: The 240 microcore - was Bicore question
Hi. If you try to "stuff" a 6Nv with more than three processes,
you
get a four process "Hypersaturated" state where the pulses oscillate
around the core at rates in excess of 100kHz (.22uF couples, 1m resistors).
Fun, but tends to heat up motor drivers really fast. Fortunately
it
can only happen with absolutely concurrent signal injection during
a
transition step in a saturated 6Nv, so it's rare and hard to get to.
Later.
markt.
From: Wilf Rigter <Wilf.Rigter@p...>
Date: Sat Jan 22, 2000 9:48 pm
Subject: [alt-beam] FULL RANGE LED PUMP
Here is a Flashing LED circuit which has energy saving and range extending
features.
This circuit has some similarity to an FLED providing the same power
saving
short pulses but has a greater operating range from >6.0 down to <1.2V.
FLEDPUMP Operating range 1.2V-6.0V Typical pulse duration 100ms
The oscillator shown is a standard bicore but can be any two outputs
which
are 180 degree out of phase. This LED circuit is usable down to <1.2V
well
below the forward voltage of the LED. When the two outputs switch state
one
or the other LED pulses brightly for a short duration and remains off
for
the rest of the time thereby saving (precious) power. This is ideal
for
solar applications and can be used with positive or negative Nv neurons.
enjoy
wilf

From: Wilf Rigter <Wilf.Rigter@p...>
Date: Thu Jan 20, 2000 1:22 am
Subject: [alt-beam] Re: LCD name tag
The original LCD circuit is Mark Tilden's (I think). The animated LCD
is my
circuit but Lee did all the work of putting it together and the layout
on
his web page. My wife pointed out that a room full of beamers
with animated
LCD name tags would probably cause some kind of emergent herd behaviour.
A
IR transmitter and PD receiver (simple) on each LCD would synchronize
them
to make them all change at the same time.One of us, One of us....
Scare the
heck out of non-beamers, eh!
wilf
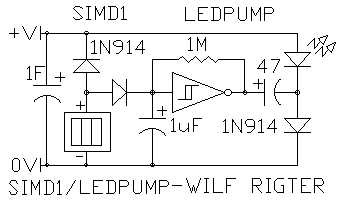
From: Wilf Rigter <Wilf.Rigter@p...>
Date: Sun Jan 16, 2000 8:54 pm
Subject: [alt-beam] Re: D1
Ok,ok here it is:
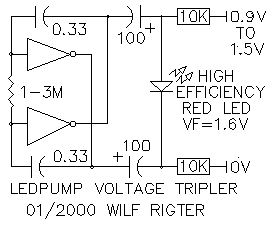
THE LEDPUMP
This simple circuit combines two dynamite circuits. An even simpler
SIMD1
and a LED charge pump/flasher.
Despite the LEDPUMP's apparent simplicity, it is a major improvements
over
original the D1 and PUMMER circuits.
The SIMD1 is a very simple D1 type SE which charges during the day
and turns
on a flashing LED at night. In addition to the solar cell and capacitor
(or
NiCd), it uses just 1 diode for isolation to prevent discharging a
fully
charged cap through the solar cell in the dark and another diode
to hold
off a flasher/threshold detector which turns on at night. It just doesn't
get much simpler!
The second part of the design shown is the simplest of all LEDPUMP
versions
and is used to drive LEDs from a single 1.5V battery (SBolt notice)
ie. for
the AQUAGUARD circuit, but works perfectly well from a solar charger
and
supercap. In the attached circuit, I used a coin super cap charged
to 2V to
flash a LED once a second for 8hrs and it's still going. To optimize
performance, you must use a premium high brightness high efficiency
LED. The
simplicity of design was emphasized to make it easy to freeform the
circuit
into jewelry etc.
You can also use this design at much higher frequency (100kHz) to turn
the
LED on continuously, I used 1M/100pf for the oscillator and 0.33 for
the
chargepump cap. If you use a higher voltage solar cell and 5V super
cap, the
single LED can be replaced with two LEDs in series. I have several
other
versions which use one or two more components and are more efficient
than
the basic LEDPUMP design shown. This includes replacing the diode in
series
with the LED with a synchronous rectifier (2N3904 and 100K resistor)
or
simply adding a 10K resistor in parallel with the diode to reduce the
diode
forward voltage drop and precharge the cap to 0V before the active
pulse to
increase brightness and efficiency.
The basic LEDPUMP (LED, CAP, DIODE) design can be used with low voltage
microcontrollers, and other micropower applications etc to increase
LED
driving voltage. Although it may not be obvious, since the LEDPUMP
seems
like such a simple circuit, it is potentially my most important contribution
to date. Remember were you saw it first.
enjoy
wilf
From: Wilf Rigter <Wilf.Rigter@p...>
Date: Thu Jan 13, 2000 6:02 pm
Subject: [alt-beam] Re: BEAM LEGO was microcore experimentation
kit
What about BEAM LEGO?
For example, put the Nv complete with trimpot and LED into a suitable
block
with GND,V+, INPUT, OUTPUT, BIAS POINT contacts in such a way that
the
blocks can be put side by side and interconnections made with a SOLARCELL,
NiCAD, SUPERCAP, PD SENSOR, DRIVER and MOTOR block. The default contact
arrangement should allow standard uCore walker to be assembled in BEAM
PLUG'nPLAY fashion. A JUMPER and PROTOTYPE block can be used to configure
experimental BEAM LEGO Bots. In this way standard BICORE, PHOTOVORE
and
other BEAM bots can be bundled into standard kits.
So what do you all think?
wilf
From: "Mark W. Tilden" <mwtilden@m...>
Date: Thu Jan 13, 2000 8:01 pm
Subject: [alt-beam] Re: BEAM LEGO was microcore experimentation
kit
BEAM Lego is a good idea, but alas anything that smells of LEGO gets
a legal department up the wazzo. So caution, experimentation
only.
There's another problem theough. Lego only assembles from bottom
to
top, so it severely cramps the permutations possible for a successful
Nv
design. Nv is best when freeformed in 3space, and if you make
some Nv-lego
mockups out of post-its, you'll see what I mean.
Later.
markt.
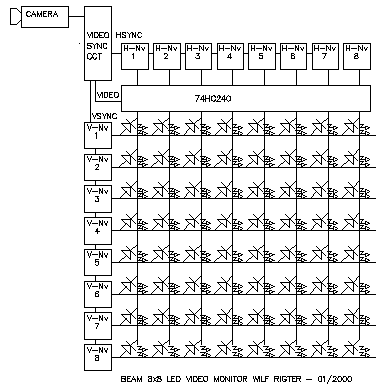
From: Wilf Rigter <Wilf.Rigter@p...>
Date: Wed Jan 12, 2000 2:08 am
Subject: [alt-beam] Re: BEAM VIDEO was Solar Powered Camera's
BEAM circuits are very similar to the older analog type video technology
still used in simple B/W TVs and 20 years ago all televisions used
analog
beamlike circuits for decoding video signal.
So it's not surprising that it is fairly simple to use BEAM circuit
blocks
to convert video into digital or analog signal suitable for interfacing
with
other beam circuits. In the example suggested by Dennison below, The
video
signal is converted into a 2x2 matrix which corresponds to the
average
light level of a quadrant of a video frame. The attached block diagram
shows
the general concept of such BEAM video decoder.
A composite video signal (ie a sugar cube camera output) is processed
by a
sync separator to produce Horizontal and Vertical sync pulses as well
as a
DC restored video signal. This circuit requires some 2N3904s and a
few
passive components. The H and V sync signals each trigger a Hsync Nv
and
Vsync Nv (74HC14) respectively which are adjusted to time out at a
point
corresponding to the horizontal and vertical midpoint of the screen.
The
signals are connected to one half of a 74HC139 (Z bridge) which generates
4
control signals corresponding to each screen quadrant. These 4 Q signals
are
used with four 4066 analog gates to route the video signal to one of
4 Nu
(74HC14). The analog voltage on each Nu cap corresponds to the average
video
signal of that quadrant This can be used to "influence" a central pattern
generator like a microcore. A digital signal can be generated with
a one bit
A/D converter also know as a comparator or Schmitt trigger. If the
video
level on the Nu cap is above the trigger level of the comparator,
a LED
turns on. A bright light moving from one quadrant to the next, will
turn on
the corresponding LEDs indicating the relative position of the light.
This concept can be scaled up to a low resolution "gray scale" (or red
scale) monitor (ie 8 by 8 LED matrix) which can also be easily made
with a V
and H chains of 8Nvs each buffered with HC240 LED drivers which
can drive
64 LEDs in real time. The video signal is "sliced" by a comparator
the
output of which drives the HC240 tristate enable lines. No Nu
stages are
needed to measure the average video since your eyes will do a
visual
integration of the LED light level. Any old video signals can be used
for
experimenting with this concept including a camcorder or VCR video
output.
regards
wilf

From: Wilf Rigter <Wilf.Rigter@p...>
Date: Fri Jan 7, 2000 8:52 pm
Subject: [alt-beam] Re: SIMPLIFIED D1 CIRCUIT
Yes,
Much it can be more efficient.
to quote Jim Mullins:
>The only problem that I anticipate is setting the
>"on" level of the D1. The range of coming on too
> soon versus not coming on fully is very small.
The original D1 using the 2N7000 gate threshold voltage as a detector
gives
a "mushy" turn on point and no hysteresis and a significant amount
of energy
wasted in the forward voltage drop when partially turned on.
Depending on the design, the 74HC14 leakage current near the threshold
will
be reasonably small (of the order of the self discharge leakage rate
of a
large super cap or battery). When the SIMD1 triggers at night, it snaps
on
and the output signal can be used to control the 5 remaining 74HC14
inverters connected in parallel with the outputs used as a "power"
switch.
Or the signal can be used as the tristate control of a HC240 or HC245
or be
used as a PNC input for a microcore etc. to apply the stored
energy to the
load. An example circuit of a SIMD1 charger / "dark" triggered PNC
for a
microcore is attached. Note the 100 ohm positive feedback resistor
loading
the solar cell only after the SIMD1 turns on, can be adjusted to optimize
the SIMD1 turn off point. The output diode is connected in place
of the
usual PNC in a microcore circuit.
regards
wilf
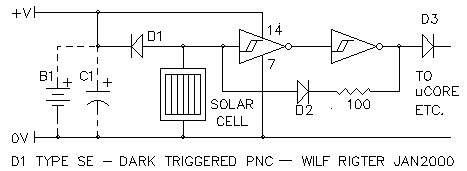
From: Wilf Rigter <Wilf.Rigter@p...>
Date: Fri Jan 7, 2000 4:57 am
Subject: [alt-beam] SIMPLIFIED D1 CIRCUIT
Hi Jim,
I hope this circuit will shine a little light on your D1 problems. Consider
using this simplified D1 (SIMD1) type solar charger /darkness trigger.
It
uses 1/6 of a 74HCT14 with the remainder used for pummer, microcore,
etc.
If the rest of the hex inverter 74HCT14 chip is not used, then a single
74HCT14 inverter chip may be used instead, which is about the same
size as
the original 2N7000. The cap C1 can be a gold cap or if the current
requirements are not high (ie pummer), one of the higher voltage/higher
impedance coin type supercaps would be just fine. Alternately C1 can
be
replaced with a suitable NiCad battery. At dawn and throughout the
day the
SIMD1 will charge the cap/battery and then will turn on the circuit
it
controls at dusk and stays on until the cap/battery is discharged.
The D1
will trigger at the lower (+V/3) threshold of the Schmitt trigger and
with a
74HCT14 that point may be as low as 10% Vmax open circuit of the solar
cell.
The SIMD1 "snaps" on when the solar cell is dark and will only reset
at a
much higher light level or when the cap/battery is deeply discharged
because
of the Schmitt trigger hysteresis. The diode (D1) can of course
be replaced
with the more efficient ZVD circuit.
enjoy
wilf
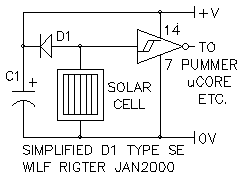
From: Wilf Rigter <rigter@c...>
Date: Tue Dec 28, 1999 11:16 pm
Subject: [alt-beam] BEAM SONICS
Hello everyone,
I have been corresponding with Bruce Robinson on the subject of analog
counters and this has developed into the attached article and circuit.
So with my best wishes for the new year to all
enjoy!
wilf
BEAM SONICS 101
wilf rigter 12/99
Hello everyone,
Goodbye to BEAM silence in 20th and say hello to BEAM sonics in the 21th century!
The SONIC circuit is a sound processor which generates a chirp if it receives several chirps (or other sound packets) from external sources like other chirpers or human whistles.
It's function is based on a concept by Bruce Robinson and it is one of those projects that is looking for a "killer application".
In the mean time this article is presented here for your enjoyment, for discussion and a test platform of related ideas eg adding sound sensing and sound processing to a beam bot.
The project combines several typical BEAM subsystems and components which have been used for many other applications. The circuit uses a single 74HC14 available from Solarbotics, etc. and a handful of other parts readily available from Radio Shack making it easy to get started. Unlike the SMART HEAD which required careful fine tuning to get results, the SONIC circuit component values are not particularly critical and you may substitute or adjust values to suit. This will change some circuit parameters but nothing's going to "hang up" and cause frustration.
As shown in the attached schematic, a electret microphone signal is increased by a factor of about 2000 with two AC coupled transistor amplifiers (Q1-2). The small coupling capacitors provide a high pass filter function which strips off any low frequency "rumble" sound and vibration which could cause problems for example on a moving robot.
MICROPHONE AMPLIFIER
The microphone amplifier is a sound receiver, sensitive enough to pick up a low level sound, ie chirper/beeper, 5 or 6 ft away. Clapping your hands or whistling can be easily be detected 15 or 20ft away. When the microphone detects a chirp or a whistle, the pre-amp output is a complex sound waveform with a mix of analog and clipped signals. This output signal is large enough to drive the following level detector stage.
SOUND LEVEL DETECTOR
The next section of the SONIC circuit uses a AC coupled Schmitt trigger (Nv neuron) as a threshold detector which processes the amplitude information of the incoming sound. Triggered by any sound pulse with an envelop above a minimum level, the Nv output is a clipped digital waveform with a duration and frequency of the incoming sound pulse.
SOUND DURATION DETECTOR
The following Nu neuron stage is a dual time constant integrator which sets a threshold for the minimum duration of and the minimum delay between sound pulses. The Nu filters clicks and noise pulses shorter than 10ms from the incoming sound. The Nu stage produces a single positive output pulse which is at least 10ms and as long as the duration of the incoming sound pulse.
Resistor RA, in series with diode D1 and in parallel with resistor RD, sets the Nu "attack" time ie the minimum required input pulse duration. The parallel resistor RD sets the Nu "decay" time which determines the minimum Nu output pulse duration and therefore the minimum delay between incoming sound pulses. Values of RA and RD are nominally 100K. In general, RA is equal or smaller than RD but values can be adjusted to suit.
CHARGE PUMP
The following charge pump (diode dump) circuit uses the positive edge of the Nu output pulse to transfer a single charge on the charge capacitor (CC) through D3. The charge on CC is reset on the negative edge of the Nu output pulse through D2. This way discrete pulses are transferred on the rising Nu output which can be counted by the following charge counter.
ANALOG COUNTER
The analog charge counter ciruit is closely related to the classic CMOS oscillator. It is used to accumulate discrete charges from the charge pump on capacitor CA until the voltage on CA crosses the input trigger level of the Schmitt trigger. When that happens the counter circuit output rapidly changes to the active state, and just like a standard CMOS oscillator, uses positive feedback from the non-inverting output to dump the charge on CA through the 74HC14 input protection diodes. Next CA start to rapidly charge in the reverse direction through D4 and the 1M resistor with negative feedback from the invering output. When the voltage on CA crosses the lower trigger level, the active outputs are terminated and the charge on CA is again dumped through the 74HC14 input diodes and the counter is "reset" (CA charge is zero).
The number of charges required to trigger the charge counter is set by the ratio of the charge cap CC (0.1uF) and the accumulator cap (CA (1.0uF) as well as the Schmitt input threshold. In this SONIC circuit, that number is arbitrarily set to 6 which makes the circuit act as a divide by 6 counter, generating one output pulse for every six input pulses.
The counter divider ratio can be adjusted by changing the ratio of the two capacitor values. The charge counter active output pulse duration is set by the 1M resistor which can be changed to other values if required.
COUNTER MODULATING
The optional PD is a green LED or photodiode which provides a reverse bias leakage current to charge capacitor CA causing the counter to dynamically change divider ratio (modulus) with time and light level requiring fewer pulses to trigger in brighter light. This tends to make SONIC circuits more active in brighter light. If used on bots this may be also used to influence group behaviour since the frequency of chirps in a group will increase exponentially with group size and light level.
SOUND TRANSMITTER
The beeper circuit is a conventional gated Schmitt trigger oscillator plus inverting buffer with a piezo element driven by the push-pull outputs at an equivalent 10Vpp signal level. The RC components may be adjusted to set the oscillator frequency to the piezo resonant frequency to maximize the sound volume.
APPLICATIONS
The charge counter generates complementary outputs used here to echo
a sound chirp after hearing six incoming chirps but which can be used for
many other things like halting or reversing a bot . With the PD installed,
at low light level and with no input sound pulses, the charge counter self-generates
a chirp after a relatively long time. (Who says you can't divide by zero!)
In bright light the SONIC circuit self-generates chirps more frequently
and triggers after fewer input sound pulses making the circuit more
active and contributing more to communal chirping.
Bots may be halted when the level of communal chirping increases
beyond a certain level in bright light, happy to bask in the light and
chirp away.
In a colony of chirpers, SONIC transmitters could be tuned to notes of the musical scale. I would expect some unusual emergent sounds to occur including the sponaneous generation of BEAM MUSIC (which perhaps only a Beamer could enjoy).
As I write this, the SONIC project is breadboarded on a workbench 20 ft away and with a couple of short whistles I get a nice "I'm alright, you're alright" chirp in response, so I know it's safe for me to recommend you build this circuit yourself and end the silence of the bots .....
enjoy!
wilf
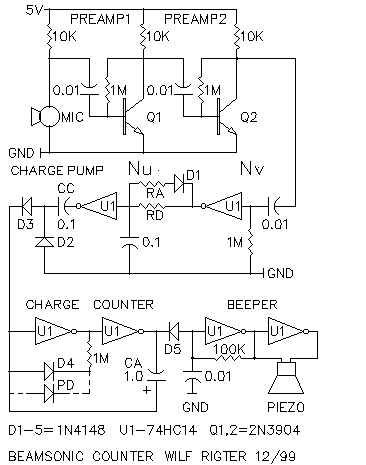
From: Wilf Rigter <Wilf.Rigter@p...>
Date: Sat Dec 18, 1999 5:35 pm
Subject: [alt-beam] Re: chloroplast
Your wish is my command!
Here is a Light Compensated SE (LCSE or should that be lcse?) It should
be
used with a solar cell with 7 to 8V max open circuit. The caps should
have a
similar voltage rating. The value of the pot is about equal to the
brightest
light resistance of the Light Dependent Resistor (LDR). The LDR points
in
the same general direction as the solar cell for tracking light variations.
It is usually necessary to desensitize the LDR by partially masking
it with
shrinktube or nail polish etc. Experimentation is required to get the
right
setting of the pot. Interesting behaviours can result, ie the SE may
charge
but not fire until a shadow passes over the LDR (fight or flight response?)
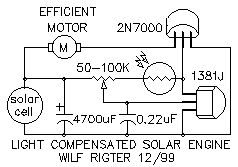
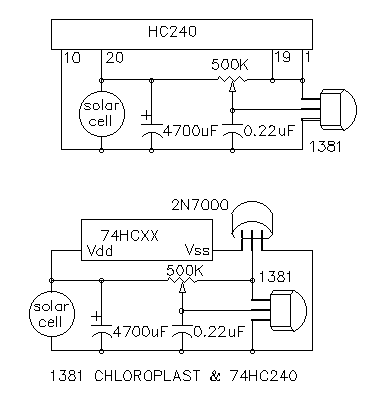
From: Wilf Rigter <Wilf.Rigter@p...>
Date: Fri Dec 17, 1999 10:14 pm
Subject: [alt-beam] Re: chloroplast
Thanks to Lee Golden, here is a long overdue 1381 Chloroplast SE which
is
equivalent of the famous 34164 Chloroplast circuit. The trigger voltage
can
be adjusted up to 7V (or more) and the reset voltage is determined
by the
suffix letter. For example, a 1381J resets at about 2.9 - 3.0V. The
1381 CSE
comes in two versions, one for efficient low current motors and the
other
for cheap and nasty motors. The first circuit is simple and works well
with
BGmicro and other efficient motors. The second circuit can be used
for both
efficient motors but also for high current toy motors using a super
cap for
supply. These cheap but inefficient motors cause a big voltage drop
on the
super cap from their high current requirement which can cause the 1381
to
reset. BTW this also applies to the chloroplast circuit. This problem
is
avoided with a diode and cap for isolation and filtering at the 1381
detector input. For currents over 500ma, use a mosfet with a lower
Rds(on)
than the 2N7000.
regards
wilf
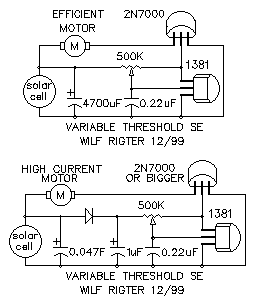
From: Wilf Rigter <Wilf.Rigter@p...>
Date: Sat Dec 4, 1999 5:18 pm
Subject: [alt-beam] Re: bicore or microcore?
Just to make matters even more complicated, there are many networks
that
will produce such bi-directional pulses suitable for driving motors.
The
attached circuit is sort of unique although it may look familiar. It
can
control 3 motors with 3 delays. It uses all non-inverting elements,
in this
case a 74HC245 or better yet a 74AC245. The novel oscillator
outputs are in
phase but the high/low duty cycle can be independently adjusted with
the two
10M resistors! The delay stages are "monocores", similar to slave bicores
but requiring only half the number of parts. The switching is clean
and free
of oscillations. The 1M resistors are used for the delay and the 2M
resistors set the ON time. Anyway the top waveforms show how
the pulses
propagate and the bottom three waveforms show the voltage across the
motors
for the connections shown. When I have some time I will draw
out a MS
bicore network. The "ganged" slaves are probably what is used in Tilden's
lamprey circuits.
enjoy
wilf
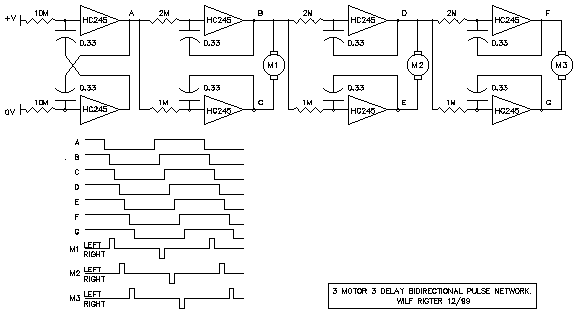
Brilliant Richard! and a good time resurrect the old servohead project.
The attached schematic works with unmodified hobby servos and can be
used
with an umbilical connection to move the motor or the shaft with respect
to
the base. In first case the umbilical requires a 2 conductor cable
for power
and in the second case, the cable is 3 conductors for the eyes. The
power
required for this circuit is a few ma but the servo continuously
draws
50-100ma and more when stalled. A 74HC240 can be used instead of the
74HC04
shown. In that case, up to 4 servos can be proportionally controlled
with
analog voltages from a photo bridge or other source like microcore
outputs
(hexapod), temperature (green house vent), differential sound level
(security camera aiming), potentiometer ( 2 wire remote control), etc).
<<hservo1.gif>>
In the uCrawler V2.0, I did what you suggested and replaced the
circuit
inside the servo housing with the crawler circuit which also uses the
servo
pot (P1) for feed back to pump the crawler legs. As shown in the attached
I
changed the time constant from .3 ms to 30ms and that circuit will
control a
head exactly as you described but power efficiency is not great (ie
similar
to a bicore). A PS head version should be quite easy to do.

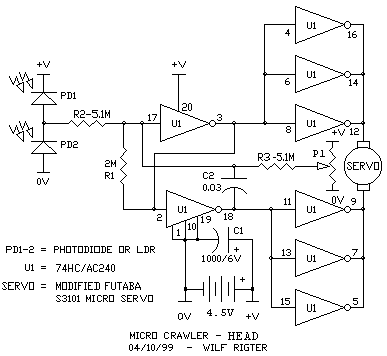 From: Wilf
Rigter <Wilf.Rigter@p...>
From: Wilf
Rigter <Wilf.Rigter@p...>
Date: Fri Nov 26, 1999 1:44 am
Subject: [alt-beam] ChloroBug
Here is a new design which has the advantage of an adjustable turning
"dead
band". After adjustment, the pot can be replaced with an equivalent
fixed
resistor. The dead band means that, when the light on the PD bridge
exceeds
a certain percent imbalance, the ChloroBug turns in the direction of
the
brighter side but, once pointed to the light, the ChloroBug will move
straight towards it with both motors on. When going straight, this
circuit
should be more efficient and twice faster than the previous photochlor
SE
circuits which either "waggle" or use alternating PWM in which only
one
motor is on at a time. Also note the optional 100pf cap for positive
feedback to make it lean a little more into the turns. A bumper feeler
and
timer cap on each side of the pot could be added to steer away from
obstacles.
<<pcse2.gif>>
From: Wilf Rigter <Wilf.Rigter@p...>
Date: Thu Nov 25, 1999 1:32 am
Subject: [alt-beam] Photo Diode Simulator
Here is a little circuit idea that you can use as a cheap substitute
for
photo diodes without sacrificing sensitivity. Any of the four
combinations
of clear, amber or green LEDs and NPN/PNP transistors will all work
equally
well for beam applications but are not suitable for high frequencies.
They
are shown here in pairs for the photo bridge configuration.
enjoy
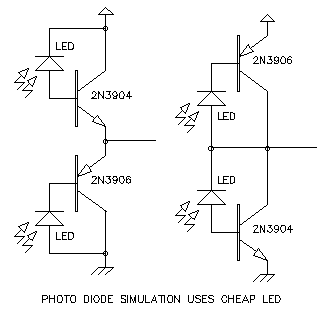
From: Wilf Rigter <Wilf.Rigter@p...>
Date: Tue Nov 23, 1999 6:19 am
Subject: [alt-beam] Re: psh question #3
Sure thing Justin,
If you have four HC240s or two HC245s you can use this circuit : one
245
would replace the two 240s in series.
<<pshaux1.gif>>
It generates two low outputs when the head is centered and one low
in the
direction of continuous turning. I am curious how you will use these
signals. If it is a "head leads:body follows" design, I assume that
you will
use some springs or a stop to tension the head rotation with respect
to the
body allowing maybe 90-180 degree of freedom and generating error signals
until the body is facing the right way. Alternatively you design
or I could
suggest some circuits that do not require springs.
Have fun!
Wilf Rigter mailto:wilf.rigter@p...
tel: (604)590-7493
fax: (604)590-3411
> -----Original Message-----
> From: BotDoc [SMTP:botdoc@y...]
> Sent: Monday, November 22, 1999 5:37 PM
> To: beam@s...
> Subject: psh question #3
>
> Thanks Wilf,
> I am wondering if it is possible to be able to
> control 2 enable pins with this type of circuit. What
> I am trying to do is have both of the enable pins on
> another IC low when the head is locked on, then when
> the head turns one direction it raises the voltage of
> one enable pin, turning that side off. I am just
> trying to control the enable pins of the hemicore
> circuit I posted a while ago to make my walker
> phototropic, it turns just fine by toggling the
> enables. It would be nice to put a head on it. The
> balancing and everything is fine with the head on the
> body, if I could only get them to communicate with
> each other. Thanks again
> Justin
>
> =====
> A motor is a robot waiting to happen
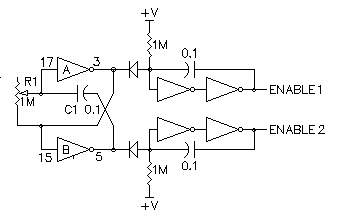
From: Wilf Rigter <Wilf.Rigter@p...>
Date: Mon Nov 22, 1999 6:43 pm
Subject: [alt-beam] Re: psh question #2
I'm back! Justin, you are correct about the psh motor outputs,
that they
are steady state high or low when the head motor is actively "turning"
but
the outputs oscillate in phase when the head is "locked" on.
I assume you
want to generate a steady state active low enable signal when the outputs
oscillate. One very simple way to do that is to detect that the current
in
the motor drops to zero at that time.Since all the motor current flows
into
the Vcc pin, a PNP transistor used to sense this current can provide
both
indication of motor activity and the active low enable.
The schematic of your filter is one of the "linear amplifier" configurations
which is almost certain to oscillate on it's own. You can demonstrate
this
with a slowly varying dc voltage (pot between 0V and +V) at the input
and
see if the inverter oscillates when crossing the threshold. Another
point to
remember is that using the 1.5K and the .1uf cap for a filter (Nu)
integrates high frequencies and generates an analog voltage across
the cap
proportional to the duty cycle of the waveform. When that voltage is
near
the threshold, it causes the inverter to go into the linear region,
oscillating just like the applying the dc voltage in the previous demo.
There are lot's of other solutions and I will whip up another one at
lunch
~2hr from now.
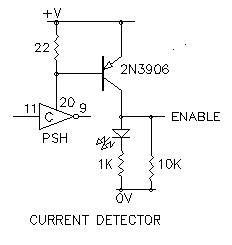
From: Wilf Rigter <Wilf.Rigter@p...>
Date: Sat Nov 20, 1999 8:53 pm
Subject: [alt-beam] Re: Cholroplast thingy
Hey Craig,
Yep, you have to use low leakage fet input opamps, especially if you
use
LEDs for photocells together with small low leakage caps. I would change
the
circuit slightly as shown in the attached to improve efficiency (kind
of
important with solar engines). With 5V(min) you can easily drive the
mosfet
gates. Not yet tested but uses fewer components, lower forward voltage.
Note
the 0.001 caps are used with the clear LED type (low sensitivity)
photodiodes for filtering and snappy positive feedback. Exact cap values
to
be determined empirically.
regards
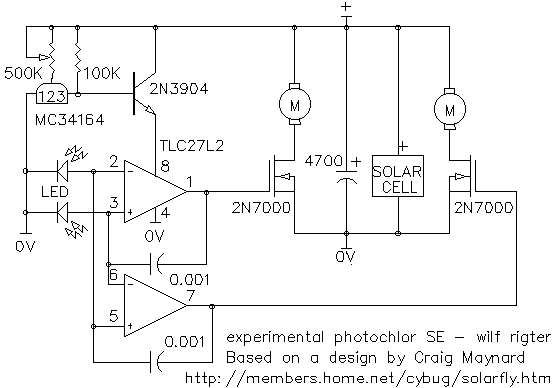
From: Wilf Rigter <Wilf.Rigter@p...>
Date: Tue Nov 16, 1999 2:41 am
Subject: [alt-beam] 74xx240 problems and solutions
I discovered these problems while playing around with some new 74ACT240
chips that were not behaving the way they should. It is possible that
problems reported by others having difficulty in getting the PS head
circuit
to work may be related. These problems are common to all beam circuits,
so
the solutions can provide insight in how to deal with such problems.
Problem with high frequency oscillation in 74AC/ACT240 chips.
74AC/ACT logic has high output current characteristics and is recommended
for motor driver applications. But AC/ACT is also much faster logic
and
there is a possibility that a circuit using AC and ACT240 (but not
HC or
HCT) chips will oscillate uncontrollably at high frequency (HF) because
of
the way that BEAM designs use these digital chips for quasi linear
applications. HF oscillation causes high dynamic current consumption.
This
instability is a feedback problem caused by a combination of circuit
layout,
stray capacitances and slow waveforms. It creates a feedback path for
phase
shifted HF signals in the linear region. The HF problem has also been
seen
odd number Nv cores like the tricore and in Nu circuits that do not
use
Schmidt triggers such as the reversing circuits of HC240 walkers that
use a
Nu connected directly to the tristate enable pins. For the PS head
in
particular, the problem is more likely to occur when C1 and C2 are
connected
series and when the Nv/Nu output oscillates the output to input stray
capacitance couples back through the series caps to the HLO input.
Luckily,
for the Nv/Nu circuit the location of R2/C2 is interchangeable and
swapping
positions of these two components breaks the feedback path. During
my
investigation of HF oscillation I also discovered that a 74ACT240 chip
made
by National Semiconductor sometimes had one output=input instead of
inverting it!!!! probably caused by an internal latchup initiated
by HF
oscillation.
Solution
The solution to both problems was to swap R2/C2 and adding a 1K damping
resistor R3. So if you have a problems with 74xx240 high frequency
oscillation or "non-inverted" inverting logic try adding damping resistors
between stages to reduce or eliminate the problem.
Problem with input threshold of HCT/ACT chips.
When using HCT or ACT logic family, the assumption of an input switching
threshold value of nearly +V/2 does not hold. Instead this logic uses
a
threshold measured at 1.2V with Vcc=5V. Since the symmetry of the HLO
outputs depends on the threshold being near 1/2V+, this can result
in a head
that continues turn in one direction unless the bridge is greatly unbalance.
Solution
This problem can be largely compensated for as long as the photo bridge
uses
a +V reference of 2 times the threshold. Adding R4 and the 2
LEDs connected
to the HLO outputs is a unique way to form a 2V shunt regulator which
is
sufficiently close to the required photo bridge reference voltage to
make
the HLO symmetrical and has a big bonus besides.
Bonus
Connecting the 2 leds to the HLO outputs cause them to blink back and
forth
like the FLED to attract attention when the SE has triggered and to
show the
direction of head rotation when hunting a light. The penalty is a slight
increase in standby current rising from 2ma to about 5ma.
A winky head for all seasons
This neat SE ready/HEAD direction LED indicator circuit can be adapted
to
the AC/HC logic version without connecting LDRs to the LED common point
as
shown but connect the LDR straight to the +V/0V lines as was shown
in the
original circuit .
Attached is a schematic for the PowerSmart head V2.0 , designed specifically
to address problems that may occur associated with using chips other
than
the 74HC240. It also shows an example of using more commonly available
1M
trim pots and larger caps with no bad effect on performance.
The bottom line is that there is not one PShead design but a family
of
flexible designs providing similar results while utilizing various
available
resources. I will add these new mutations of the PS head circuit
to the
tutorial together with some ideas on Siamese heads, soon.
Wilf Rigter

From: Wilf Rigter <rigter@c...>
Date: Sat Oct 30, 1999 3:53 am
Subject: [alt-beam] Re: Bicores...some technical questions
Hi Elmo,
Here is a simple animation of a bicore schematic that uses a range
of
colors between red and blue to illustrate the principles of BEAM
circuit
operation. In this example I used 5 colors representing: RED=V+,
ORANGE=3/4V+, YELLOW=1/2V+, GREEN=1/4V+, and BLUE=0V. The changing
colors
indicate the charging and discharging of the capacitor voltages at
the
bicore inputs and the rapid change in output (and input)
state when the
input voltage crosses the 1/2V+ switching threshold. This
should give you
some idea how the voltages at the inputs affect the outputs of
a 74HC240.
If this is useful, I will add a set of 4 waveforms next to the
schematic to
simulate an oscilloscope screen.
Of course this simple bicore simulation using Paint Shop Pro Animator
is
just a start. Java applets with buttons to adjust variable resistors
or
light sources shining on simulated photo diodes etc would give
a much
better graphic simulation of beam circuit operation. Would anyone
be be
willing to develop this into an (open architecture) beam circuit
simulator?
Next here are some answers to the questions you raised.:
Elmo wrote:
> Hi there everyone,
> So i thought i would post a few questions to the list to see who knows
> what.
> So here's what i want to find out:
>
> I am assuming that larger cap values in the basic bicore circuit
> increase pulse width and smaller resistor values will increase the
> frequency. Am i right?
>
These are two related ideas:
1. The frequency of both outputs increases when the capacitor
or resistor
values decrease.
2. The period is the time for one high/low cycle.
3. Pulse width depends on your definition: the "on" or "high"
time of one
output is equal to the "off" or :low" time of the other output. They
are
said to be complementary outputs.
4. Pulse width of the "on" time can be expressed in time units
but in beam
circuits, it is better defined as a percentage of the period ie
50%
pulsewidth = symetrical on/off time. This is also known as duty cycle.
>
> Would it be better to have a circuit that has a fixed frequency and
> variable pulse width or fixed pulse width and varible frequency?
fixed frequency with variable duty cycle is perfect for beam applications
>
> Is it better to drive a bicore circuit at higher frequencies or lower
> frequencies?
A bicore used for a walker must have a frequency or more precisely a
period
which gives the right angle of rotation for the legs.
A bicore used for a head must have a frequency which is high enough
to give
smooth rotation. The dutycycle determines the direction of rotation
ie
25%=left, 75%=right and. 50% duty cycle stops the head rotation.
>
> Is the resitance of the motor meant to affect the oscillation or
pulse
> width of the circuit?
Resistance of the motor should have no direct effect on frequency but
may
provide feedback to decrease the pulse width when the motor is "loaded"
in
the direction of rotation.
>
> Why are bicores built using high pass oscilators rather than then
more
> common low pass?
>
> i.e. High pass -||---|>o-
Low Pass -R---|>o-
>
|
|
>
R
=
>
|
|
>
gnd
gnd
>
The bicore is a modern version of the ancient vacuum tube crosscoupled
astable multivibrator design which itself was named after a type of
mechanical vibrator used for example in Henry Ford's model T ignition
coil.
>
> Most people seem to add extra inverters into the baasic circuit to
> increase the current output to the motors. Why do they add extra
caps
> into these parts of the circuits rather than just adding extra inverters
> in paralell at the output of each of the main oscilating part of
the
> circuit?
The caps you refer to could be part of a slave bicore or a monostable
stage.
hope this helps
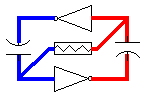
From: Wilf Rigter <Wilf.Rigter@p...>
Date: Tue Oct 19, 1999 1:09 am
Subject: [alt-beam] Re: Head Questions
Evan Dudzik [SMTP:evandude@y...] wrote:
>> Elmo <andrewe@i...> wrote:
>>2) Can i build a standard 74HC14 type biocore for
>> use in a head unit?
>an HC14 cannot make a bicore (only two neurons in a
>bicore) for some reason, they seem to need to form at
>least 3 neurons.
Not at all:
two HC14 Nvs with two resistors and two equal capacitors
make a fine un-suspended bicore.
two HC14 Nvs with one resistor and two unequal capacitors
(ie 0.1 uf and 0.33 uf) make a suspended bicore.
three HC14 Nvs in a tricore loop have a tendency to oscillate
at high frequency.
>> 3) Why use a biocore at all for this application.
>> Wouldn't a simple
>> solar engine with phototropic abilities and a
>> mechanism for inverting
>> the output to the engine so it can go in reverse, be
>> sufficient?
>yes, but the bicore functions differently here... it
>has the ability to turn VERY slow to one side or VERY
>fast, depending on the difference in light on each
>side. this circuit you proposed would go in putts
>that were always the same distance, so it would
>continuously overshoot the light unless very lucky,
>and when it was locked on to the light, it would still
>swing a LOT. When a bicore is locked on, it just vibrates.
If you really want to do this, try something like the attached
untried but promising POPPER HEAD circuit. Reduce the
storage cap to increase the pulse rate.
enjoy
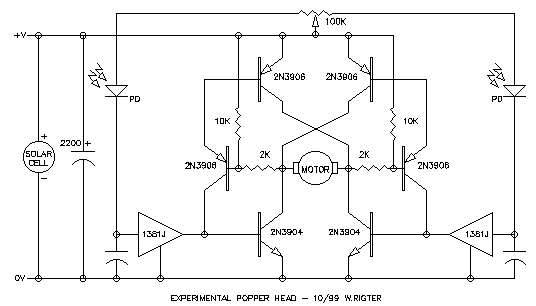
From: Wilf Rigter <Wilf.Rigter@p...>
Date: Sat Oct 16, 1999 8:40 pm
Subject: [alt-beam] Quasi uCore
Hello again,
Here's another bit of circuit magic, this time a microcore design including
motor drivers that uses only non-inverting buffers like the AC/HC 245,
241
or 244 chips. The Quasi uCore (QuCore) is the first microcore
design that
does not require a 74xx14 or equal Schmitt trigger. When used with
the AC
version, it can directly drive a BG micro type gear motor, which provides
in
a single chip, the "almost complete" microcore 2 motor / 4 legged walker.
The secret is the use of non-inverting buffers with feedback capacitors
to
simulate Schmitt triggers. Like it's microcore predecessor, this circuit
will saturate and for now requires manual pulse neutralizing
to start a
single process by grounding one of the pull-up resistors at one of
the
QuCore stage inputs. Like a microcore, the pulses are non-overlapping.
This
is very useful for controlling a 2 motor 4 legged walker but also the
two
motors of a single leg of a hexapod which require the typical leg motion
of
UP, FORWARDS, DOWN, BACKWARDS. Like the microcore, the duration of
each
pulse can be independently adjusted. Unlike the microcore, two stages
use
ground and two stages use +V as reference for their input resistors.
Also
unlike the micro core one output pair is active low and one pair is
active
high. Anyway it is a unique design and may yet play a role in the evolution
of beam bots.
enjoy
From: Wilf Rigter <Wilf.Rigter@p...>
Date: Tue Oct 12, 1999 8:11 pm
Subject: [alt-beam] Re: Suspended Microcore?
Hi Richard,
Interesting idea!
One characteristic of the 2Nv suspended bicore is that both stages
simultaneously change state. The process is initiated when the voltage
on
either inverter bias point crosses the threshold and the second inverter
of
the bicore is "slaved" to the first inverter which generates an identical
but inverted process providing positive feedback to the first inverter
to
speed up the transition. A good example of this is a 74HC240 (or a
74HC14!!!) bicore with unequal capacitors (ie 0.1 and 0.33) in which
the
inverter with the smaller cap attached to it's input always initiates
the
bicore transitions since the voltage at it's input always crosses the
upper
and lower thresholds first.
This implies that multiple Nv suspended core must have an even number
of Nv
stages for positive feedback. A hypothetical 4Nv suspended "quadcore"
(attached) would also have a controlling inverter with the other 3
stages
"slaved" and changing state at the same time. Therefore a 4 Nv suspended
bicore always saturates to produce processes initiated by whichever
of the 4
stages has the smallest time constant but like a bicore, only multiples
of
180 degree phase inverted signals are generated. If Photo Diodes were
used
in such a network it would cause each process to be initiated by the
stage
with the most light on the PDs with each subsequent stage inverting
and
reinverting the process around the loop until it is applied "in phase"
to
the input of the initiating stage. Perhaps you can test these
assumptions
and report back?
<<quadcore.gif>>
From:Wilf Rigter <rigter@c...>
Date: Tue Oct 12, 1999 4:09 am
Subject: [alt-beam] Re: how exactly does a bicore work?
Yes!
The bicore head circuit uses Pulse Width Modulation so the motor "goes"
both ways. But with the head application the caps are small so the
voltage waveform is switching rapidly and the motor's enertia
makes it
move back and forth no more than a fraction of a turn. :It just vibrates
when locked on to a light source because the pulse in each direction
is
the same width. if not locked on it slowly scans because of a small
mismatch in the left and right pulse width. The head turns towards
a
light because more light falls on one PD than the other and the
imbalance turns the motor towards the light. Like our own eys the PD
should be crossed over left to right. For example, when a light
falls
mostly on the left PD, it causes it's leakage current to increase more
that the right PD which makes the left pulse shorter than the
right
pulse and moves the motor smoothly towards the right. This would
make
the head photophobic and by crossing over the PD it becomes phototropic.
By making the caps a little larger the frequency (in low light) slower
and cause the head to visibly shake.
The bicore wastes quite a bit of power in switching the motor current
without actually moving the head especially when the head is locked
on.
So new circuits were designed for controlling a head which offer some
advantage:
The monocore head circuit applies a straight left or right signal to
the
motor until the head is locked and then oscillates and the powersmart
head use a different power saving technique which turns of the motor
drive off when the head is locked on and the light falling on the PDs
is
balanced.
regards
wilf
regards
wilf
From: Wilf Rigter <rigter@c...>
Date: Sat Oct 9, 1999 2:03 am
Subject: [alt-beam] Animated LCD name tag
THE ANIMATED LCD NAME TAG
The attached ANIMLCD schematic shows how it's done : It flashes the
words ROBO
and then DOC for about 1 second each Any other
2 words within the limitations of the seven segment display can be
shown. I
have build one and it works great!
Instead of the two bicore lines driving the static type LCD name tags,
the
animated LCD adds the classic bicore "reversing"
circuit to generate 4 lines for controlling the LCD. How Beamish can
it get?
The rule for displaying any two messages is as follows:
1. segments which are "on" for both words are connected to the ON line
2. segments which are "off" for both words are connected to the OFF
line
3. segments "on" in the first word and "off" in the second are connected
to ON'
4. segments "off" in the first word and "on" in the second are connected
to OFF'
5. the backplane terminal is connected to the OFF line
Sounds simple but it takes a bit to work out all the segment connections.
You
can check the connections for ROBO/DOC to see
how they follow the rule.
You may be interested in the reason for all the switching waveforms.
It is
that LCD segments must not be subjected to a DC
voltage or else they will die. That is why the "on" segments and backplane
are
driven "out of phase" by the two bicore
outputs which generates a 30 Hz AC voltage equal to 3V RMS between
the "on"
segments and the backplane. An "off" segment is
connected to the same bicore output as the backplane and therefore
the voltage
between an "off" segment and the backplane is
0V. The Bicore "reverser" switches the polarity of some segments to
be "in or
out of phase" with the backplane signal
thereby turning those segments either on or off under control of the
second
bicore. The two messages alternate at about 0.5
Hz rate displaying each for about 1 second.
Next : more messages and a low power LCD display for bicore/microcore
diagnostics!
enjoy
wilf
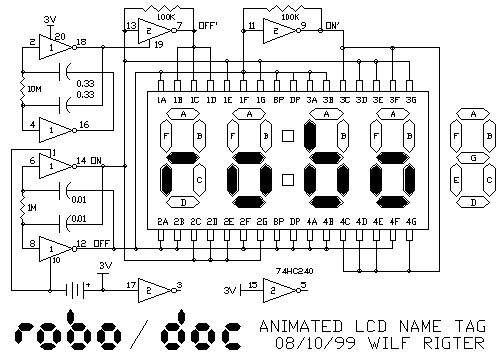
From: Wilf Rigter <rigter@c...>
Date: Fri Oct 8, 1999 5:30 pm
Subject: [alt-beam] Re: lcd name plates....
(Formatted this time and with the GIF attached).
Ahh! Great idea Ian! Seven segment type numerical LCDs say from a broken
digital clock or calculator. If you are lucky
and the letters of your name can be "expressed" in seven segments then
you can
use this display ( "W" is a problem!) .
Power consumption is virtually zero so it can be powered from 2
button cells
for a couple of years. For a brighter but
power hungry display that requires no bicore you can use the LED seven
segment
displays but these do require resistors to
limit the current. (hey, laying a single seven seg display on it's
side can
display a "W" !) The attached shows a typical
seven segment display. Connect the common "backplane" and the unused
segment
terminals to one output of the bicore.
Connect the other segment terminals to the other bicore output. Make
sure you
connect all unused bicore chip input pins
to ground or you'll drain the battery. Just for starters :
next let's use the
HC240 tristate function pins to flash 2
different messages!
wilf
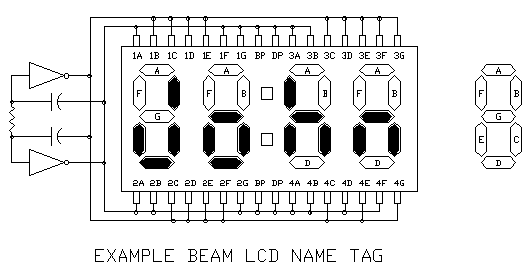
From: Wilf Rigter <Wilf.Rigter@p...>
Date: Wed Oct 6, 1999 8:08 pm
Subject: [alt-beam] uCrawler V1.0
Sometimes you got to take one step back before leaping ahead as illustrated
in the attached article:
enjoy
wilf
MICRO CRAWLER V1.0 - A ONE MOTOR/TWO LEGGED WALKER
04/10/99 - WILF RIGTER
Hello and welcome to another BEAM article. This time I present a new
generation walker and a new feedback method. The Micro Crawler is really
a
devolutionary step in walker design, in fact it is less of an insect
and
more like a tidal pool creature crawling in the mud from whence it
came
(more on that later). However it is also a drastic overall design
simplification and has some interesting emergent behaviour and as such
is
perhaps worthy of consideration as a separate BEAM species. Besides,
uCrawler also includes a new leg centering method which I call the
BEAM
feedback servo which has potential applications in higher order walkers.
The inspiration for this design came from the realization that rear
legs of
a multi motor walker are often slaved and synchronized to the front
legs and
in a sense are "idler" legs. The other example that turned on the lightbulb
was the simplicity of the single motor symet and in nature the lungfish
or
mud hoppers provide an example.
The uCrawler V1.0 is phototropic and will nicely crawl towards
and follow a
bright light source. The other feature of the V1.0 is it's preference
for
somewhat rough surfaces ie the sofa cushions and short fiber Persian
carpet.
Future work will attempt to optimize the "feet" to make the crawler
compatible with smooth surfaces and additional work is required to
add
reverse motion. As variations on the theme, ideas for sand and
amphibian
crawlers are also roiling on the event horizon.
THE uCRAWLER BODY
The uCrawler v1.0 body is little more than a head and a tail consisting
of
three parts:
1) A modified hobby servo with a pair of legs (or flippers) at the front
of
the walker.
2) A long sloping PCB "tail" attached to the servo, containing photosensors,
the Servo Core, and the battery pack.
3) An idler wheel attached near the end of the tail supporting the
battery.
The side and front view drawings illustrate the overall body layout.
<<uCrawlerside.gif>> <<uCrawlerfront.gif>>
THE IDLER WHEEL
The idler wheel turns the uCrawler into a bit of a hybrid using the
best of
wheeled and legged creature worlds. Unlike most wheeled bot idler the
ucrawler wheel does not swivel and remains always fixed in-line with
the
body.
The idler wheel serves two functions: it supports much of the weight
and
acts like a resistance to the reaction of the leg motion which causes
cute
but otherwise useless tail wagging behaviour. In a sense it is also
like a
stabilizing fin or a tail rotor of a helicopter. The resistance to
sideways
tail motion is the reason for not allowing the wheel to swivel.
In the prototype I used a soft rubber capstan idler wheel and bracket
from a
walkman tape recorder bolted to the bottom at the end of the 6" tail.
THE STANDARD HOBBY SERVO
Many readers are already familiar with the hobby servo but I will include
a
short description of it's design and operation. The unmodified servo
consists of a boxlike housing with two mounting ears, an output shaft
and 3
pigtail wires for power and control signals. After removing four screws,
inside the housing we find a small PCB with the control decoder and
driver
electronics, a small permanent magnet motor with a gear box and a feedback
potentiometer connected to the output shaft. The output shaft has a
mechanical stop attached which prevents the shaft from rotating more
than
about 180 degrees. The servo is therefore designed for partially rotating
the output shaft like a bicycle steering wheel or as a powered joint
for
robot arms or legs.
The hobby servo uses 0V and +3-6V power connected to the black and red
wires
respectively and the electronic driver is controlled with pulse width
modulated (PWM) control signals on the white wire. (Important note:
servo
wire color codes vary and using the wrong hookup can destroy the servo!
Always check for the correct color code for your servo) The PWM signals
are
narrow positive pulses which are 1.5ms in width with a maximum deviation
of
+/-0.25ms. This corresponds to the output shaft center position and
up to
+/- 90 degree clock wise (CW) and counter clockwise (CCW) rotation.
The
repetition rate of the PWM signals is usually between 20-100 pulses
per
second. for smooth servo control When the pulses cease the servo remains
in
the last position.
THE MODIFIED HOBBY SERVO
While it is possible to generate the required pulses using beam circuits,
as
reported in a previous article, most beamers just rip the electronic
guts
out of the servo and often remove the mechanical stops as well. Other
roboticists just remove the stops and sometimes the feedback pot in
order to
convert the servo to a bi-directional continuous rotating gear motor
for
driving wheels etc. with speed and direction controlled by PWM pulses
from a
micro controller chip.
When servos are used for BEAM bicore or microcore walker applications,
the
perpetual problem of centering the legs rears it's ugly head. Springs
and
gravity are alright but by modifying the servo we have also removed
the
excellent position feedback circuit which would be perfect for centering
or
steering legs in a BEAM walker if it weren't for the need of generating
the
precise control pulses.
SERVOS FOR BEAM WALKERS
Unlike most other servo applications, walkers require servos which
constantly "reciprocate" back and forth. Beam walkers use micro core
or
bicore oscillators to apply a constantly reversing voltage across the
motor
winding. The signals are applied without output shaft feedback and
instead
gravity or springs are used to load (slow) the servo at the end of
travel
like soft mechanical stops and to coarsely center the legs. While
it would
be possible to use BEAM circuits to generate the 1.5 ms pulses +/-0.25
ms,
it would require a fair bit of additional circuitry to what is supposedly
the simplest possible design. The uCrawler design gets around the problem
by
dumping the PWM control circuit and putting a very simple BEAM like
oscillator in the position feedback loop. Before discussing the electronics
let's first look at the required servo mods.
HACKING SERVOS - BEAM SERVO STYLE
The uCrawler modifies the Servo by removing the electronics PCB and
by
connecting 2 wires to the motor terminals and 3 wires to the servo
pot for a
total of 5 wires, to connect to the external control circuit. The uCrawler
circuit is so simple that a standard size version could be easily mounted
inside a standard servo housing and future revisions will do just that.
When
using the smaller "micro" servo housing, used in the prototype, SMT
components would be required for an internal control board.
Since the servo pot is connected to the output shaft, the moving "wiper"
contact changes the ratio of resistance for the upper and lower terminals.
If the outside terminals of the pot are connected to +V and 0V, then
the
voltage on the wiper contact is proportional to the rotation of the
output
shaft and the legs connected to the servo.
"Great!", you say, "let's connect the pot to the bicore to center the
legs!"
"Hmmm, sorry, but the resistance is only 5K and incompatible with the
bicore
circuit" says I (and others before me)
So what is needed is a little adaptive circuit design which turns out
to
utterly simple.
THE SIMPLEST BEAM SERVO
There is a very simple circuit which is basically a HC14 Schmidt trigger
circuit which uses the servo motor and potentiometer for feedback to
create
the oscillation and side to side rotation. This circuit's operation
is very
simple and easy to explain. The circuit shown in the EARLY SERVO1 drawing.
<<earlyservo1.gif>>
Let's assume that the output shaft and pot are rotating CW and that
the
wiper voltage is becoming more positive. When the wiper voltage crosses
the
positive threshold of the Schmidt at about 2/3 Vcc, the circuit
output
switches and the motor reverses. Now the motor has to rotate CCW until
the
wiper voltage drops to 1/3 Vcc at which point the Schmidt trigger changes
state once again and the motor rotates CW. This continues indefinitely
with
the legs moving back and forth, precisely limited to maximum CW and
CCW
positions. While this provides 100% position feedback, it is single
minded
in it's operation.
ADDING SOME MORE FEEDBACK
This simple HC14 circuit can be slightly modified to add features such
as
fine tuning the centering of the legs or to add phototropic behaviour.
This
is done by adding a summing network to combine the output of several
feedback sources. The summing resistors should be large resistances
in
comparison to the feedback source resistance for signal isolation.
EARLY SERVO2 shows a second centering pot and a summing resistor to
fine
tune the center of rotation. Since the 10M summing resistor is 10x
larger
than the summing resistor of the servo pot, the effect of adjusting
the
centering pot is about +/- 10% of the total rotation around the center
point. In addition, a pair of Light Dependent Resistors (LDR) act as
a
voltage divider, the output of which is summed via a 10M resistor with
the
output of the servo feedback pot and the centering pot. Again the effect
is
approximately +/-10% of the total rotation around the center point.
So the
effect of an imbalance of the LDR network (unequal light) turns the
center
of leg rotation towards the light source, which makes the bot photoropic.
Reverse the connections of +V and 0V to the LDRs and the bot becomes
photophobic.
<<earlyservo2.gif>>
SIX SERVOS IN ONE CHIP
Now the remarkable fact is that the BEAM feedback servo uses only 1/6
of a
74HC14 IC and some resistors to provide the logic: 6 servos in one
chip is
well within the normal parameters of BEAM simplicity.
But there is a caveat: If a leg is trapped and is prevented from reaching
the end point of CW or CCW rotation the circuit will simply sit there,
stalled and possibly overheating, until there is divine intervention
from
it's creator to free the legs and allow normal operation to continue.
By comparison a Bicore walker would continue to oscillate and move
and use
this motor load "feedback" to shift the center of rotation providing
a
better chance of freeing the trapped leg. The Bicore walker doesn't
really
know and is not so single minded about where it is "supposed" to go.
While
adding a cap and one more feedback resistor can provide the desirable
continuous oscillation in case of a stall, an alternative solution
which
also provides the motor drivers was used for the final uCrawler V1.0
circuit.
THE V1.0 BEAM SERVO
Now let's look at the uCrawler circuit design. Like a standard Bicore
it
uses a 74HC240 (or better yet, a 74AC240) but the oscillator is more
like a
monocore circuit. The bottom line is that it uses 2 inverters for the
oscillator and summing network and the 6 remaining inverters for motor
drivers. The design also solves the "stalled leg" problem and of course
requires no springs!
With reasonably well matched LDRs I found that it was not necessary
to add
the "centering" pot in the final design since the center error was
very
small and not cumulative as it would be in a conventional Bicore design.
<<uCrawlerschem.gif>>
A TAIL OF A PCB
The PCB shown in the top layout drawing is a proposed layout: the prototype
uses a 3"x4" solderless proto board and 3V battery pack taped to a
plastic
strut. Without the extra weight of the protoboard and the 4.5V batteries
I
expect a pretty lively. There is enough detail in the layout drawing
that
would allow an ambitious BEAMER to make his own PCB. In the prototype
and
PCB the LDR pair should be facing forwards and bend towards the front
of the
crawler one LDR on each side of the servo housing. The fixed resistors
can
be replaced with pots and you will have a lot of fun like I did to
determine
useful combinations of resistor values. The fixed values shown are
a the
best combination of resistors to date. Like any good fish story
, I can
imagine an aquatic version of the crawler with flippers swimming (or
more
accurately paddling) around the pool with a long tail and fin replacing
the
idler wheel. Alternately drive the tail with the servo and use pectoral
fins
for stabilization. Afraid of water? Perhaps let your imagination fly
and
fancy dress the uCrawler in feathers (no tar please) or with modified
feet
perhaps sand's your game. A final comment on the prototype: the
legs are
bent at 90 degrees apart and each is about 2" long. The tip (1/4")
of each
leg is also bent back so that it slides forward with little resistance
but
when pushing back, the tips digs in for good "purchase" (look it up
in the
dictionary heheh!) The speed of the prototype is about 1-2" per second
depending on the surface.
<<uCrawlerlayout.gif>>
IT'S A WRAP
Well we've come full circle and back to the beginning of the tale of
the
simplest of all beam walkers. I will continue crawler development especially
searching for a reversing uCrawler, so any suggestions along those
lines
will be appreciated.
enjoy
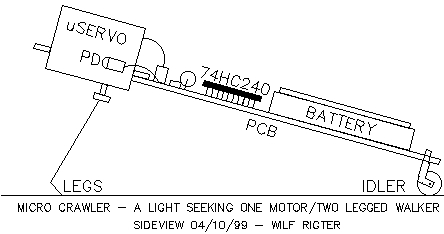
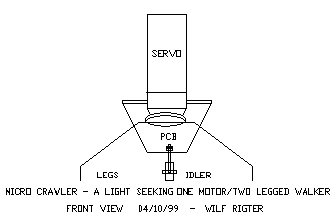
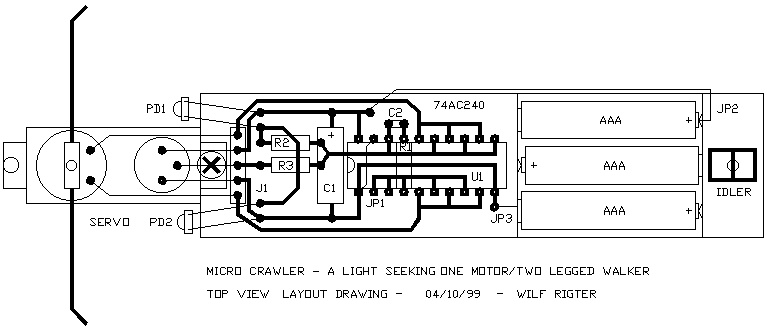
From: Wilf Rigter <Wilf.Rigter@p...>
Date: Sat Sep 18, 1999 9:11 pm
Subject: [alt-beam] Re: 3 motor bicore walker
Hello Grant,
Born about a year after WWII (bad war, peace at last, let's celebrate!),
I'm one of the original baby boomers. Monkey curiosity? It's in our
genes or
I'm in Kansas, heheh!
<command : don't take that the wrong way, or else!>
Attached is a picture worth a thousand words (actually 2535 bytes).

What were we talking about? Oh yeah, triple bicores: take one master
and two
slave bicores, reduce the coupling resistor values by about 30%, connect
them in series and you'll have a 3 phase pattern generator with complementary
outputs. The exact phase relationship should be adjusted with the coupling
resistors to match the mechanical timing requirements.
There is also the single master, many slave monocore design successfully
used in Darrell Johnson's Worms which reduces the number of passive
components by about 50% .
enjoy
Wilf Rigter
From: Wilf Rigter <Wilf.Rigter@p...>
Date: Fri Sep 10, 1999 2:42 am
Subject: [alt-beam] power_smart_head fest
Hi Bumper,
What do you think of a little "tête-à-tête-fête"
to help you get your head
together (groan!). If you can stand the occasional pun, I could help
you
step by step through the process and posting the dialog on the
list would
be interesting for others to follow. Attached is simplest schematic
for the
Power_Smart head circuit re-organized a bit to make it more understandable.
That design may be a good starting point, assuming you have access
to a
74AC04. If not, then a 74HC04 from Radioshack will work too but would
require an h-bridge such as the fetbridge described earlier. Otherwise
the
240 version can be used but first we should agree on pin numbers, layout
component values, etc. The LEDs on the buffer outputs help a lot with
debugging and tuning. If you are interested you (or I) can make up
a layout
drawing so that we can build this unit together, step by step and debug
as
we go along. Sort of like a virtual BEAM workshop with anyone interested,
joining in and providing their feedback and progress reports. Let me
know
what you think.
I was also thinking of some kind of head contest:
Competitive - where the heads go "head to head" wielding laser pointers
(well LED spotlights anyway) to blind or poke the other guys eyes out
and
generally and try to screw up the other heads. (grin)
Cooperative - using laser pointers (or LED spots), draw beautiful patterns
on the ceiling while doing a little beam tech "pas de deux".
regards

From: Wilf Rigter <Wilf.Rigter@p...>
Date: Mon Aug 23, 1999 11:54 pm
Subject: [alt-beam] Re: eVORE scheme...
Richard ,
The antenna is connected to ground, the motor between ground and the
gate,
the diode is in parallel with the motor limiting the winding voltage
to 1.6V
and the maximum motor current is 1ua. Those must be pretty efficient
motors
you are using. =)
Me thinks you should check again before I start believing in witchcraft.
Is
the pinout the same as a 2N3904 with e=s,b=g and c=d? Attached is the
probable schematic.

From: Wilf Rigter <Wilf.Rigter@p...>
Date: Sun Aug 22, 1999 11:08 pm
Subject: [alt-beam] Chirper and other sound effects!
ok Sparky,
Here it is!
This circuit uses the 2 spare gates of Ian's reverser circuit
and makes
"birdy chirps" when the bot backs up. You can change the sound
to "lasers"
by changing the 100K resistors to 1M and many other sounds are possible
by
playing around with the other components values.
have fun
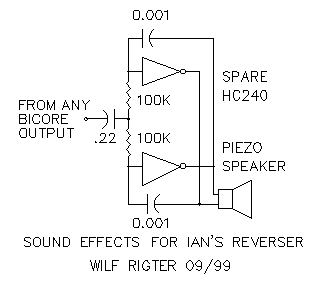
Here you go Richard
I designed this one specially for you. So no more excuses for not finishing
Hexapod!
The G input disables all outputs when the PNC is active high. The D
input
affects
only the M1 outputs by reversing the connections between Nv1 and Nv3.
A 74AC245 can drive small motors (ie BG Micro Lens motor) directly
but a
74HC/HCT245 will require h-bridges where the M1/M2 motors are shown.
At +V=5V, the total supply current increases by 1mA.
enjoy
wilf
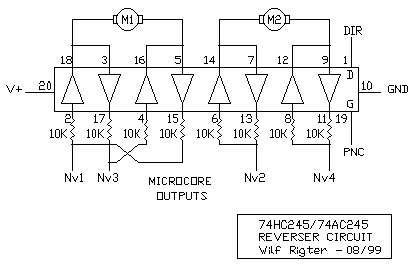
From: Wilf Rigter <rigter@c...>
Date: Thu Aug 12, 1999 3:11 am
Subject: [alt-beam] Re: "Linear Wheels" (was: LEM videos now
on-line)
Now that's a unique motion and just what I hoped for! I would love to
hook up a
complex sensor layer and see it riding that horse!
It seems to me that a conceptually simpler "linear wheel" would, as
shown on
attached example, consist of a 10 (or more, or less) segmented
circumference
wheel with a "free wheeling" spindle on each segment. The curvature
of each
spindle is equal to the arc segment between each of the spokes to form
a near perfect
circlular wheel. The Killough Lego version can be seen to consist of
6 wheels ,
each a flattened spherical spindle, with pairs of wheels driven in
tandem 90
degree out of phase. As a result of that "single spindle" arrangement,
the wheels have
to reverse rotation every half cycle which incurs some energy loss
which would not
be present in multple spindle segmented wheels. I was surprised how
smooth the
motion of the Killough platform looked on the video. I expected to
see some bumpiness
but the spherical wheel shape seems to take care of that.
regards
wilf
From: Wilf Rigter <Wilf.Rigter@p...>
Date: Sat Aug 7, 1999 7:30 am
Subject: [alt-beam] Re: Low power oscillator
Hi Ben,
I thought I would pass on this solution since it easily meets your
requirements and is very simple and compact. This micro power
(uP) timer
uses a TI CMOS rail to rail dual opamp (TLC27L2) which cost less
that $1
here in sunny Canada. Just add a 5.1M resistor, two 5M trimpots and
a
tantalum 2.2uf capacitor to complete the circuit. The frequency
and duty
cycle are stable from 5V to 15V and while current varies from 5uA to
10uA
over that voltage range with the 0.2 Hz/ 4% dutycycle waveform
which you
specified. The output can drive a LED or equal load but of course this
will
increase supply current. To set the output waveform, first adjust
dutycycle
since it interacts with frequency and then adjust frequency which is
independent of dutycycle. Once the values of the pots are set they
could be
measured and replaced with fixed resistors.
So let us know if the uP timer meets your needs or else it's back to
the
drawing board.
regards
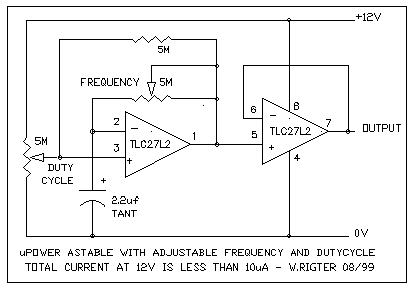
From: Wilf Rigter <Wilf.Rigter@p...>
Date: Fri Aug 6, 1999 7:29 pm
Subject: [alt-beam] Re: LDO regulator was h-bridge problems
Hello Scott,
Thanks for your question! After browsing through my email directory,
I
discovered that so far I have published a few articles that use the
LDO
voltage regulator as part of a more complex circuit ie embedded applications
of the LDO regulator. Since this is such a versatile, low cost
and
accessible design which can be used for a number of other applications,
attached is a general purpose LDO regulator circuit. The adjustable
LDO
regulator output voltage ranges from 2.4V to Vin-400mV and Vdropout
is
generally about 400mV. The Vreg will also vary about 200mV over the
full Vin
and Iout current range but quiescent supply current is (approximately)
only
200uA + Iout/50.
By comparison, a 7805/317 regulator has a Vdropout of about 3V and draws
about minimum 10mA quiescent current. Some single chip LDO regulators
I
have used are from National (100mA/LM2931 or 1A/LM2940) but a host
of other
more exotic LDO regulators are available from Maxim and others.
Unlike the 7805 or LM317 and similar (more or less indestructible)
regulators, you do have to think about the application of this LDO
regulator. For example, the maximum power dissipation for a 2N2222
is
should be limited to about 500mW without heat sink. For example, if
a 9V
battery is used for Vin with Vreg set to 5V, then the voltage drop
(Vdrop)
across the 2N2222 is 9V-5V=4V and the maximum allowable continuous
output
current (Iout) is 500mW/4V=125ma. The maximum available short circuit
current of the adjustable LDO regulator is about 250mA with Vdrop=Vin,
meaning that the circuit will self destruct in less than 10 seconds.
So a
little finger trouble shorting the output is OK but use precautions
when
connecting the LDO to a new circuit since there may be a permanent
short or
solderbridge which will result in melt down.
The LDO regulator in the D2 circuit is more forgiving since it has inherent
foldback current limiting which drops the Iout current to a few mA
under
full short circuit conditions. In the D2 application there
is also a
shutdown mode available which turns off the LDO and reduces quiescent
current to about 10 uA when Vin falls below a preset value and turns
the LDO
regulator back on when the Vin is above a preset value. With a low
current
source (ie solar cell) used for Vin (and with LDR removed), these same
D2
features cause the characteristic SE behaviour of charging a battery
or
supercap up to a voltage trigger level, turning on and latching the
SE
output, and discharge stored energy into a load down to a lower preset
voltage level where the SE turns off and the cycle repeats. With the
addition of a LDR the D2, like the D1 SE, holds off the discharge cycle
until after dark and then discharges only once for maybe an hour,
making
pretty lights for the garden etc, until recharging the next morning.
While embedded regulators have to be simple affairs, a full featured
(but
simple to build) adjustable LDO regulator used as a rugged rechargeable
portable bench supply with a meaningful bargraph LED display to indicate
voltage and error conditions could be specifically designed for BEAM
landers
(ie with features to fast charge smaller bot NiCad batteries) if there
is
any interest.
regards
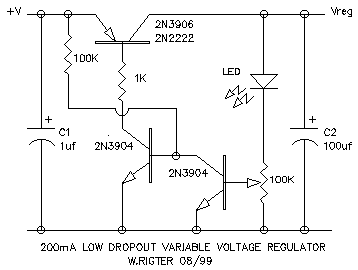
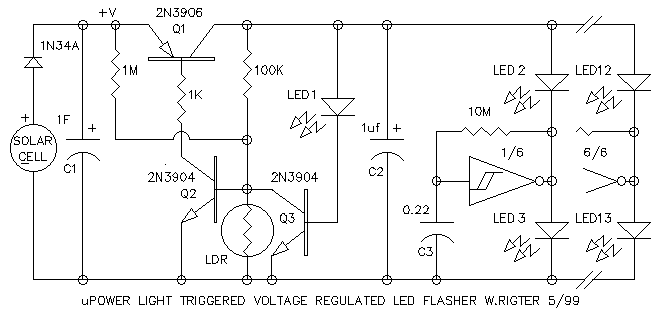
From:Wilf Rigter <rigter@c...>
Date: Thu Aug 5, 1999 10:34 pm
Subject: [alt-beam] touch sensor, Robot Jurasic Pond, etc
Summer time and the living is easy!
What's that? Help wanted to design a RJP type environment for aquabots?
Robot Jurasic Tank/Pond/Pool/Lake/Sea/Ocean?.
Well more on that later but first:
cbrenizer wrote:
>Anyone have any experience 'hacking' resistive sensors like this?
Great potential! "Nudge, nudge, wink, wink, say no more".
These particular transparent touch sensors are used as overlays for
monitor or
LCD screens but similar technology can be used for digitizing
pads ie mouse
pads. In general, these use two resistive sensor sheets superimposed
but
separated by a thin layer of air. Each sensor sheet has contact strips
along two
of the four edges ie. one sheet = top and botom edges / the other =
left and
right edges. Similar to a PC joystick, these sheets act as X and Y
axis
potentiometers when a voltage is applied across each sheet through
the
conductive strips, alternately first to one sheet then the other. When
pressing
down on the sensor, the location of the "point of contact" on each
sheet is
determined with a 2 channel A/D converter to sense the X and
Y potentials at
the point of contact. These two values provide the coordinates of the
point of
contact.
A PC joystick can be used in a Bicore or Monocore servo loop to
position a 2DOF
head (with an arm attached?), this touch tensor could provide a similar
function. A simpler touch "ribbon" around the circumference of a bot
can be used
to determine the "potential" (ie location) of a "point of contact"
and (with a
sample and hold device) could use this to directly influence Microcores
or
Bicores to generate a corrective action or motion.
Riding along a nice little Beam of "techciting" ideas if water
is thought of as
a resitive fluid ocupying a 3D volume, then similar to a touch sensor,
a voltage
alernately injected between a number of points (sides, corners
etc) in this
volume will set up potential gradients which can be detected. One could
use the
touch sensor principle to create a 3D joystick by using a "potential"
probe with
a conductive tip inserted into the tank. Of course the "tank" in this
case can
be quite a small volume (eg 1 cubic inch).
Speaking of a Robotic Jurasic submarine park, a submerged "Subbot"
could use
the same principle to determine it's position coordinates in
a much larger
volume of water. Instead of fancy A/D converters, Beam aquabots could
use
"potential" gradients in a servo loop sliding along potential gradient
lines
perhaps "feeding" on the larger gradients (or directly from the electrodes).
Similarly motion/behaviours in response to stimuli other than
light eg
Thermotropic or Iontropic behaviours (eg underwater thermal and ionic
gradients)
thereby creating an different kind of autonomous 3DOF aquabot. Well
just a start
but maybe the stuff contests are made of!
enjoy
wilf
From: Wilf Rigter <Wilf.Rigter@p...>
Date: Sat Jul 31, 1999 3:05 pm
Subject: [alt-beam] Re: A Must Read: Coupled Bicore, First Experiments
Results
First congratulations to Wouter, for writing this paper and giving us
the
opportunity to think about these ideas and to make comments. Naturally
my
comments are all meant to be constructive even if they are critical
of some
details.
The oscillator B1 in fig 1 is also the textbook CMOS oscillator. Adding
a
10M resistor in series with the input of U1 will greatly improve symmetry
and frequency stability (vs temp and Vcc) of the output waveform.
I had some trouble understanding the graphs which plot phase and phase
difference. It may be useful to show graphs with both oscillator square
waves, phase plots and the derived phase difference plots (at least
one
example).
The two overlapping traces require some explanation. For example, Graph
2
represents the smooth variation of phase difference with respect to
time for
two uncoupled oscillators with similar frequencies and I would expect
a
single plot not two as appear to be shown. As you have noted the vertical
axis values -1 and 0 and +1 are one and the same value and the interpolated
values are similarly related, so these 2 overlapping traces are in
fact the
same value. I would suggest eliminating the trace which starts
at 0 since
that one shows a visual discontinuity in the middle of the graph which
detracts from the information you are trying to present.
Coupled oscillators are closely related to Phase Lock Loops (PLL) and
this
analogy points out the possibility of using BEAM components
for embedded
communications. When the local oscillator is coupled to an external
(remote) square wave, the local oscillator frequency will converge
with the
remote oscillator and will be phase locked with a phase difference
equal to
the difference in "free running" frequencies. If the remote oscillator
frequency is frequency modulated with a "data" signal then, by measuring
the
phase difference, this "data" can be recovered. The remote oscillator
can be
physically some distance away and use sound or IR as the transmission
medium. Since the only components required for such PLL communication
system
are Beamcores, LEDs, and PDs, it should certainly be considered a Beam
design.
regards
Wilf Rigter
From: Wilf Rigter <Wilf.Rigter@p...>
Date: Mon Jul 26, 1999 10:00 pm
Subject: [alt-beam] Re: Solar cell v. doubler
And here is the last installment of the doubler circuits which uses
a
74HC4053 analog mux to generate a voltage at the Vee pin 6 equal but
opposite voltage to the Vcc at pin 16 Input voltage can range from
1.8V to
6.5V so V+ to V- ranges from 3.6V to 13V. Input and output capacitors
are
added to suit. Two drawings are included the top shows the internal
circuit
details and the bottom is the typical blackbox schematic. Note that
two of
the analog (form c) gates are connected as a classic CMOS oscillator
and the
third (form c) analog gate is used as a synchronous rectifier. Efficiency
is
good at modest currents ie <20ma and the circuit was primarily designed
as a
transparent model (teaching aid) for the charge pump circuit.
enjoy
Wilf Rigter mailto:wilf.rigter@p...
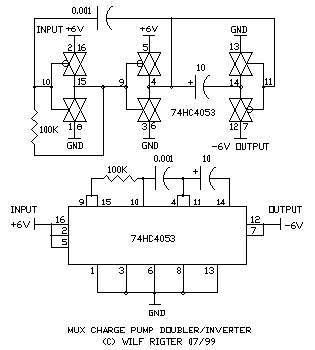
From: Wilf Rigter <rigter@c...>
Date: Sun Jul 25, 1999 1:47 am
Subject: [alt-beam] Re: Solar cell v. doubler
Hi Bob,
Thank you for the info on solar cell max power operating point.
Using a 74AC04 and 1N5817 Shottky diodes, the CMOSPUMP (attached)
converter losses are even lower and I get 77% efficiency with 3.1V/103ma
input and 5V/50ma output and a whopping 85% efficiency with 2.9V/50ma
input and 5.0V/25ma output. I don't know what the maximum power point
voltage for those Solarbotic's solar cells but if they use 6 sections
then 2.9V is in the neighbourhood.
When charging a SE super cap the output rises to over 6V if the SE if
not fired. If the typical end of charge SE firing voltage is 3.6V,
4.5V
or 5V (?) it occurs on a more linear part of the charging curve which
if
the solar cell efficiency operating point is optimized is faster
for
sure (grin) and more efficient that just using the solarcell
by itself.
( no free lunch eh? ) With a benchtop supply set to 3.6V
and a 100 ohm
series resistor, a 0.047F cap charges through the converter to 3.1V
in
about 10 seconds which is the same as without the converter but look
what happens with the converter in the circuit at higher 0.047F output
voltages :
3.6V - 12 sec
4.1V - 14 sec
4.5V - 16 sec
4.8V - 18 sec
5.0V - 20 sec
Which can translate into a significant improvement in the power
efficiency for a number of reasons ie if a higher voltage lower current
motor is used! And it is compatable with the chloroplast SE.
You can scale these results for lower input voltages, typical of low
light levels, and get similar improvements.
I don't have a solar cell and need someone else to test some real
performance figures. One can quickly try out the circuit by using a
typical Beam chip (74HC240) and some 1N4148 Si diodes but best
perfomance and highest output require the specified components. I am
working on a synchronous rectifier and the Bicore INVERTER (attached)
is an early example that works "ok" but needs improvement for low
voltage/startup performance. If all goes well, the final version of
the
converter will have synchronous rectifiers and use feedback to regulate
the input voltage to the maximum power point of the solar cell (weird!)
and be embedded in a SE.
enjoy
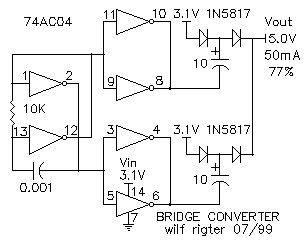
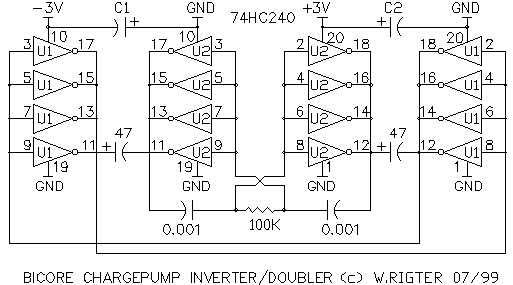
From: Wilf Rigter <Wilf.Rigter@p...>
Date: Fri Jul 23, 1999 3:43 am
Subject: [alt-beam] Re: Solar cell v. doubler
Well, surprise!
Efficiency is not too shabby especially for the Bicore Charge Pump.
About
70% with 3.4V in and 5.5V out @ 50 ma. I tested this with a 74AC04
and
1N4148 diodes so a 74HC/AC240 with Shottky diodes should give even
better
performance. An interesting feature of the fullwave charge pump is
that it
requires no output filter since it generates pure DC out. At 2.6V input,
the
tested 74AC04 Bicore Charge Pump easily drives a BG micro gear motor
at over
4V out. How the efficiency of a system as a whole is affected is quite
complicated. For example, I remember an article which demonstrated
the
overall efficiency of a solar cell battery charging system was increased
by
adding a dc to dc converter despite the converter losses, by loading
the
solar cell to operate at it's maximum power output point and optimizing
the
output voltage and current to match battery charging characteristics.
enjoy
Wilf Rigter
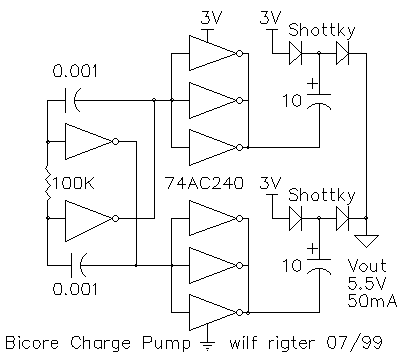
From: Wilf Rigter <rigter@c...>
Date: Wed Jul 21, 1999 4:40 am
Subject: [alt-beam] Re: Solar cell v. doubler
Maybe netscape is better for compatability. So here is the somewhat
optimized
and tested micro-chargepump circuit (ucpump.gif) . Depending on the
solarcell, I estimate it will charge a 0.047F cap to 5V in one or two
minutes. The coupling cap can be increased to 47 uf for slightly
improved
efficiency. Note the polarity of the coupling cap. The current into
the main
cap at 4.5V is about 10ma with 25 ma drawn from a 3V source so efficiency
is
not it's strong point but simplicity and cost certainly is. Milage
may vary.
regards
wilf
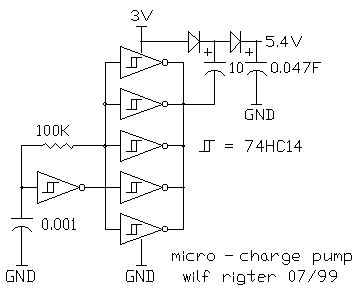
MPNC Nvcores - a logical solution for saturation problems
using the multiple pulse neutralizing circuit
wilf rigter - 07/99
In a conventional microcore design the dreaded twin process saturation
problem is addressed with a Nu based pulse neutralizing circuit (PNC)
which absorbs all circulating processes and when it times out initiates
a single process in the microcore. Since the PNC forces one Nv output
active low any motor connected to that Nv would be rotating possibly
mangling a pair of legs in the process. This is normally avoided by
disabling the output drivers during the time the PNC is active.
Despite the PNC's longevity in BEAM land, all things must change as
old
PNC based ucore designs are superseded by a new generation of Nv core
designs which include a "multiple process neutralizing circuit" (MPNC).
Unlike the PNC base ucore circuits, this new design instantly
initializes the Nvcore and does not require any motor driver inhibit.
After power up, the MPNC constantly monitors for and neutralizes
multiple processes in the core. Since the MPNC does not require an
Nu
inverter, a single 74HC14 can be used for a 6Nv core.
The MPNC design is added to a Nvcore with simple diode logic requiring
only 2 diodes for a 4Nv ucore and 4 diodes for a 6Nv hexcore.
THE 4NvMPNC
A 4Nv microcore uses 2 diodes to snuff out core saturation by
neutralizing multiple (twin) processes with the anodes of the diodes
connected to N1 and Nv2 outputs and the cathodes to Nv3 and Nv4 bias
points respectively. 4NvMPNC.GIF shows the schematic for a MPNC ucore
complete with a 74AC240 reverser circuit. The MPNC logic is simple:
with
two possible saturation states (NV1 AND Nv3 active or Nv2 AND Nv4
active), the 1Nv output is active low and this level connected
through
the diode to the Nv3 bias point forces the Nv3 output high, neutralizing
the saturation process. Similarly the Nv2 output neutralizes any
potential saturation process in Nv4.
THE 6NvMPNC
A 6Nv MPNC hexcore requires 4 diodes compared to the 2 diode MPNC ucore
to neutralize not only twin but also triplett multiple processes.
To
instantly start the 6Nv core with a simgle process in Nv1 the diodes
are
connected as follows: The anodes of 3 diodes are connected to Nv1 output
with cathodes connected to the bias points of Nv3, Nv4 and Nv5. The
fourth diode anode is connected to Nv2 output and cathode to Nv6 bias
point. The graphic 6NvMPNC.GIF is attached showing the schematic of
a
6Nv hexcore with MPNC.
THE 6NvMPIC
As an introduction to the more advanced concept of the Multiple Process
Injection Circuit (MPIC) for gait control, I have included 6NVMPIC,
a
draft schematic which shows how one can inject (and regenerate) an
arbitary number of processes in a 6 Nvcore. The MPIC includes the same
function as the MPNC since it must be able to inject as well as
neutralize in order to control processes. It is possible to add the
MPIC
to a conventional PNC design to initiate the gait at power up. The
MPIC
control lines can be connected to a number of sources including DIP
switch, "Collission Nu", "Turning Nu" etc but also (via a simple
infrared or radio link) to an IBM PC printer port or onboard STAMP
or
PIC I/O line. The example shows a single process default HexCore with
20
second duration Nu controlled process injection circuits.
From: Wilf Rigter <Wilf.Rigter@p...>
Date: Thu Jul 15, 1999 1:05 am
Subject: [alt-beam] Re: automatic pnc
Hello David,
I feel a little guilty knowing that Bruce has invested significant effort
in
his cold start circuit design but it all part of the learning game
so here
is a some friendly competition:
Although not tested, I think what we have here is an instant auto Pulse
Neutralizing Circuit (PNC) which will force a single process at power
up and
any other time at the cost of two 1N4148 diodes. It makes the assumption
that in a 4 Nv ucore you can have zero, one or two processes
active at one
time. Since the PNC guards against the 2 process condition and since
these
only occur as process pairs in 1 and 3 or 2 and 4, then adding the
diodes
will neutralize the twin processes in 2 or 4 whenever a process is
active in
1 or 3.
If you wish to guard against the more unusual zero process condition,
you
can combine a Pulse Injection Circuit (PIC ( yikes! no flame wars
please!))
and the function of 4 red LEDs for indication. This is done with
the
addition of a capacitor and 1K resistor to inject a process into the
ucore
should all processes for some reason die out (unusual). The PIC is
actually
a 4 input AND gate made from the 4 LEDs together with the 1K pull up
resistor. When all processes die off all four Nv output will go high
and the
output of the LED AND gate will also go high pulling the 1M resistors
of the
Nv input high. depending on the value of each Nv time constant one
Nv input
will cross the positive trigger level and the corresponding output
will go
low effectively inject a process into the core. Simultaneously the
AND gate
output drops since there are no longer four high input and the process
starts to circulate around the core with each LED lighting to indicate
the
Nv which is currently active.
The additional 0.1 capacitor is there to deglitch the circuit
Nv but is
probably not be necessary. Using a single 1K resistor instead of the
normal
4 resistors for LED indication effectively cancels out the 2 additional
diodes and the capacitor and so it's fair to say that the PNC and PIC
functions comes for free. In addition, the time constants of the Nvs
are
increased by a factor of 2 or more, since the 1M Nv resistors are referenced
to the forward voltage drops of the LEDs (should be about +1.2V) making
it
practical to use smaller resistors or capacitors. The obvious applications
of voltage controlled Nv time constants was covered earlier in my ETC
and
Servocore articles. The only restrictions for PNC/PIC is a minimum
5V
powersupply, a 74HC14 (not 74HCT14) chip and relatively low forward
voltage
drop red LEDs. Be sure to terminate the unused inputs of the
spare
inverters to 0V if not used for some other functions (like a 6Nv core).
This circuit comes quite close to my BEAM design target of "a linear
INCREASE in functionality with a linear REDUCTION in complexity"
ie the
more I throw out, the more it does, which of course I hope is scalable
to
"zero complexity=infinite functionality" (reductio ad absurdum =) .
enjoy
From: Wilf Rigter <Wilf.Rigter@p...>
Date: Mon Jul 12, 1999 3:10 am
Subject: [alt-beam] Nu(tating) Motor
I mentioned Nutating gears earlier so here something to wrap you head
around. Warning you will have to abandon some ideas about motors before
you
can grasp this concept. And yes I had one in my hand and saw it work
as
described - very weird! . The beauty of this thing is that it would
run just
fine connected to a hex Nv core.
.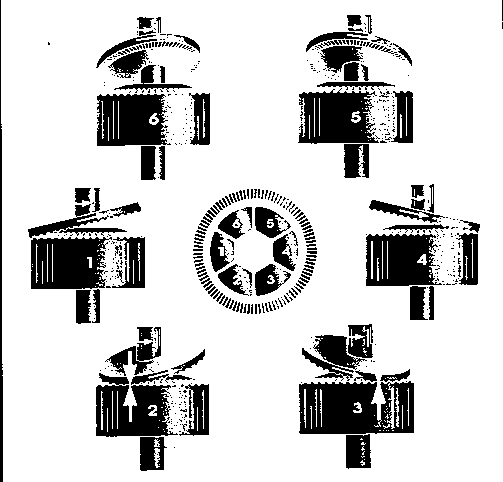
This is from a sales brochure:
The Nutating Motor is a unique development utilizing the rotation
of
magnetic force, speed and a nutating gear to obtain low speed/high
torque
output for positioning applications. Electromagnets (in torroid) are
energized in sequence 1,2,3,4,5,6 resulting in magnetic forces (indicated
by
large arrows) on the rotor plate. As magnetic force moves from 1 to
2, the
rotor plate 'rolls' on nutates on the cone-shaped torroid surface holding
mating teeth of rotor and stator in mesh. At any given time approximately
8
teeth are in contact allowing extremely high total torque forces but
low
pressure per individual tooth. When the magnetic force has moved through
360', the rotor will have advanced one tooth since it has one more
tooth
than the torroid gear. For example, if the torroid gear has 147 teeth
and
the rotor gear has one more, the motor provides 147:1 ratio. With a
60 Hz
line input, the magnetic force would rotate at 3600 rpm and the
rotor
would rotate at 24.4 rpm (3600 -, 147) . The kinetic energy losses
are far
less than in a conventional motor because only a magnetic field is
rotating
at high speed, not a high inertia rotor.
Compact and Light: No bulky motor or gearbox
Maintenance Free: No lubrication. No reduction gears to maintain.
Only
three moving parts in a nutating motor. Capable of running under
water.
Instant, 100% Energizing & De-Energizing: 'Magnetic
field energizes
nutating motor instantly at 100% power. No stored inertia.
No delayed
energy build up at the start and, no backlash at the stop.
From: Wilf Rigter <Wilf.Rigter@p...>
Date: Sat Jul 10, 1999 8:02 pm
Subject: [alt-beam] Re: Something funny with the 1382 voltage
triggers?
Since this specifically mentions my name, will thrust myself back into
the
fray. Steven, I submit that "tinkering" is the natural process
of evolution
through selective incorporation of random mutations. That selection
process
through reproductive success occurs in NATURE as well as BEAM land.
With
nature's great experiment in consciousness and the ability for
abstract
thought, symbols and language there are many other selection
processes
available for evolution. But on a fundamental level they are still
very
much "what if" tinkering. When speaking of circuits, some
very simple
building blocks like the standard CMOS oscillator example in CMOS data
books
have been cloned a billion times with minor mutations to adapt
it to
specific applications. How's that for reproductive success! So when
one such
mutation comes along which uses the same number of parts but adapts
this
popular design to a new environment perhaps one could hope for a similar
success rate ( barring the technological equivalent of a mass extinction
event).
There is authentic sense of beauty in simplicity and elegance and this
circuit has plenty of that (oxymoron?) I find it remarkable that
after the
scrutiny of millions of designers, there are still new useful combinations
of these 4 or 5 components. This inherent flexibility in simplicity
is an
unconventional and counter-intuitive conclusion. Conventional wisdom
would
have it that complex designs are required to provide solutions to complex
problems. My lifelong experience has shown me that only the simplest
solution withstands the test of Occam's Razor. Furthermore, that if
the
simplest solution is a relatively complex system then if the components
and
subsystems of such complex system are simple, in my experience, in
such a
system there is always an exponential increase in functionality for
a linear
increase in complexity because the number of combination and permutations
of
subsystem connections increases exponentially. The root of this
functionality remains the optimized subsystems approach and certainly
not
complexity of the system for the sake of complexity.
Wilf Rigter mailto:wilf.rigter@p...
tel: (604)590-7493
fax: (604)590-3411
> -----Original Message-----
> From: Steven Bolt [SMTP:sbolt@x...]
> Sent: Saturday, July 10, 1999 2:03 AM
> To: beam@s...
> Subject: Re: Something funny with the 1382 voltage triggers?
>
> On Fri, 9 Jul 1999, Terry Newton wrote:
>
> > Could be SM 1381's don't like having their low output being
> > pulled high by something else, that's not exactly something
> > you want to do with output stages. If you try that with any
> > kind of power you'll likely get smoke or other flakiness.
>
> The typical 2-transistor latch/driver wastes about 4mA max. when
> pulling an active low 1381 output to the about 0.7 allowed by the
> base-emitter diode of the driver transistor. Imho not enough to do
> damage, and not very significant in terms of efficiency, for this
> circuit...
>
> > If that's the problem then maybe just a single resistor,
> ---8<---
> > A 1N914 in series with the 1381 output (anode to 1381, cathode
> ---8<---
>
> With all those resistors and diodes being added by Wilf, Bob and
> you, the component count is about what you need for a proper latch
> and driver :)
>
> Best,
>
> Steve
>
From: Wilf Rigter <rigter@c...>
Date: Mon Jul 12, 1999 1:26 am
Subject: [alt-beam] Re: Chloroplast Solar Engine
Nice going Craig!,
Occam's Razor in action slashing away the unnecessary bits of my earlier
and now obsolete "hysteresis SE" (a well deserved retirement).
Also note the even simpler and quite effective "flash SE" which combines
the desirable elements of voltage trigger and monostable reset. It
is
quite robust working with different motors and draws about as much
current as an FLED or similar. The 100K pot is adjusted for the trigger
voltage (1.8V-24.0V!) and can be replaced with 2 fixed resistors, the
100uf cap can be adjusted to change the monostable time to reset the
latch. If there is interest I could add the details and layout info.
enjoy
wilf
From: Wilf Rigter <Wilf.Rigter@p...>
Date: Thu Jul 8, 1999 3:59 am
Subject: [alt-beam] Re: Something funny with the 1382 voltage
triggers?
Argghhh!
Methinks there is more "trial and error" (tinkering if you like) between
the
solar cell and the wheels of a beam bot than between the ears of some
of our
esteemed contributors and I they must be pleased to hear that (grin
no LOL).
I've been working all day doing megawatt tests and it's nice to relax,
do
some BEAM work, neutralize some negative energy and balance my karma.
So
join me for a little dip in the stream of consciousness: Perhaps a
new gear
mechanism (the Nutating gear: coincidence ? anyone try this Beamish
gear ?
Yup, it's real, look it up) . Spring loaded leg suspension to deliver
more
useful energy (Shannon struts?) A propulsion system for very
small air
floaters, at that size, air is like syrup (what was that jellyfish
with the
major henry bladder thingy again?) My first walker ( i'll never look
at
insects the same way!) My first head. (watching it still blows me away:
what
about a 3DOF head with claws: turn, track, telescope out, close
claw when
object between fingers, contract, release in basket. Oops! is
that a foil
ball or what?) A new circuit (Schmitt, Hartley, Collpits, Wien, Eccles,
Jordan, etc, etc,etc : now those were the days) Embarassed by
such
distinguished company, but I just had to try out this cute little idea
ergo
the rigter oscillator. Is it possible that newbie "trial and error",
"thinkering", "i wonder what would happen if" could have produced this
dead
simple but (afaik) unique oscillator circuit. You bet your life,
anyone
could have discovered it (and probably has but without realizing it
) :
evolution IS trial and error! Now with a non-inverting oscillator,
I can do
the multi monocore NuWorm thingy without any inverters (grin). ok there
you
go: a five worm segment driver. Details to follow! Anyone else
care to
share a little consciousness?
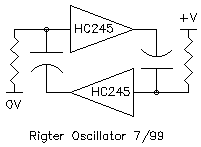
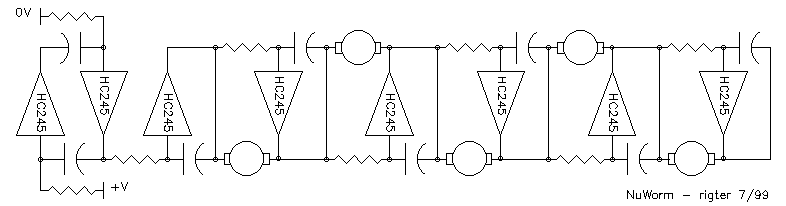
Enjoy
Wilf
From: Wilf Rigter <Wilf.Rigter@p...>
Date: Tue Jul 6, 1999 6:00 am
Subject: [alt-beam] Re: Something funny with the 1382 voltage
triggers?
HellO Bob,
I doubt that SMD parts are the problem except that the longer lead length
of
TO92 packages in freeforming may make the circuit more sensitive to
EMI or a
small amount of feedback which causes some small oscillations when
the latch
is on the edge of the linear operating region and which can help initiate
the latch turn off. I suggested the increased resistor value to reduce
the
"gain" of the latch decreasing saturation and increasing the sensitivity
to
feedback. The side effect of this lower gain is potentially more (not
less)
oscillation during turn on with some motor loads because the
2N3904 (NPN)
may not fully saturate. With an efficient (higher resistance) motor,
a 4.7K
base resistor for the 2N3906 (PNP) is enough to saturate the NPN during
turn
on but ought to cause the NPN to come out of saturation earlier to
turn the
latch off at the end of discharge. A 5K pot for the PNP base
resistor
allows fine tuning. However all that PNP base resistor fine tuning
may not
be the best solution since it optimizes the circuit for a narrow operating
condition and does not solve the more fundamental problem of the 0.7V
drop
out voltage.
As Steven Bolt points out, the voltage on the cap has to drop below
0.7V for
the 2 transistor SE to reset. Ouch! That wastes a lot of energy since
the
motor probably stalls before that point and the dumps the rest of the
capacitor charge without doing any work. Looking at the capacitor voltage
in
a bit more detail, it's not the voltage on the capacitor but
the voltage
across the PNP base resistor that determines when the latch resets.
When the
voltage on the capacitor drops to " 0.7V", we are really looking at
the
effect of that voltage on the PNP and NPN base currents. At that capacitor
voltage, the voltage across the PNP base resistor drops to some value
around
100mV and depending on the gain of the transistors and motor resistance,
the
base currents are no longer sufficient, the NPN comes out of saturation
and
a little feedback causes the latch to reset.
While the 1381 SE will trigger reliably at 2.7V, the turnoff voltage
is
dependent the characteristics of the solar cell, light level, the motor
and
the motor load. As shown in the attached, adding a LED and 1K
resistor
across the motor gives a visual indication when the 1381 fires and
since the
LED is also in series with the (now) 1K PNP base resistor, the
voltage drop
across the LED will raise the minimum capacitor voltage required to
keep the
latch on to about 1.7V Since the cap no longer discharges to
a low voltage,
the motor continues to do useful work until the latch turns off and
the cap
recharges more quickly. While this may not be a BEST solution, it's
simple
and worth a try.
regards
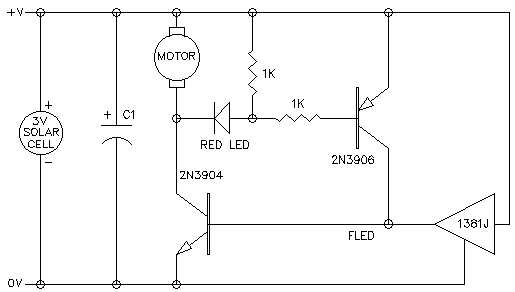
From: Wilf Rigter <rigter@c...>
Date: Mon Jul 5, 1999 3:40 am
Subject: [alt-beam] Re: UPDATED Power Smart Head page
Hi Chiu,
you wrote:
> BTW. Don't know if you realize but the caps shown in the pictures
are .001uF
> whereas the schematic calls for .01uF. Just something to make
note of.
In this circuit, as long as the caps are the same value, the
absolute
value does not matter much since it only affects the dead band and/or
overshoot between forward and reverse. Since this is a function of
the
total RC of the circuit, it is also dependent on the effective R of
the
PDs or LDRs. Smaller cap values are usually good for smooth operation
but try experiments with larger values which give a kind of lifelike
"double take" effect and in dark conditions may change the low power
"slow scanning" speed.
>A great description of the HLO circuit (pronounced "hello") can be
found at:
>http://www.geocities.com/SouthBeach/6897/rigter/wr_3.html#mar1
Like most BEAM circuits adding just a few component changes can
radically change the circuit behaviour. The HLO (the High Low
Oscillator) circuit, like the slave Bicore, depends entirely on the
external input voltage to oscillate. The PowerSmart input circuit,
like
the embedded Bicore, is an inherent oscillator which can be gated High
or Low but unlike the HLO oscillates if the external input voltage
source is removed. In addition the "Nv/Nu" output driver circuit
produces a full differential voltage across the motor when the input
stage is not oscillating and a PWM voltage across the motor when the
input stage is oscillating with a larger time constant than the Nv/Nu
output stage (low light = low power scanning). When locked on to a
"brighter" light or reflecting object, the input stage oscillates with
a
time constant smaller than the Nv/Nu output stage and the differential
voltage across the motor drops to 0V. In the latter case, each motor
terminal has a square wave applied to it, but they while they are in
phase, no current flows through the motor.
The "Nv/Nu" circuit used in PowerSmart Head output is itself simply
fascinating! It consists of a single RC section but instead of the
conventional grounded R (Nv) or grounded C (Nu) this circuit has both
legs driven in anti phase (with an inverter) to combine both functions.
The two output buffers can be inverting or non inverting. The circuit
provides an output voltage duty cycle across the motor terminals which
is proportional to the ratio of the time constants of the driving
frequency (TC1) and the time constant (TC2) of the Nv/Nu circuit. At
logic 1 or 0 (TC1>>>>TC2) the output is simply forward or reverse.
At
low input frequency (TC1>>TC2), the motor reciprocates forward and
reverse but with a dead band in between changing directions. At medium
input frequencies (TC1>TC2) the average motor terminal voltage is pulse
width modulated with an average voltage proportional to the duty cycle
(reduced power) and at still higher frequencies (TC1<=TC2), the
output
duty cycle approaches zero and no motor current flows (minimum power).
I
have attached a schematic of this Nu/Nv circuit with (hand
drawn/approximate) waveforms. Although not apparent from the waveforms,
the horizontal time base is relative and waveforms are expanded relative
to each other to a fixed length for clarity.
Like Mark T's famous XOR motor driver, it needs a sound byte name to
describe its function so I have tentatively called this Nu/Nv circuit
the PID neuron. A good name has the potential to evoke creative new
ideas and applications for a circuit. Conversely typecasting
the
behaviour of a Nv or Nu neuron can seriously limit the ability to
understand the behaviour and discover new applications for these
simplest of circuits. So I think the PID tag will soon be dropped!
Any
suggestions for a good name for this neuron will be greatly appreciated.
enjoy
wilf
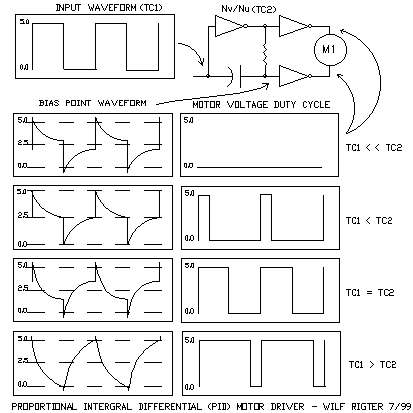 From: Wilf Rigter
<Wilf.Rigter@p...>
From: Wilf Rigter
<Wilf.Rigter@p...>
Date: Wed Jun 23, 1999 5:18 am
Subject: [alt-beam] Re: Ah! Blessed Skepticism! (was: Feedback
explained?)
I was impressed by many of the previous comments on this thread (not
including my own).
Most of Mark T. comments were on microcores and >4Nv cores and some
are very
puzzling indeed. Take the following statement:
What is surprising
though is that a 4 neuron microcore with a single process
in it can
still be influenced by it's prior passing over a neuron
3 neurons
ago. It can "see" itself and be repulsed.
Try it. Dead short a cap without a process on it, remove
quickly
and watch the process rate change in a microcore. Processes
live
in a tenuous voltage space very susceptible to any charge
influence.
Neuron outputs trigger on the log decay of the coupling
cap before
the inverter input, which is a very shallow voltage curve
and
subject to any charge influences prior to it. Exact equations
are
pending, but as many of you know, a 5% variation in coupling
capacitors can mean seconds in variation characteristics.
But you didn't hear it from me, cause you won't believe
it until
you can use it.
markt.
This statement about a "memory effect" of previous processes in Nv
cores
must have been based on some theoretical work since these effects are
probably caused by an average dc component of the process waveform
shifting
the trigger level which shows up as a term in equations that do not
include
the "dc restoration" effect of the commonly used HC logic family input
protection diodes. However if this "memory effect" is desired or considered
useful then the simple addition of resistors in series with the Nv
bias
point can re-introduce this "DC component term".
<<Nvmemory.gif>>
Now I agree that garbage in equals garbage out no matter how much positive
or negative feedback you put in the loop and all the mumbo jumbo aside,
I
did this bench test:
To a standard suspended Bicore add a BG micro motor directly to the
Bicore
outputs. Observe the rotation and Bicore pulsewidth is about 90 degree
each
way and 1 second pulsewidth duration. Now load the output shaft with
some
finger pressure (not a complete stall) and note the rotation is about
30
degree each way and the pulse width is 0.5 seconds. So there
it is
mechanical AND electronic feedback. Obviously the rotation is reduced
by
mechanical loading BUT the pulsewidth is also reduced. This appears
to be
caused by a combination of motor noise coupled through the Bicore
timing
caps pre-emptively triggering the Bicore and/or the effect of reduced
Bicore
output voltage swing coupled through the timing capacitors affecting
the
Bicore time constant.
It seems to me that in a walker this MAY be a useful feedback by reducing
wasted power in case of a stuck leg and it MAY be safer to change walking
gait to a shorter shuffle on slope to avoid tipping over or on a high
resistance surface it MAY produce a more efficient gait.
If the Bicore output is buffered before connecting to the motor, the
output
pulse duration is actually slightly longer when the motor is loaded
even if
a small resistor is introduced in series with the powersupply to reduce
supply voltage under load (so much for powersupply feedback).
Next I will add some gain to this motor current feedback signal to
see if
these effects can be more precisely controlled.
enjoy (although that's starting to sound like the Prisoner's "be seeing
you")
Wilf Rigter
 From: Bruce Robinson
<Bruce_Robinson@b...>
From: Bruce Robinson
<Bruce_Robinson@b...>
Date: Tue Jun 22, 1999 6:46 am
Subject: [alt-beam] Heads: reinventing the wheel.
While sitting around waiting for walker parts to arrive, I decided to
play around with head circuits for the first time. I came up with what
seemed like a good idea: use some kind of pulse generator to drive
two
Nv's in parallel. Use some kind of photodevice (photo-resistors in
my
case) to change the delay. The outputs of the Nv's go to opposite inputs
of the head motor (or driver).
Theory of operation: when both photocells receive the same amount of
light, the motor receives inputs on both sides, and so doesn't move.
If
one photocell receives more light, its resistance is lower, so the
Nv
it's attached to will time out first; since the othe Nv is still active,
this will turn the motor slightly. Made sense to me, so I tried it
--
dismal failure. It worked reasonably well in dim light, but not in
bright light.
Now I save all the messages on BEAM circuits, even if I don't understand
them, so I went to my circuit folder to look up the recent discussion
on
heads (which I didn't follow, but saved). And guess what I found? A
suggestion from Ben Hitchcock for pretty much the same circuit -- he
used photodiodes and an Nv oscillator, I used photocells and an
unbalanced bicore to create pulses. The principle was the same. I also
found a comment on this circuit from Wilf:
> ... The problem with this circuit is that the output pulse width becomes
> progressively narrower as the light level increases reducing output
> dutycycle to approach zero.
Yeah, well I'd just figured that out the hard way. But I'm a stubborn
cuss and it seemed to me there ought to be some way to make this work.
Besides, I didn't have the parts used in the other head circuits. I
thought about using the light-sensitive optics from modern welding
helmets to make a lens that would darken in bright light (too
expensive!), and I thought about some kind of primitive iris driven
by a
tiny motor (too complicated).
And then I went back to basics. This circuit is like a race: two runners
going like mad to reach the finish line. But we're not interested in
the
winner's time; all we're interested in is the time between when the
winner finishes and the loser crosses the finish line. We could care
less about the time while they're both running. So what we really want
to do here is once the winner crosses the finish line, get the loser
to
slow down to a walk -- after all, he/she can't win, so why hurry.
In other words, what I wanted to do was have a "normal" delay through
a
typical (1 meg, say) resistor, but use the photocell in parallel to
shorten the delay. But when one Nv timed out, I wanted to cut the other
photocell out of the circuit. After several complicated and unworkable
designs, I realized the answer was staring me in the face. Remarkably
simple, too.
Use a large resistor to ground as on a typical Nv. Hook up a photocell
in parallel, but instead of grounding it, run it to the output of the
other Nv, with an isolating diode. When the two Nv's are triggered,
the
outputs both go low. This allows the photocells to charge the
capacitors quickly, until one of the Nv's times out, sending the output
high. That cuts the photocell to the still-active Nv out of the circuit
(thanks to the diode), allowing the active Nv to slow down and finish
at
a leisurely pace.
And having learned the hard way, I tested this circuit before
broadcasting it, and it works very well indeed. You DO need to have
well
matched photocells, however.
So, with all due credit to Ben, who thought of it first (even if I
didn't copy him) ...
Enjoy,
Bruce
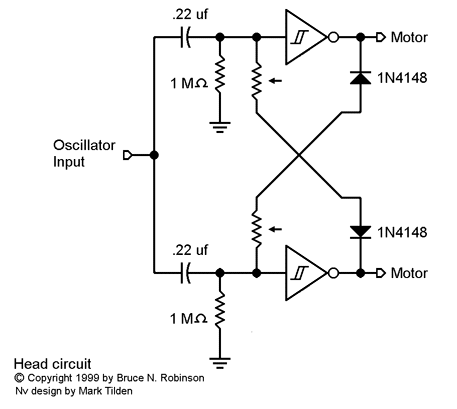 From: Wilf Rigter
<Wilf.Rigter@p...>
From: Wilf Rigter
<Wilf.Rigter@p...>
Date: Fri Jun 18, 1999 8:25 am
Subject: [alt-beam] LATCHINGPOWERBIMOSBICOREBRIDGESJUSTCAN'TSTOPPPPPPP.....
Hello Beamers,
Here's my little foray into bridge circuits : the first one is smokeless
and
suitable for micorcores, the middle bridge demonstrates the latching
action
which the runs a motor back and forth with rotation reversed by the
momentary closure of limit switches (a NoCore walker?) and the last
one
actually acts like a Power Bicore. All are good for about 200 ma but
the
power bicore may oscillate with some motors (BG micro and Mac ejectors
motors work fine).
All great fun and maybe a peek into Pandora's box in case you thought
a
bridge was a bridge and nothing but a bridge.
enjoy
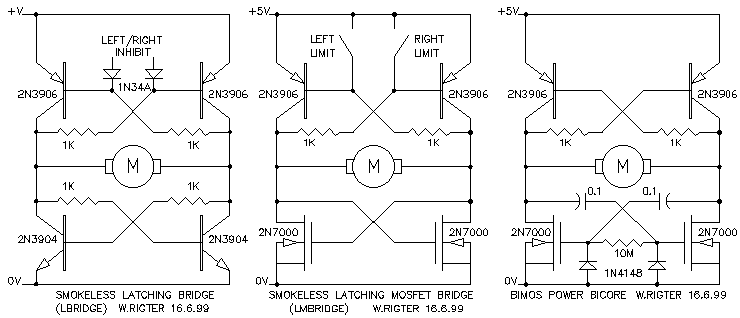 From: Wilf Rigter
<Wilf.Rigter@p...>
From: Wilf Rigter
<Wilf.Rigter@p...>
Date: Thu Jun 10, 1999 7:53 pm
Subject: [alt-beam] Re: thoughts from a day at the zoo
Hie sparkly,
The attached drawing shows the legs in the two positions at the end
of
rotation in each direction as viewed from above. This should work but
perhaps more experienced builders can comment. Turning is accomplished
by
changing the average stride vector away from the centerline of the
body.
This could be done by changing feedback from end of stride detectors
or
differentially change the tension of the leg centering springs. The
three
turning examples show front motor, rear motor and two motor turning.
The
legs are shown in their normal stride length but this can be affected
if
springs are attached to the legs. Remember that the legs lift and the
body
tips for normal walking gait and the front motor would lift one leg
higher
than the other so I am not sure how turning affects the gait. Perhaps
the
rear motor turning is the most efficient since there is little lift
on the
rear legs. The other thought that came to mind is using nitinol wire
for a
waist motor to change the vector between the front and rear legs..
regards
Wilf RigterFrom:
Wilf Rigter <Wilf.Rigter@p...>
Date: Tue Jun 8, 1999 2:22 am
Subject: [alt-beam] Re: Solar Walker
Hello James,
As a follow up on my earlier comments, here is the LIGHT WALKER 1.0
design
as shown in the attached schematic. In this design the SE function
has been
put inside the microcore loop. From another perspective this is a pentacore
design. The 1381 acts like a combination Nu, PNC and SE trigger.
Note that
the 74HC14 and AC240 are powered up all the time. Normally the 4Nv
outputs
will all be high, the motors will be stopped and no current will flow.
The
solar panel will charge up the main cap and also the memory cap of
the 1381.
The memory cap ensures that the 1381 input voltage will not drop during
the
first process interval when the motor current starts to pull down the
main
capacitor voltage. When the 1381 fires it "injects" a process into
the first
Nv with a rising edge. This process ripples through the other Nvs and
when
the process reaches the last Nv it resets the memory cap of the
1381. This
sequence is a 4Nv process cycle which causes the bot to advance by
one step
on each leg. Next the solar panel charges the main capacitor and the
1381
memory cap back up and when fully charged the 1381 triggers the next
process
cycle. If there is enough charge on the main cap the SE fires almost
immediately and the walker continues uninterrupted. This embedded SE
design
can be extended to 6Nv or 8Nv designs as well.
The reverser circuit is quite a nice solution to the problem of early
reverser time out when the LIGHT WALKER only walks intermittently.
To avoid
this problem, the reverser memory capacitor is discharged in steps,
one
process cycle at time, with about 7 or 8 cycles required to return
to
forward motion regardless of the time between steps. In addition
the
reverser circuit switching is synchronized with the start of each cycle
to
avoid the typical gait recovery time associated with asynchronous reverser
circuit switching. This synchronous reverser idea can be applied to
many
walker designs and imho is a nice contribution to the state of
the art of
BEAM tech.
The LIGHT WALKER still needs tactile inputs. Perhaps it can be left
as an
exercise for the reader to complete the full LIGHT WALKER design.
enjoy
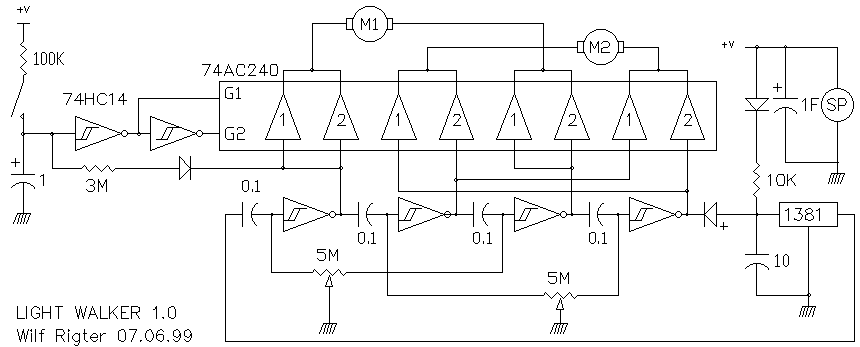 From:
Wilf Rigter <Wilf.Rigter@p...>
From:
Wilf Rigter <Wilf.Rigter@p...>
Date: Wed Jun 9, 1999 2:00 am
Subject: [alt-beam] D1 is dead, long live the D2
Hello fellow Beamers,
Only kidding about the D1 guys, but as Bob Shannon pointed out : what's
so
good about that design anyway?
So as a start to retiring the venerable D1 Solar Engine, here
is D2, a
replacement for both the D1 SE and the LED Bicore combined with a very
nice
added feature: Load voltage regulation for 12 constant brightness LEDs
during the discharge. Note that the 14 pin 74HC14 drives 12 LEDs
instead of
the 20 pin 74HC240 LED Bicore which only drives 8 LEDs. I'll do a little
write up of the D2 theory and will post it soon.
enjoy
From: Wilf Rigter <rigter@c...>
Date: Sun Jun 6, 1999 12:25 am
Subject: [alt-beam] BEAMant - description of circuit operation
BEAMant - Description of circuit operation
wilf rigter 05/06/99 BEAMant (c) M.Tilden
Overview of circuit operation and probable behaviours
-----------------------------------------------------
The core of the BEAMant consists of 2 coupled master Bicore oscillators.
The photo Bicore will oscillate over a wide range of frequency and
duty
cycle and the motor Bicore has a relatively fixed frequency with a
duty
cycle influenced to a lesser or greater extent by the state of the
photo
Bicore. Under some conditions the photo Bicore will have NO influence
on
the motor Bicore. which is the reason for describing the BEAMant core
as
coupled master Bicores rather then master slave Bicores. (I am not
sure
if the term "embedded Bicores" applies here).
The output of the photo Bicore is acting on the bias points of the motor
Bicore and changes the duty cycle of the motor Bicore oscillator but
not
it's frequency. This coupled Bicore circuit (Unicore?) overcomes a
serious limitation of the conventional photo Bicore in which both duty
cycle and frequency are affected by light. There are three categories
of circuit behaviour which depend on the light level, and component
selection.
1. In the dark the photo Bicore oscillates many times slower than the
motor Bicore.
2. In medium light the two bicores oscillate with a small ratio between
the two frequencies (ie 2:1 to 1:2)
3. In bright light the photo Bicore frequency is much higher than the
motor Bicore frequency.
In the dark, with the photo Bicore at the lowest frequency, the ant
will
turn in clockwise and counter clockwise circles as the motor duty cycle
is alternately changes. then as the light brightens it will alternately
steer left and right.
As the light increases to medium some complex and even chaotic behaviour
can occur as the coupled oscillators do a little dance at low
harmonic
ratios. This includes jittery phase locking behaviour with a chaotic
quality . So in the medium light the ant may behave in complex,
strange
and unpredictable ways.
In brighter light the photo Bicore frequency rises and with higher
frequency ratios, we see the ant moving in a straight line with moderate
photo tropic behaviour. The high frequency photo Bicore output will
be
integrated (smoothed) by the motor Bicore inputs and the duty
cycle
information of photo Bicore will be extracted in the form of
differential dc voltages which influence the bias points of the motor
Bicore. This in turn changes the duty cycle but not the frequency of
the
motor Bicore.
In order to add a threshold to the point where the BEAMant changes from
travelling in a straight line to turning behaviour, one shots or
monostables were added to the motor Bicore outputs. This is sometimes
called a "dead band" in which motor Bicore duty cycles close to 50%
(ie
45%-55%) are ignored. The oneshots are really Nv stages with an "ON"
time which is shorter than the shortest motor Bicore on time which
you
want to ignore. In that case the motor will rotate at equal speed if
the
motor Bicore duty cycle is near 50% This occurs because the motor
bicore outputs duration's will be slightly longer than the Nv outputs
and small difference will not affect the motor duty cycle. When the
motor Bicore duty cycle is changed to the point where one motor Bicore
output has a shorter duration than the Nv TC then this shorter pulse
will be transmitted unaltered to the output of the corresponding Nv
while the bicore output with the longer duration continues to be
limited by the Nv time constant. The result is that the on time of
one
motor output is shorter and the BEAMant will turn into that direction.
This turning is caused by several sources including low light
"searching" where the slow cycle of the photocore is directly expressed
as alternating left/right turns and at very low light clockwise and
counter clockwise turning. At Medium light levels the turning is more
photo tropic but may exhibit unusual waggles and detours ( phase
slipping oscillators), In bright light the behaviour should be quite
predictably photo tropic. The speed of the BEAMant should be constant
except during turns. The so-called XOR Nu circuits will change this
behaviour to turning or reversing or photo phobic in case of a side
or
head on collision and depending on the duty cycle of the photo Bicore.
Bicore details of operation
---------------------------
The photo bicore (Pcore) is a dual photo to pulse width generator and
the motor bicore (Mcore) is a differential voltage controlled duty
cycle
generator. More precisely the Pcore outputs are complementary
signals
whose frequency depends on R/C and the sum of the photo currents AND
whose duty cycle depends on the difference in photo current.
The
complementary Pcore outputs are connected to the Mcore with two
equal
resistors resulting in coupling currents which are dependent on the
voltage difference of Pcore outputs and the Mcore biaspoint inputs.
The
Mcore outputs are complementary signals whose frequency depends on
R/C
and on the sum of the Pcore coupling current AND whose duty cycle
depends on the difference of Pcore coupling currents.
The resulting influence of the Pcore on the Mcore output duty cycle
is
delightfully complex depending on the frequency ratio of the two coupled
oscillators and the duty cycle of the Pcore.
For the purpose of the BEAMant, frequency ratios are dependent on light
conditions as follows:
1.In low light, the Pcore frequency is much lower than the Mcore
and
the ratio is high.
2.In medium light, the frequencies are similar and the frequency ratio
is low
3.In bright light, the Pcore frequency is much higher than the Mcore
and
the ratio is high.
The range of Mcore duty cycle depends on the ratio of the Pcore coupling
resistors and the Mcore timing resistor.
This gives rise to 3 distinctively different modes of operation:
1. In low light the Mcore duty cycle depends on the DC state of the
Pcore outputs. ie once every few seconds the Pcore changes state and
the
duty cycle of the Mcore changes state correspondingly e.g. 25% to 75%.to
25% to 75% etc
2. In medium light the Mcore duty cycle strongly depends on the phase
difference of the Pcore and Mcore signals. At very low frequency
ratios, the Mcore duty cycle will be modulated by the difference
frequency gradually shifting between 25% and 75 % and back to 25% etc.
If the 2 frequencies are nearly equal the Mcore may phase lock to the
Pcore with the Mcore duty cycle dependent on the leading or lagging
phase difference.
3. In bright light, when the Pcore frequency is high, the Mcore
duty
cycle will depend only on the Pcore duty cycle ie the difference in
photo currents.
Oneshot Nv Stage/PWM motor drivers - detail of operation
The Nv motor driver output stages are "oneshots" which is what Tilden
calls them on his neural network drawing. These are not conventional
oneshots however since their time constant is not independent of the
input signal. For the purpose of this discussion I will call these
"resettable oneshots" simply Nv. For a given rising edge on the
input,
the Nv output goes low for a period determined by RC but this period
is
shortened if a falling edge occurs on the input before the Nv times
out
and the output is reset on that falling edge.
More than one behaviour is possible depending on various ratios of time
constants. The most obvious function of the Nv is as a duty cycle
threshold detector providing a "dead band" between driving in a straight
line and turning. Since the direction of a 2 motor platform is sensitive
to the motor bicore (Mcore) duty cycle, tuning would be required to
make
it go in a straight direction under "neutral" conditions.
In practice, bicores are asymmetrical and coupled oscillators are not
particularly stable. Therefore uncontrolled parameters (ie threshold,
temperature, frequency) can shift duty cycle which would detune a
"straight direction" adjustment. This can be corrected by adding a
duty
cycle dead band between the mcore and the motor large enough to ignore
small duty cycle variations.
This is done with a "resettable oneshot" Nv on the motor bicore
outputs with Nv R/C time constant (TC(Nv)) adjusted for a "full
pulse width" which is shorter than minimum Mcore output pulse width
that you want to ignore. Now any pulses from the Mcore that are
greater than the TC(Nv) will always be limited to the full pulse width
of the Nv but pulses that are shorter than TC(Nv) will reset the output
of the Nv on the falling edge and are therefore equal to the Mcore
pulse
width.
Other ratios between the time constants of the motor bicore and
the Nv oneshot exist which give rise to a different function
but I
believe that this description was the reason for including a Nv in
the motor Bicore outputs.
XOR Nu sensor/direction motor drivers - details of operation
The term XOR, as it is applied here, was derived from the boolean
eXcluxive OR logic. In this case,it means a motor will turn only if
one
terminal is high and the other low. One side of each motor is driven
by
the one shot Nv motor drivers and the other side of each motor is
connected to the output a Nu motor driver.
Together each Nv and Nu driver form a bridge with the Nv side providing
fixed frequency/PWM pulses and the Nu side providing a negative or
positive supply reference for motor reversing. When the motor reference
supply is high it causes the motors to rotate in the forward direction
and when Nu output is low, it causes the motor to rotate in the reverse
direction.
Each Nu stage input is connected to a tactile sensor which detects
collisions on opposite side of the motor to which it is connected as
well as full frontal collisions. The function of the Nu stages is to
stretch a tactile input (determined by TC(Nu)) and reverse the motor
supply reference voltage for the duration of the Nu pulse width
When a collision occurs on one side the Nu, the supply reference for
the motor on the other side is reversed and for the duration of the
TC(Nu) that motor will now rotate in the reverse direction with each
active Nv PWM pulse width determined by the normally inactive "off
time" for that motor.
Assuming high light conditions, the BEAMant behaviour is reasonably
predictable, and side collisions cause the BEAMant to pivot or spiral
on it's axis. Unless the second tactile sensor is activated it will
continue to spiral until the Nu times out. The photo effect for the
time
that the motor is reversed becomes photo phobic for the reversing motor
and photo tropic for the forward motor.
If both tactile sensors are activated the BEAMant will exhibit it's
normal waggling behaviour in reverse at a faster than normal speed
and
the overall photo effect will be photo phobic. Under medium and
low
light conditions behaviour is more complex and (for me) difficult to
describe in detail (you'll just have to build a BEAMant and tell
me).
Well this is my best understanding of the BEAMant circuit operation
and
predicted BEAMant behaviour. Has anyone seen these critters in action?
I
look forward to hear examples of the real BEAMant behaviour both Mark
Tildens's and of course your own experiments with this design.
I think there will be immediate applications for the coupled master
Bicore (Unicore?) for walkers and heads.
Since the frequency of the motor bicore is more or less fixed, it solves
several design obstacles related to the conventional walker and head
photo Bicores including the zero power problem for a Bicore Head.
enjoy
From: Jean auBois <aubois@t...>
Date: Fri May 28, 1999 5:38 pm
Subject: [alt-beam] Re: Unicore (was: PBS special- Poppers)
At 07:22 PM 5/27/99 , Jason - wrote:
>>Hi. I believe you are talking about the beamant 6.6 it is driven by
Mark's unicore design. He isn't releasing any details yet
He 'released' handouts about the unicore design at the Telluride
Neuromorphic Workshop a Long Time Ago. If the following description
is
even close to being accurate, the technology is covered by Mark Tilden's
patent.
Look at the advanced Nv network portion of the BEAM Tek site, particularly
the "phototropic" stuff (geez -- do you know how LONG ago I wrote that
article??? It was the result of Mark explaining this beast to
me.) It
describes the basic idea of using two IR sensors and two resistors
as a
predictable differential light-sensitive element. Take that,
add two of
the inverters from a '240 and a couple of capacitors and you've got
the
visual bicore.
Embed that into another bicore which, for the sake of argument, you
call
the central oscillator. This means that you need two coupling
resistors
between the bicores, two more of the inverters from the '240 and a
couple
more capacitors.
Use two more of the inverters from the '240 and add a resistor and
capacitor each to make two Nv neurons; connect their inputs to the
outputs
of the central oscillator. Connect the outputs of these Nv neurons
to one
end, each, of two motors.
Make a couple of 'tactile' sensors. Use the final two inverters
of the
'240, two more resistors, and two more capacitors to make two Nu neurons.
Connect the tactile sensors to the inputs of the Nu neurons; connect
the
outputs of the Nu neurons to the other ends, each, of the two motors.
Note: the '240 has to be able to source/sink enough current to run
the motors.
You now have a unicore beamant, more-or-less. Note: you
still have to
figure out the values of: 2 resistors in the light-sensitive bridge,
visual
bicore capacitor values, coupling resistor values, central oscillator
capacitor values, Nv resistor and capacitor values, and Nu resistor
and
capacitor values. You'll also have to figure out how to hook
up the light
sensitive bridge to the visual bicore (i.e. which sensor affects which
phase), how to hook up the visual bicore to the central oscillator,
how to
hook up the Nv neurons to the motors and likewise the Nu neurons.
By "how
to hook up" I mean whether or not the connections are "straight" or
"crossed". Generally speaking, a wide range of behaviors can
be achieved
by varying the resistor values and the hookup topology.
I don't have a clue how to deal with the power supply -- Dennison's
got
something, doesn't he? Of course, you could always use a rechargeable
coin
cell.
In normal operation, the two motors alternate continuously as long as
there
is enough power (unlike a photopopper where one motor might get power
several times in a row.) The device obviously steers away from
the side
where the motor stays on longest (in other words, although they alternate,
the duration of each side depends on the bicores.)
The Nv and Nu neurons form XOR drivers. When a tactile sensor
is
activated, its corresponding Nu neuron triggers for some pre-determined
amount of time. When it is triggered, the 'meaning' of the Nv
signal for
that motor is inverted which produces the "reverse" behavior.
Or something like that. This is probably a rather faulty description.
Your mileage may vary. Perhaps Rigter or Wouter or Chiu or Dennison
or
someone can digest this and explain it better.
From: Wilf Rigter <rigter@c...>
Date: Sat Jun 5, 1999 6:29 am
Subject: [alt-beam] Power Smart Head (Re:Head)
Hi Steve,
You reminded me of the MonoHead circuit I designed a short while ago
which, like a normal Bicore Head, required motor power even when locked
on to a target. Since I am all charged up with new ideas after a dose
of
the BEAMant circuit (I feel I wasted a couple of months not having
seen
it before) I redesigned the MonoHead circuit which now conserves motor
power in several ways including turning off the motor current when
"locked" on.
The Power Smart Head
This head circuit uses a High/Low/Oscillator (HLO) which is a
comparator with capacitive feedback that generates a High or
a Low
output when the photocells are unbalanced and Oscillates when each
photocell receives roughly the same light. The motor driver consists
of
a bridge with a direct coupled buffer and a differential Nv buffer.
The
bridge drives the motor in one direction or the other when the
photocells are unbalanced and the HLO is either high or low. When the
photocells are slightly unbalanced, the motor driver pulses conserving
power to make small changes But when both photocells are equally
illuminated, the HLO oscillates at about 10Hz. At this frequency the
differential Nv buffer and the direct buffer of the bridge are the
same
polarity, the motor is stopped and the brake is on. This is a low power
standby mode which requires just a few ma of supply current. When the
light conditions are rapidly changing the motor may reverse back and
forth but while reversing polarity, the bridge has a momentary dead
spot
which also reduces wasted power.
I have only done a few bench tests and have not yet build a Head with
this circuit but the design seems work ok. Since only 4 inverters (as
few as 3 actually) are needed, it is possible to make a 2DOF head using
only
one HC240 or AC240 chip. If you require higher current, an HC139
Z-bridge may be connected to the motor driver outputs with the unused
HC139 outputs connected to a LED to indicate the locked condition.
Finally the unused inverters can be used for other functions such as
a
low pulse rate seek oscillator to scan for light sources
enjoy
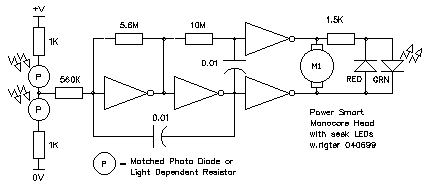 From:
Wilf Rigter <Wilf.Rigter@p...>
From:
Wilf Rigter <Wilf.Rigter@p...>
Date: Wed May 26, 1999 12:18 am
Subject: [alt-beam] Re: gear motors
Ah yes! Those Omron ejector motors have a cam on the output shaft which
opens a switch at the end of about 320 degree rotation in either direction.
Once the motor is turning, the switch acts like a "seal-in" contact
in
parallel with the external "pickup" input.
Attached is a BiCore with a special OMRON motor driver circuit
which uses
this cam switch to limit maximum rotation of the output shaft. The
max
rotation of 320 degree is too great for direct drive of the legs but
can be
use with a linkage or output gear. Alternately, the cam can be modified
to
make the rotation suitable for direct drive of the legs.The circuit
is
designed to also allow less than maximum rotation when the BiCore
changes
state as would be required for turning etc. The timing can and must
be
adjusted to suit the application. The same OMRON driver circuit can
be
easily adapted for use with MicroCore signals. A bridge version of
this
circuit could also easily be designed.
As can been seen on the schematic, every reversal of the BiCore causes
a
AC125 gate output pulse to initiate the motor rotation. As soon as
the motor
turns a few degrees the cam closes the switch and connects the AC240
driver
output in series with the switch. The AC125 pulse will terminate (go
tristate) before the 240 output changes and the motor continues to
rotate
until the bicore changes state or until the cam opens the switch.
Then the
process reverses.
enjoy
wilf
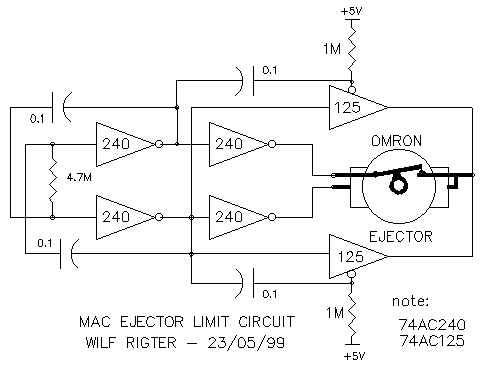
From: Wilf Rigter <Wilf.Rigter@p...>
Date: Fri May 21, 1999 7:10 am
Subject: [alt-beam] Re: Tricore info question
Hello Wouter and list
Sorry for the delay, I've just been very busy. To my surprise,
the tricore
has 3 modes. Zero and one process and 3 processes at very high frequency.
The PNC restores normal one process mode. Here's an example of another
"odd"
core: a Pentacore that places the PNC inside the 4Nv loop. On power
up, the
PNC Nv (not Nu =) resets the other Nvs. Since it's inside the loop,
it
resets them one every stepping cycle, automatically reinitializing
the core
in case of saturation. With the adjustable 1M pot you can vary the
speed of
the walker from full speed to 10 seconds for one stepping cycle.When
set for
full speed, the walker should start walking as soon as the power is
applied.
I haven't time to build this at the moment but it should work as advertised.
One neat idea is to add a IR receiver that senses IR pulses and connect
the
active low output of the IR receiver to the bias point (x) of the PNC.
Now
when you have a Pentacore bot adjusted to slow speed, then you can
control
it with a TV remote control when pressing any key generates an IR pulse
that
causes it to take one step cycle at a time. That is what I meant by
core
synchronization. If you want some interesting herd synchronizing
behaviour,
build several Pentacore bots and connect a visible LED and a IR LED
(IR
beacon) to the output of the first NV after the PNC. Then the PNC of
the
"fastest" bot will time out and at the start of that bot's step cycle
it
will radiate an IR pulse which will trigger the next nearest bot and
that
one to the next cascading away from the center until all the bots within
the
receiving radius take one step cycle with a wave of blinking visible
and IR
LEDs, one step after another.
sound like fun?
enjoy
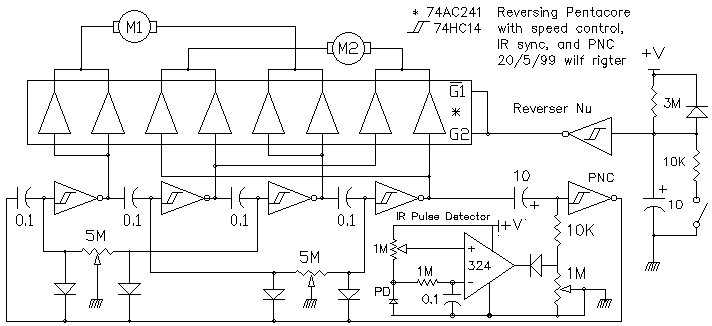
From: Wilf Rigter <Wilf.Rigter@p...>
Date: Mon May 24, 1999 3:04 pm
Subject: [alt-beam] Re: Suspended master-slawe bicore walker.
Hello Walter,
Going from textbook to reality, one detail you need to consider is that
the
switching thresholds are never precisely Vcc/2. In fact with
74HCTxxx
devices, the thresholds are deliberately offset to match TTL
logic levels.
In the case of 74HCT240, the Bicore switching occurs relatively
early
(at +1.5V) on the rising capacitor charging voltage curve (noise immunity)
and symmetry is achieved by matching the 2 capacitors. This is necessary
to match the input time constants since each stage alternately
triggers the
Bicore from the input which has the voltage rising from 0V towards
Vcc/2
and which is the always the first to cross the threshold at ~1.5V.
As always there may be something useful in this.
regards
Wilf Rigter mailto:wilf.rigter@p...
tel: (604)590-7493
fax: (604)590-3411
> -----Original Message-----
> From: Wouter Brok [SMTP:w.j.m.brok@s...]
> Sent: Monday, May 24, 1999 1:34 AM
> To: Jakub Pietracha
> Cc: beam@c...
> Subject: Re: Suspended master-slawe bicore walker.
>
> Hello Jakub,
>
> No, as you describe it it isn't a suspended bicore anymore. Actually
it's
> a
> normal bicore (i.e. a ringlike structure of two Nv-neurons) but with
one
> restiction: the resistors (of the two neurons) are dependent on eachother
> in such a way that the total resistance will be constant (if one
> resistance
> is made bigger by turning the pot the other one is made smaller by
the
> same
> amount).
>
> The resulting behaviour from this replacement is quite different
from the
> behaviour of the original master suspended bicore. For example, now
it
> will
> be possible to control the duty-cycle in a better way (and thus the
swing
> of the legs).
>
> By saying this I realise that I suggest that the suspended bicore
has a
> dutycycle, different from 50%, which is harder to control then in
the new
> situation. This might raise some questions, because I think most
people
> believe that the duty-cycle of the suspended bicore is 50% by defenition.
> This however is not generally true, although one would expect the
average
> dutycycle to be 50%. The duty-cycle of on period of oscillation does
not
> need to be 50%. Actually it can differ quite a bit from that because
of
> noise.
>
> For a suspended bicore with equal capacitors and inverters which
have
> threshold-voltages approximately Vcc/2, the moment of switching states
is
> very likely to be caused by noise. And if this is so the circuit
can
> switch
> state in the first half a period, for example, earlier than in the
second
> half of the period, which results in a duty-cycle for that period,
> different from 50%.
> One would expect that the average duty-cycle is 50% since noise is
> (thought
> of to be) stochastic and doesn't favour one particular part of the
period
> of oscillation. However if it does favour one paricular part of the
period
> the resulting average duty-cylce differs from 50%. Is this possible
I
> wonder ... Yes, I think it is (although perhaps not the reason for
the
> nonsymmetric leg-swing in your question) because maybe the noise
produced
> by the motor is different in amplitude for the two different directions.
> If
> the noise influences the master suspended bicore this then will result
in
> an average duty-cycle not equal to 50%.
>
> A couple of weeks back somebody posted the same question to the list
...
> same problem. Maybe what I described above is the reason of the problem;
> any comments from other people on the list?
>
> Jakub, the solution you choose is a good one to really control the
> duty-cycle, but I don't know if it is what you want. Like this the
circuit
> is less sensitive to noise and maybe you actually wanted it to be
> sensitive. If so I would suggest that you connect springs to the
legs, so
> that they will not turn all the way around eventually and accept
the fact
> the the walker doesn't walk in a straight line.
> If what I described is the reason (maybe you will get more reactions
later
> proving me wrong (which I would like to know)) then I you could make
the
> circuit less sensitive to noise by using capacitors decoupling
> power-supply-lines and by choosing different-valued capacitors in
the
> master suspended bicore.
>
> Come to think of it ... it is the moter connected to the master which
> turns
> non-symmetrically is it?
>
>
> Regards,
>
> Wouter Brok.
>
>
>
From: Wilf Rigter <rigter@c...>
Date: Fri May 14, 1999 5:41 am
Subject: [alt-beam] Servo Bots / Inspiration
Hello all,
I had no idea of the volume of stuff I have written since I joined the
list 6 months ago. I definitely take up the bandwidth but it seems
to be
appreciated. Chiu, thank you for organizing Rigter's Nupages. It would
have bogged me down a lot to do this myself and just while i'm on a
"creative roll".
So when the subject on the list touched on my current research project
I
thought I better go on record.
So as a little taste of things to come here are three schematics for
a
new class of Beam Tech : Beam Servo Bots. I have been working on the
idea of using hobby servos, without ripping their guts out, for a long
time but only recently had the time to try it out. These three servo
controller circuits use hobby servos the way they were designed to
be
used but controlled in true Beam fashion with Microcore, Bicore and
many
other Beam like circuits. No proprietary circuits or microcontrollers
just plain old Beam tech. This could blow the pants of low end RC market
as well: the implications are truly amazing. Imagine 6 "voltage to
servo" controllers using a single 74HC14. No more springs or limit
switches! Proportional controlled steering!
Hobby servos use pulses to adjust the angular position of the output
shaft. According to the standard these servos are designed to rotate
approximately 180 degrees. They require a pulse train of positive
pulses with a width of 300us to 2.5ms for maximum clockwise and counter
clockwise rotation. The motor hits the mechanical limits beyond these
values and this can damage the gear box as well as damage the
electronics. (so warning to all: there is no guarantee that these
circuits will work for you and the experimenter uses these circuits
at
his own risk).
Servo Heads - proportional control
Hobby servos operate in two modes, digital mode and proportional
(analogue) mode. The Beam servo controller servohead1 schematic
shows
full-blown linear voltage to pulse width converter using a 74HC14
Schmitt trigger oscillator which take the output of a pair LDRs, reverse
(green) LEDs, or PDs and proportionally positions the servo output
shaft
controlled by the voltage at the midpoint of the "optical half bridge"
(OHB). This OHB approach is nice in that the output voltage is
proportional to the difference in light level falling on the sensor
pair
and is virtually independent of the ambient light level. Servohead2
uses
the same idea but with a using a 74HC04 or 74HC240 cmos oscillator.
This oscillator is a close cousin to the Bicore but uses less
components. Both of these circuit use the same principle to control
of
the pulse width with a control voltage by converting the control voltage
to a current with the transistor current source! When a transistor
has a
resistor in the emitter, the current sourced from the collector is
proportional to the base voltage. Only the time constant of the positive
pulse is controlled with the control voltage. The time between pulses
is
roughly 2.5ms but can vary a lot. This is not important in this
application as the servo is not sensitive to small variations in the
pulse frequency. For these oscillators the current source linearizes
the
relationship between control voltage and pulse width and this is
important to be able to predict the final position of the servo rotor
for a given input voltage.
The action of the Servo Heads is a little different from the
conventional Beam heads in that they are more like the head of living
creatures turning 180 degrees and not like the spinning top (bring
in
the exorcist) Beam heads rotating 360 degrees or more. This is nice
because the head is less likely to strangle itself on it's umbilical
cord (not a problem for autonomous or solar Beam heads also) To
stabilize the rotation avoid the shakes and generally reduce power
I add
a cap to the midpoint of the OHB usually 1000pf for LEDs 0.1 for PDs
and
up to 500uf for LDRs. Also watch the current consumption of the PDs
and
LDRs, if very sensitive they can draw a lot of current and should be
protected with a 1K resistor in series with the OHB +V connection.
Green
LEDs never have this problem and since the input current for the
Proportional Beam Servo Controller is extremely low it is perfectly
compatible with the small (ua) reverse LED currents.
Another application for this Proportional Beam Servo Controller circuit
would be as the proverbial hothouse controller using two thermistors
in
the half bridge to control a vent based on the difference in
temperature. Or use a single thermistor and a resistor or a LM34 or
similar to control vents and valves for the VAC of your hothouse or
home
or ??
Servo Core - Digital Servo Controller
Beam circuits require a complimentary power output stage like a BiCore
with a bridge or 2 microcore stages with 245 buffers for each motor.
Beam Servo Bots take advantage of the hobby servo build in electronics
power output circuit. In the Servo Core example a conventional ucore
has
been adapted by greatly reducing the time constant of each stage to
generate 4 servo pulses which are send to 4 servos with the pulse width
of the pulses controlled via 4 control voltages. These control voltages
are generated by a second conventional 4Nv microcore as used in 2 motor
walkers. Notice that only one microcore stage is used for each
motor
and that the digital output of each Nv supplies the fully left and
fully
right signals.
As a result when the Nv output is high (75% of the time) the servo
is
turned full clockwise and when the pulse goes low (25% of the time)
the
servo slews to the counter clock position and return to it clockwise
resting position after the low pulse terminates.
The effect of this is a wave like (millipede) motion of the servos
as
the process goes around the microcore loop. Of course this can
be
extended to a larger number of Nvs and servos. I haven't used this
on a
platform but it seems like a useful type motion. The 4 servo core is
just a starting point which can be connected to master slave Bicore
and
even a microcontroller outputs to provide a convenient digital to servo
interface
Well I will stop here although there is much more but I am sure there
will be many other contributions to this fascinating application of
Beam
tech to Servo Control.
Thanks to all the great ideas on this list : they truly are an
inspiration for me (and I am sure for Mark Tilden as well).
A special thanks to Steven Bolt for the idea of the current source to
control pulse width , the optical bridge and his many other unique
contributions. And of course a many thanks to Mark Tilden for starting
so much of this, staying at the center and somehow keeping the magic
going.
enjoy
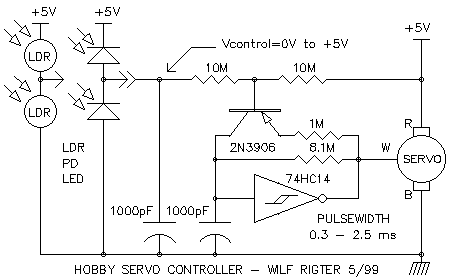
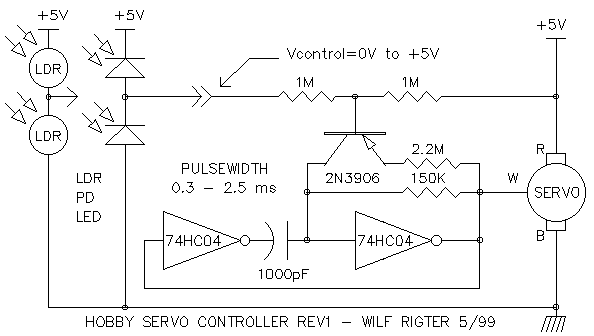
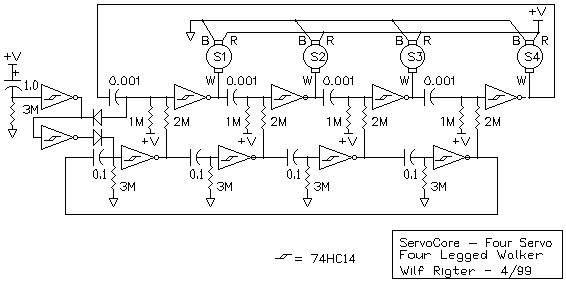
From: Wilf Rigter <rigter@c...>
Date: Mon May 10, 1999 1:07 am
Subject: [alt-beam] QCORE
Hello all
Here is a little "retrotech" circuit I build and tested showing that
there are more ways than one to build a microcore. Like it's CMOS cousin
this circuit also saturates on power up and the PNC pushbutton must
be
held down for a second to kill those nasty multiple processes.
enjoy
wilf
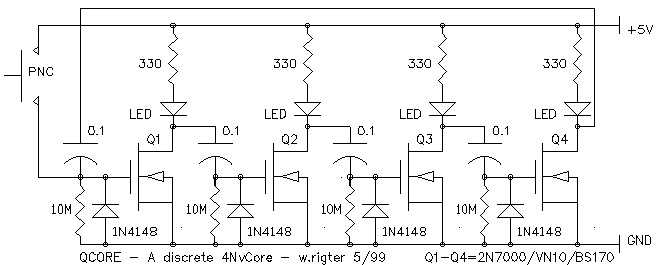
From: Wilf Rigter <Wilf.Rigter@p...>
Date: Thu May 6, 1999 5:41 am
Subject: [alt-beam] Re: LC circuits
Hello Alex,
No, not stupid at all ! Here is a fine example of an electromagnetic
Beam
circuit. This Relay Core has a definite L 'ement" of retro about.
The
triangles are meant to Show the similarity with the MicroCore. Relays
are of
course natural Schmitt triggers. This low tech design could have been
build
a century ago! Who knows, if someone had invented it then perhaps
today we
would be driving walkers instead of cars.
enjoy
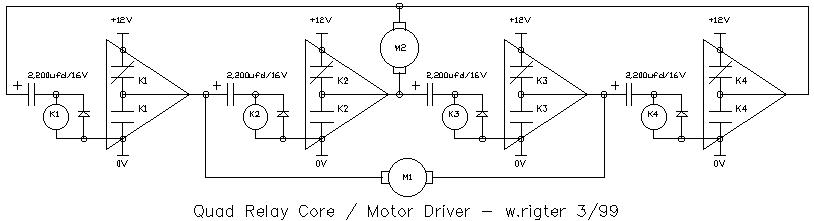
From: Wilf Rigter <Wilf.Rigter@p...>
Date: Thu May 6, 1999 3:55 am
Subject: [alt-beam] Re: Bicore head targeting?
As discussed at the chat today here is a (new?) idea.
With a phototropic BiCore head mounted on a uCore walker, the head should
be
free to turn towards a light target and send an error signal
to influence
the walker uCore to start turning toward the target. From some
experimenting, I found that integrating both BiCore phase signals
produces
two average Vdc error signals proportional to each phase duty cycle.
Since
the duty cycle of each phase is complementary to the other phase, this
produces two complementary error signals which can be applied to the
two
corresponding uCore bias points to lengthen the process in one Nv and
shorten it in the other Nv, in effect causing the walker to turn.
(ie <
50% = turn left, 50%= straight ahead, >50%=turn right) Given a relatively
high oscillation frequency for the Head BiCore, it is simply a matter
of
connecting both BiCore outputs through 2 suitable resistors to the
uCore
bias points using the uCore caps themselves to integrate the average
DC
component of the BiCore outputs.
The problem is that the head circuit stops sending out an error signal
(50%
duty cycle) when fully turned and locked on the light source. So once
the
head is turned into position: no more error signal and no more influence.
Solution ? add a centering spring(s) between the head and the
walker,
tensioning the head to face to the front of the walker. Now when
the head
turns, the BiCore has to "work" to keep it turned towards the light
and
therefore keeps sending an error signal to the uCore until the head
and
walker both face straight towards the light. 8^)
What do you think?
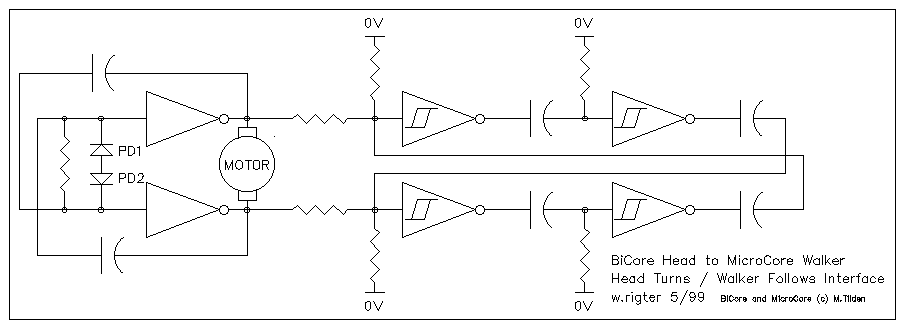 From: Wilf Rigter
<Wilf.Rigter@p...>
From: Wilf Rigter
<Wilf.Rigter@p...>
Date: Thu May 6, 1999 1:52 am
Subject: [alt-beam] Re: step by step FLED SE analysis ( was F#$@
beam)
Hi Steve,
perhaps you can check one part at a time as you assemble the whole SE
and
report what you find.
On the attached schematic, what values for C1 and R1, what motor and
solar
cell? : so we can compare notes.
Here are some suggestions for checking each part/step along the way.
1. check the (illuminated) solar cell output (unconnected): 3-5V?
2. add the cap, charge and measure the voltage: 3-5V?
3. touch FLED across the cap: does it flash?
4. charge cap and touch motor across cap: does it turn?
5. connect 2N3904 and the motor across cap, charge cap, then touch
a 330 ohm
resistor between 2N3904 base and +V : motor turns/moves?
6. add the 2N3906 and resistor, then touch a 1K resistor between the
2N3906
base and 0V : motor turns/moves?
7. add FLED, if circuit not working: touch 1K resistor between
between the
2N3906 base and 0V : motor turns/moves?
let us know where you get stuck.
(try to) enjoy
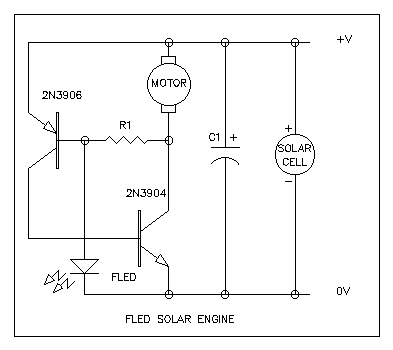 From: Wilf
Rigter <rigter@c...>
From: Wilf
Rigter <rigter@c...>
Date: Fri Apr 30, 1999 5:02 pm
Subject: [alt-beam] Hysteresis Solar Engine (HYSE)
Hello all,
After a few false starts I'm back on track with a new tested SE design.
This was build to prove that the hysteresis of a supervisory chip can
be
increased and used for SE latching. It was tested using a MC34164
(5V)
voltage supervisor since I have no 1381 to play with. It worked fine
with a range of input currents ma to 30 ma using a simulated 9V OCR
solar cell.
The design was breadboarded and tested with 3 different motors including
the relatively common Mac ejector motor. With the 0.047F cap shown
and 5
mA supply current @ 5V, the Omron motor runs for about .5 sec every
5
sec and the output shaft turns about 90 degrees for each pulse (which,
incidentally, is exactly what is needed for a walker application but
that's another design)
The way that the hysteresis is increased is worth mentioning. In this
circuit with V+ = 5.2V, the supervisor is still operating below the
threshold (!) This happens because the 34164 output is low and the
50 uA
current flowing through the 100K resistor also flows through the 10K
resistor raising the trigger threshold by 500mV. When the supervisor
trips at about 5.3V, the output changes from 500mV to 5.3V and the
current through the 100K and 10K resistors drops to zero while the
motor
current "snaps" on. When the voltage across the 10K resistor drops
to
zero, this also drops the lower threshold voltage by about 500mV
and
provides the required. hysteresis.
When the voltage drops down to about 4.8V, the supervisor output turns
back on and the process starts again. Since the supervisor output
voltage rises to about 500mV before the threshold is reached,
the FETs
used must have a Vgs (@0.1mA) > 1.0V or else the circuit will not
work!
I have not yet build a complete working "photopopper" type application
with this circuit, so you take your chances. The design should be
scalable to other chips and voltages as long as the supervisor chip
is
the non inverting active low/open collector type and the Vgs of the
FETs
is higher than the Vhys at the lowest supply current of interest.
From: Wilf Rigter
<Wilf.Rigter@p...>
Date: Tue Apr 27, 1999 2:11 am
Subject: [alt-beam] Re: AQUASENSOR
Thank you Steven,
Here's a single chip LED version. The LEDs must be high efficiency type.
With 3% duty cycle the average current is about 200 uA.
regards
From: Wilf Rigter <rigter@c...>
Date: Sun Apr 25, 1999 7:33 pm
Subject: [alt-beam] AQUASENSOR
Hello everyone,
Introduction
Here is a simple but effective soil dehydration alarm circuit. Once
the
threshold is adjusted for the specific plant and soil conditions, the
alarm will sound when it is "feeding" time.
It was inspired by Steven Bolt's Green Thumb project. The basic function
of detecting dry soil conditions is there but in a smaller more compact
circuit. Used with a 1.5 AAA or button battery it draws a mere 5uA
and
15 ua when the beeper sounds. It works down to 0.8V with a lower but
still acceptable sound frequency and sound level. At which 1.0V, the
current consumption is only 0.5uA and 3 uA when the beeper sounds.
With
such low current consumption the battery should last for several years.
The threshold is quite stable over the operating voltage and temperature
range because of the closely matched characteristics of the "same chip"
CMOS inputs which largely cancel out temperature and voltage effects.
This is a small improvement on the orignial since Steven Bolt uses
two
chips with different input thresholds and this may make the threshold
setting sensitive to voltage and temeperature variations. The two 10K
probe resistors are optional but may help protect the circuit against
static discharge etc. Without "field experience", I can not tell you
that this device will promote plant growth however if anyone builds
it
and keeps careful records (as Steven Bolt has done for his plant
experiment) this could be an interesting science project.
While this project is not, strictly speaking, related to Beam robotics,
the circuit uses a same "freeformable" single chip design which is
the
hallmark of so many Beam circuits.
A micro power valve is next perhaps using some air pressure in the water
bottle to propel the liquid uphill. Stay tuned!
How it works
The design uses soil resistance as the parameter for determining the
threshold of insufficient soil moisture content.
The resistance threshold detector circuit consists of a RC bridge phase
discriminator. One RC leg of the bridge is used as an adjustable
reference time constant (TC-ref) while the time constant of the other
RC
leg is determined the same value capacitor but an unknown resistance
in
the form of the soil moisture probe.
Under wet soil conditions the "unknown" resistance is a low value
(>20Kohm) and the TC is small compared to TC-ref. The threshold of
soil
resistance is detected by applying a square wave to the bridge network
and by detecting which TC is the longest. The detector uses a two gates
from the 74HC132 schmitt NAND gate as an RS flipflop with both outputs
Set high when the applied voltage is 0V and on the rising edge of the
applied squarewave, the flipflop input connected to the leg with the
shorter TC is Reset (low output) while the leg with the longer TC
remains set. The first input to go high (shorter TC) together with
the
cross-coupled high output from the other side causes the output of
the
first side to Reset and thereby inhibits resetting the other side
because of the crosscoupled low output.
The 1Hz square wave clock is a conventional one gate Schmitt trigger
type and the 1KHz audio alarm clock drives a Piezo type speaker. The
audio alarm is held off with a 1N4448 diode connected to the
reference
side of the flipflop as long as the soil resistance is lower than than
the reference resistance. When the soil dries out out increasing the
soil resistance and TC to a value greater than the reference TC, the
reference output is reset and the alarm is enabled and generating a
pulsing beeping sound.
While this is a simple application for this circuit I have found that
this design can also be used to detect changes in capacitance and then
behaves like a proximity detector. Adding a bias resistor to the
"unkown" reistance leg of the bridge can provide a micro power voltage
threshold detector and the list goes on.
This intriquing simple TC phase comparator has much potential for other
applications (including microcontrolers such as the PIC Stamp which
also
use a similar single slope conversion TC/D and A/D interface) and I
look
forward to seeing this circuit pop up in other Beam designs.
enjoy
wilf
From: Wilf Rigter <Wilf.Rigter@p...>
Date: Sat Apr 17, 1999 6:03 pm
Subject: [alt-beam] Slave BiCore operation
Hello to all BiCore fans,.
I wrote this description of the operation of a slave BiCore a little
while
ago but forgot to post it. I know that some readers already know this
stuff
but I thought you might enjoy reading it and especially the surprise
ending
in the next post.
The attached GIF of a Master-Slave BiCore shows the relevant waveforms.
The
description of the master BiCore was previously posted. Because of
the
symmetry of circuit operation, the waveforms on the bottom side of
the
circuit would be identical but "upside/down".
In normal operation the familiar Slave BiCore is a kind of complementary
Nu
Neuron with feedback.
Assume a stable condition where:
The outputs of the master are 1 and 0,
the inputs of the slave are 1 and 0,
the outputs of the slave are 0 and 1.
Therefore the voltage across the slave coupling resistors (Vsr) = 0V
and the
voltage across the slave capacitors (Vsc) = 0V. Now assume the master
BiCore
has just flipped it's bits.
The master outputs are now 0 and 1,
the slave inputs are still 1 and 0,
the slave outputs are still 1 and 0.
Therefore Vsr=Vcc and Vsc=0V and the slave capacitors start to charge
/
discharge through the "coupling" resistors. So far, no different from
two Nu
neurons (integrators) delaying a step input by their RC time constant
:
The slave inputs 1 and 0 charge towards opposite values and when either
of
the slave inputs reaches the switching threshold at approximately 1/2
Vcc,
the corresponding slave output starts to switch from 1 or 0 to 0 or
1. Now
feedback occurs, which is quite different from the Nu neuron and more
like a
Nv neuron:
When the first output changes, this change is capacitively coupled into
the
other slave input and causes that input, already near 1/2 Vcc to cross
it's
threshold which in turn causes the second output to change, which is
capacitively coupled into the first input. The second RC node with
the
larger time constant plays no role in the timing of the slave
BiCore and
the RC components can be eliminated. This positive feedback results
in an
rapid voltage change at both slaves input towards the value as the
corresponding master outputs. During this rapid change, each
slave
capacitor charge is "dumped" through the slave input protection diodes
so
that the voltage across the caps and resistors rapidly changes to 0V.
At
that point the following stable condition exists:
The master outputs are 0 and 1,
the slave inputs are 0 and 1,
the slave outputs are 1 and 0
Vsr = 0V and Vsc = 0V
The process repeats when the master BiCore again flips it's bits in
the
opposite direction.
The formula for the delay time of a 74HC/ACxx Slave BiCore is approximately
0.7RC.
The time constant of the master BiCore is much trickier to calculate
especially when components are closely matched since the switching
threshold
is close to 0V across the suspended resistor (ie on the flat part of
the
exponential discharge curve). This is what makes the master BiCore
time
constant long for a given RC and quite sensitive to preemptive triggering
by
"feedback" from the load. A rule of thumb used for determining the
74HC/AC04
or 74HC/AC240 type master BiCore time constant is approximately 1.4RC.
Based
on the requirement for 90 degree phase delay between Master and Slave
BiCores the same RC components can be used in both. The 90 degree phase
shift means that the Slave BiCore output changes occur half way in
time
between the Master BiCore output changes.
enjoy
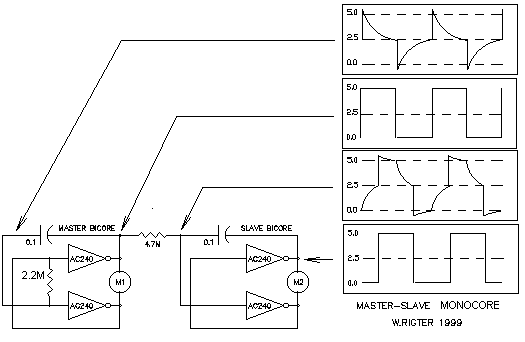
From: Wilf Rigter <rigter@c...>
Date: Sat Apr 17, 1999 2:04 am
Subject: [alt-beam] Re: SE / alf circuit variation..
Hi Darrell,
Your design should give better performance/lower parts count, since
the
pulse generator current is higher than 5 uA. The 1381 circuit will
also
cost more, which others addressed by designing this part out of the
circuit in the first place. But if you got it, use it 8^)
I'm not sure about the output structure of the 1381 you are using but
if
it is a push/pull output then adding a 100K to 1M resistor as shown
is
desirable to limit the current when the 1381 output goes low again
and
the diodes have to source current or more likely, the circuit resets
on
the basis of the 1381 hysteresis rather than the forward voltage of
the
diodes. I believe there are several different types of output depending
on the part suffix. If the active high/open collector version is used,
then a 100K to 1M resistor from the output to GND should be used
instead. The value of the resistor will determine the dropout voltage
for the latch with higher resistor values resulting in lower voltage
level before the latch resets and the circuit starts the next charging
cycle .
enjoy
wilf
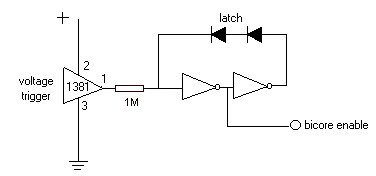 From: Wilf Rigter
<Wilf.Rigter@p...>
From: Wilf Rigter
<Wilf.Rigter@p...>
Date: Mon Apr 12, 1999 7:49 pm
Subject: [alt-beam] Re: Linked BiCores; How Does The Slave Cycle?
Very sharp Wouter!
Actually I send those waveforms to you privately but as long as we are
discussing them here I have attached them to this reply.You will find
one
additional circuit which exploits the overvoltage at the input of the
"isolated" suspended BiCore to generate some additional supply voltages
(+7.5V and -2.5V).
The graphs are approximations I made with a CAD program. They don't
have a
calibrated time axis. You are correct that the 74HC04 and 74HCU04 would
have
the same exponential curve using the same RC parts but a different
period
because of the difference in thresholds. The 74HC04 inverter has a
voltage
gain of about 100 and a narrow (50mV) gap around 2.5V between the upper
and
lower thresholds. The 74HCU04 inverter has a much smaller gain and
widely
separated upper and lower thresholds. In this description, threshold
means
the input voltage level at which the output voltage starts to change.
The
graphs for the HC/AC240 are very similar to the 74HC/AC04 so the example
holds for both cases. However there are important effects related to
output
load current and obviously the 74HC04 has much less current capability
(higher output impedance than the 74AC04 and 74HC/AC240. Power supply
noise
and "ground bounce" can change the period of a master or slave
BiCore by
50% which could be suppressed by good supply decoupling and supply
bus
layout for more repeatable results. Of course, this all falls into
the
category of "feedback" so you can explore ways to the modulate BiCore
pulse
width in response to change in load by deliberately allowing a certain
amount of noise to influence the BiCore period. This is the way in
which
BEAM design exploits electronic circuit behaviour on the edge of chaos
giving rise to such complex and surprising behaviour in BEAM bots.
<<ALLWAVE.GIF>>
enjoy
Wilf Rigter mailto:wilf.rigter@p...
tel: (604)590-7493
fax: (604)590-3411
> -----Original Message-----
> From: Wouter Brok [SMTP:w.j.m.brok@s...]
> Sent: Monday, April 12, 1999 12:07 AM
> To: beam@c...
> Subject: RE: Linked BiCores; How Does The Slave Cycle?
>
> Hello, again
>
> Actually, having a look at them I come up with a couple of questions:
> -In the circuit of the 'suspended' bicore you use the 74HC04 and
the
> 74HCU04. I don't know what the difference is between them, but what
> suprises me is that the exponential parts in the graphs don't seem
to be
> the same, while I assume the resistors and capacitors are. How is
that?
> -Are the time-scales the same for all graphs?
>
> How do the graphs look for the 74HC240; I don't know how much time
it
> costs
> to make them, but if it doesn't take much I would like to see them;
or are
> they the same as any of those?
>
> Regards
>
> Wouter Brok
>
>
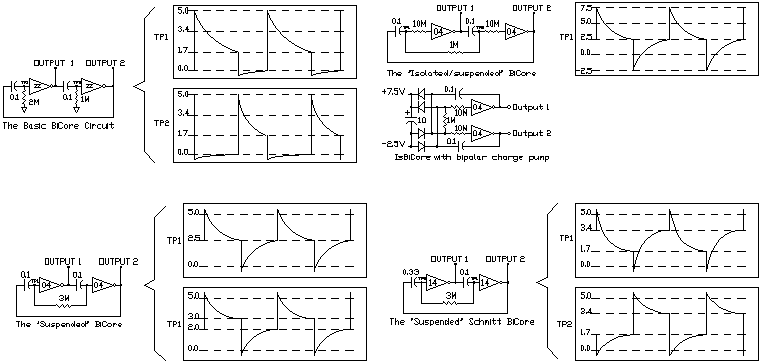
From: Steven Bolt <sbolt@x...>
Date: Fri Apr 2, 1999 8:14 am
Subject: [alt-beam] Better 74HC design WAS opamp SE's, RE:74HC240
(fwd)
Btw, this is what the SunEater_IV in SunEater_V looks like at the
moment. The 74HC14 has two STinverters left, just enough to realize
the `eyes', tactile sensors and motor control. I need to squeeze it
all in one IC to meet small & light target. The adjustables may
be
replaced by fixed resistors when the little guy is behaving
properly. Still have to do the layout. Wish I had more time...
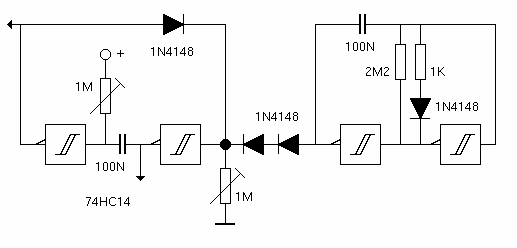
From: Wilf Rigter <Wilf.Rigter@p...>
Date: Mon Feb 22, 1999 8:44 am
Subject: [alt-beam] Re: It works, but I don't know how... new
diagram
Not expecting it on the BEAM list?
The designer's own explanation always helps! Ofcourse the pulse generator
itself consumes power since it also operates in the linear region part
of
the time. Anyway I tried the sensor latch with the 3 diodes to the
V+ and it
seems to work quite well.
Strangely, the resistor to ground is quite critical: 51K worked great
but
100K not at all. Also saved one diode which should work in your circuit
as
well. See attached GIF.
<<sensomem.gif>>
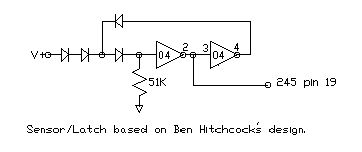
From: Wilf Rigter <Wilf.Rigter@p...>
Date: Sat Feb 20, 1999 10:35 pm
Subject: [alt-beam] Re: hmmm...i wonder which subject
Hello Noam and associative memory fans,
I tried you circuit and found that it oscillates most of the time because
with the 3 gate configuration 1/2Vcc can appear at the input which
puts the
inverter in the linear region. I believe that larger networks of 74HC14
gates may work. It requires 3 or 4 resistors at each input node to
increase
the probability of switching and make the circuit "interesting". That
means
4 or 5 (or more) gates.
I'm going to try this with 10 gates (9 resistors) to create a
"neighborhood" for the middle cell. If all goes well this could lead
to
arrays of such 9 resistor cells with each cell connected to it's
9
surrounding neighbors which may be capable of generating "LIFE"
or other
CA. These can be asynchronous with propagation determined by a cap
(and
large series resistor) at each input. Or the cells can be synchronized
by
adding a "tristate" gate (instead of the large series resistor)
to each
input so that the cell will retain the last memory. Pulsing the tristate
inputs will cause a next generation for the whole array (at least that's
the
theory).
Attached is a GIF of NOAM's circuit using a 4066 instead of the transistor
he described. All whip up the GIFs for the proposed 10 cell array later.
<<noam1.gif>>
enjoy
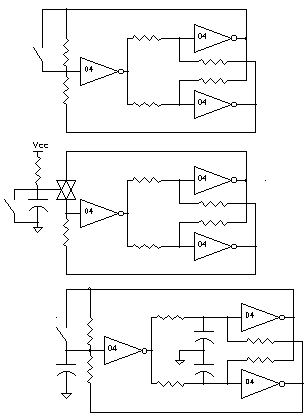
From: Wilf Rigter <rigter@c...>
Date: Wed Feb 17, 1999 5:19 am
Subject: [alt-beam] Re: 240-based 'reverser' query
Nah Justin
Chiu-Yuan Fang wrote:
> Here's a qeustion for Ian. Are the 47Kohm resistors for implex
or some other
> reason?
Hi Chiu
You didn't recognize this circuit? Not exactly textbook but I've used
it
for years in my designs. This design reverses 4 stages at once and
is
only useful for some applications. Check out my attached 241 reverser
solution which includes the NuPNC (continuously looks for and corrects
core "saturation").
Anyway no, the resistors are each in parallel with an inverter stage.
Inversion is controlled as follows: 1. tristate the inverter and the
signal bypasses the inverting buffer (through the resistor) non-inverted
2. Un-tristate and the signal at the "output" is inverted by the active
buffer.
I believe the diagram is incomplete : it should show the "outputs"
connected to the adjacent "unlabled inputs" and the associated
"unlabled buffered outputs" are capable of driving a small motor load.
The sensor on the left is the reverse Nu and the sensor on the right
the
"OFF/STOP" switch (used also during PNC)
enjoy
wilf
 From: Wilf Rigter
<Wilf.Rigter@p...>
From: Wilf Rigter
<Wilf.Rigter@p...>
Date: Mon Feb 15, 1999 11:27 am
Subject: [alt-beam] N/2 NEURONS
Back by popular demand and full of corrections and latest developments,
here
is the article on the N/2 NEURON. I send most of this info to Mark
T. and
the Zoz but while the latter came back with some nice comments including
the
XOR BEAM anathema which spurred the ELEMENTAL N/2 design , the former
appears to be "incommunicado". Still right across the hall from each
other
eh! (yes am canadian). So without the benefit of the master's comments
but
looking forward to all your "questions" here is the article.
enjoy
wilf
N/2 NEURONS - MULTIPLY AND DIVIDE (c) wilf rigter Feb 14,1999
INTRODUCTION
The N/2 neuron is presented here as a proof of concept of a spiky stimuli
processing neuron! The N/2 neuron is so named because N/2 is represents
the
ratio of 1/2*N output pulses for every input pulse.
The N/2 neuron has the capability to process spiky inputs and
produce spiky
outputs over a wide range of transfer functions that includes INHIBIT,
ATTENUATE, REGENERATE and AMPLIFY. It seems intuitively obvious
that
networks of N/2 neurons would be capable of very complex stimuli processing.
Despite of its complex capability, the N/2 neuron is a remarkable simple
circuit.
THE N/2 NEURON MODEL
The neuron model of the N/2 neuron is the "programmable spike multiplier"
.
Input spikes are multiplied at the output by a factor N/2, programmed
by the
N/2 neuron internal process time constants. Programming (tuning) of
the N/2
neuron is performed by adjusting analog variables which control two
internal
process time constants. The ratio of the two process durations
determines
the ratio of output to input spikes by a discrete factor of N/2 where
N is a
whole number equal to or greater than zero.
The electronic model for the N/2 neuron is the "gated oscillator with
memory". An external negative transition is detected by the edge
triggered
Nv input generating an internal gating pulse which enables an internal
oscillator to produce output pulses for the duration of the gating
pulse.
The last state of the oscillator output is retained when the gating
pulse
terminates. The number of pulses generated for each input pulse
is
determined by the ratio of the gating pulse width and oscillator period
both
of which are adjusted with analog (RC) components.
While the ratio of analog variable time constants is infinitely
(continuously) variable, the ratio of input to output pulses is a discrete
factor N/2. The first 4 factors of 0/2, 1/2, 2/2 and 3/2 are
especially
important since these generate 0, 1/2, 1 and >1 pulses for each input
pulse.
The factor of N=0 (0/2) INHIBITS (blocks) the transfer of input pulses.
The factor of N=1 (1/2) ATTENUATES (divides) the transfer of input pulses
by
2.
The factor of N=2 (2/2) REGENERATES (but delays) the transfer of input
pulses by 1 ( 1 for 1).
The factor of N=3 and higher (3/2 and higher) AMPLIFIES the transfer
of
input pulses by N/2.
THE N/2 BINARY COUNTER
The N=1 factor is a special case with an interesting property: N/2 neurons
you can count on! The N/2 "divide by 2" (or multiply by 1/2)
transfer
function is equivalent to a binary flip-flop and can be cascaded in
a linear
network to produce any length neuron ripple counters.
THE XOR N/2 NEURON
There are a number of N/2 neuron circuits which behave in similar ways:
The XOR N/2 neuron consists of three series connected elements:
1. Nv input stage
2. XOR reversing stage
3. Oscillator output stage.
The XOR N/2 neuron combines an edge triggered input, a polarity control
block, a Nu and a local +/- feedback loop. The RC components of the
input
and output stages are the analog variables that can be adjusted to
give
various time constants. It is the ratio of the Nv and Nu time
constants
that determine the transfer function of the N/2 neuron.
Vcc_______ ________________________________
| | |
XOR
Nu |
+-->[1M] | __
__ |
|
+--))86 \_
____|14 \__|__ OUT
IN ---||-+------))__ / `--[330K]--| |__ /
.001 Nv
|
.001===
|
0V
FIG 1 - THE XOR N/2 NEURON CIRCUIT)
As shown in FIG 1, The N/2 neuron external input uses a Nv at one input
of a
XOR gate as a "edge triggered" Nervous neuron to generate a gating
pulse.
The output of the XOR gate is connected to an Nu neuron and the output
of
the Nu neuron is the external output of the N/2 Neuron. The second
XOR input
is connected to the Nu output to provide positive or negative feedback
with
the feedback polarity controlled by the Nv. Under stable (no process)
conditions the XOR provides positive feedback for the Nu which
then behaves
as long term memory. When an input pulse occurs, a Nv process is generated
during which the XOR supplies negative feedback to allow the Nu to
cycle
(Schmitt oscillator). Note the use of different RC components
for the Nv
and Nu stages because the thresholds of HC86 and HC14 are quite different
which affects the time constant for the RC component values. As with
most Nv
/ Nu neuron circuits, the XOR N/2 neuron requires tuning.
THE 2XOR N/2 CIRCUIT
A similar approach can be used with a gated CMOS oscillator normally
constructed with two inverters (see FIG 3). When the inverters are
replaced
with non-inverting stages the circuit acts as a memory. The internal
gating
pulse on the XOR inputs control whether the XORs are inverting or not.
It
may be necessary to add a small (.001) capacitor to the OUTPUT to clean
up a
glitch at the end of the Nv period because of slightly different thresholds
of the 2 XOR stages.
Vcc________ __________________||_______||__ 0V
| | |
|| | ||
| | |--[500K]---+
.01 | .001
+-->[1M] | __
|
|
.01 | +--))86 \___|
__ |
IN ___||__|------))__ / `---))86 \ __|__ OUTPUT
|| `-------------------))__
/
FIG 2 - THE 2XOR N/2 NEURON
The N/2 circuits in FIG 1 and FIG 2 use XOR gates, for which there
are no
simple equivalents in biological systems and which are considered to
be too
"digital" by some (apparently including Mark T.)
THE ELEMENTAL N/2 NEURON
The last N/2 neuron circuit is in that sense more biomorphic! It is
designed
with the simplest of all circuit elements avoiding all trappings of
digital
logic. The active components could in theory be reduced to the equivalent
of
3 or 5 transistors. The ELEMENTAL N/2 NEURON consists of three series
elements.
1. Nv input stage
2. Bilateral switch
3. Nv Oscillator
The ELEMENTAL N/2 NEURON uses two each resistors, capacitors, inverters
and
a single bilateral switch to form the gated oscillator/memory circuit.
Since
the input switching thresholds of these devices is symmetrical and
near
Vcc/2, the switching symmetry and time constants of the Nv input and
the Nv
oscillator stages are close in their characteristics and relatively
stable
with variations in Vcc. The other advantage of the ELEMENTAL N/2 NEURON
is
the reset of the capacitor charge when no process is active (Bilateral
switch is closed). This means that every active process starts
from zero
capacitor charge which is precisely the same condition for a freerunning
Nv
oscillator at the start of each half cycle. As a result, the N/2 ratio
pulse
multiplying transfer functions of the N/2 change linearly with RC values
and
maintains a robust predictable relationship between the functions and
component values and eliminates empirical "tuning"!
The ELEMENTAL N/2 NEURON circuit is shown in FIG 3.
Vcc
__
| _____ __|04 \___
| | |
|__ / |
[100K]
| |_
|
|R1 | | `-[100K]-|
IN ____||__|______/ ===
R2 |____ OUT
||
/ 4066 | __ |
.01
|_____|__/04 |___|
\__ |
FIG 3 - THE ELEMENTAL N/2 NEURON
THE N/2 NEURON PROCESS
The examples of the two N/2 circuit in FIG 1 and 2 can be used to
demonstrate the basic N/2 capabilities. The Nv generates an active
low
gating pulse at the input at each falling edge of the input waveform
which
enables the oscillator process and depending on the duration of the
Nv input
process (NvTC) and the oscillator process (XTC), the output will generate
0,1/2,1,1.5,2, etc output pulses for each negative input transition.
The XOR N/2 NEURON PROCESS
In the case of the XOR N/2 neuron, the gating pulse causes the oscillator
output to input feedback to change from positive to negative feedback.
An
integrator followed by a Schmitt trigger with negative feedback is
a
classical Schmitt trigger oscillator alternately charging and discharging
the oscillator capacitor with a period determined by the RC components
and
the Schmitt trigger input thresholds. Note that the initial oscillator
process starts at 0V or Vcc and therefore has a much larger timeconstant
than the subsequent processes which oscillate between the trigger
thresholds. Depending on the ratio of the Nv and oscillator "process"
time
constants (NvTC and XTC), the oscillator produces 0, 1/2, 1 or
more pulses
for every negative input transition. For example: An active low
Nv process
connected to one XOR input changes the other XOR input to output
polarity
from inverting to non-inverting. This changes the Nu output to input
feedback from positive to negative feedback and causes the voltage
at Nu
bias point will start to changing in the direction of the Nu
output
polarity. Because of Nu input hysteresis, there is a delay before
the Nu
bias point voltage reaches the trigger threshold when the output changes
state. If XTC is larger than NvTC, the voltage at the Nu bias
point will
never reach this threshold before the Nv pulse terminates and the transfer
of input to output pulses is inhibited (blocked) and the output remains
unchanged (N=0). Longer NvTC periods permit the bias point voltage
to cross
the threshold and the Schmitt trigger output to reverse one or more
times.
This results in the various N/2 transfer functions described in more
detail
below.
The ELEMENTAL 2/N NEURON PROCESS
In the case of the ELEMENTAL N/2 neuron a negative transistion on the
NV
input generates an active low gating pulse which turns off the bilateral
switch. This starts the Nv input time constant with zero charge on
the input
capacitor which then charges up through the input resistor to Vcc.
During
that time the bilateral switch is open and the Nv oscillator process
starts
with zero charge on the oscillator capacitor (like the Nv input capacitor)
which charges towards 0V or Vcc depending on the state (memory) of
the last
process. The processes of the Nv input and Nv oscillator are very similar
and if the switching thresholds are near Vcc/2 then these two processes
are
symmetrical and effects of temperature and voltage variations tend
to cancel
out.
INHIBIT
When the time constant of the Nv input (NvTC) is shorter than the time
constant for the first oscillator half cycle (XTC) then the oscillator
will
return to it's starting state when the Nv process terminates and no
change
in N/2 neuron output will result. As a result no input pulses
will reach
the output so the N/2 neuron is said to be blocked or inhibited (N=0)
ATTENUATE
If XTC is approximately equal to NvTC, the voltage at the oscillator
bias
point will just cross the threshold and oscillator output will change
state.
The inverted output then starts to charge the capacitor in the direction
of
the new output polarity. The oscillator output will not change until
the
bias point voltage reaches the second threshold. As long as the Nv
gating
pulse terminates before the second threshold is crossed, the oscillator
output will only change state once. When the Nv pulse terminates
positive
feedback will hold the last oscillator output state (memory). On the
next
falling edge at the Nv input, the process repeats causing the
oscillator/memory to change state (flip-flop) on each successive
falling
edge of the input waveform. As a result, half of the input pulses are
transferred to the output (N=1). If several stages of N/2 (N=1) neurons,
are
connected in series, the resulting network behaves like a binary counter!
REGENERATE
If XTC is shorter than the NvTC, the voltage at the Nu bias point will
cross
the first threshold, causing the oscillator output to change state
and then
the charging voltage will reverse and the bias voltage will cross the
second
threshold to change the oscillator output state once more. As long
as the Nv
pulse terminates before the bias voltage again reaches the first threshold,
the oscillator output produces one output pulse for every input pulse.
(N=2)
AMPLIFY
If XTC is much larger than the NvTC, and the voltage at the oscillator
input
voltage crosses thresholds 3 or more times, the oscillator output will
produce 1.5 or more pulses for every input transition.The transfer
of input
pulses is AMPLIFIED when more output pulses than input pulses are generated
(N>2)
N/2 NEURON DEMONSTRATION
Unlike it's digital counterpart, the N/2 neuron depends on the ratio
of the
analog components for the Oscillator/Nv time constants to select a
transfer
function. In practice this means you can use a photodiode or other
sensor to
change one time constant and thereby successively change the transfer
function of the N/2 Neuron from INHIBIT to ATTENUATE, REGENERATE and
AMPLIFY.
To demonstrate the N/2 binary counter example (N=1), we can manually
tune
the time constants. Tuning the N/2 neuron for a specific function
is
simple. For example to tune the N/2 neuron for N=1 (divide by
2), apply a
pulsing waveform (ie 2Hz MicroCore pulses) to the 2/N input pin. For
the
components shown, the active low input pulses must be >2ms and
can be any
frequency below 250 Hz. Higher frequencies can of course be achieved
with
different component values. The 1M Nv pot is initially set for
minimum and
then slowly adjust the pot until you observe a squarewave at the output
using a LED in series with a 5K resistor between the output and Vcc
for
indication. If the pot is adjusted further for smaller TC ratios, the
N/2
neuron becomes a quantizing pulse multiplier, producing one output
pulse for
each input (N=2=REGENERATE) or 1.5, 2, 2.5, 3, etc output pulses for
each
input pulse (N>2=AMPLIFY). Note that the minimum input pulse width
must
always be greater than the Nv time constant. Also note that the fractional
output pulses are a combination of a square wave and pulses which will
also
cause the LED to blink.
N/2 BIOMORPHIC CLOCK
After tuning the first N/2 neuron to divide by two, measure the resistance
of the variable resistor and wire up the remaining gates (replacing
the pot
with fixed resistors) for a total of four N/2 neurons capable of counting
16
input pulses . Any number of N/2 (N=1) neurons can be cascaded to divide
the
input frequency by 2 to the nth power. For example 5 chips (2
ea. H14 and 3
ea. HC86) provide a maximum of 12 neurons which will divide input pulses
by
4096. I will design a simple decoder which will reset an eleven stage
counter chain clocked at one minute intervals, when the counter reaches
1440
(the number of minutes in a day) so that the dream of a "BIOMORPHIC
CLOCK"
is realized. Alternately 12 neurons and decoders for 10, 6, 24 can
be used
to construct a BIOMORPHIC BCD CLOCK. Remember that these are
"ripple"
counters and a 1ms delay (settling time) is introduced at each
stage. This
limits the input frequency and/or limits the maximum length of the
network
just like digital ripple counters .
MONO N/2 NEURON
While the N/2 neuron circuit works fine in simple networks, there are
some
issues that need to be resolved, including normalizing the input and
output
pulse widths and pulse spacing required to stabilize the behaviour
of N/2
neurons in complex networks. Narrow negative going input pulses
will reset
the input Nv before the gating pulse terminates and must be avoided.
For a
network of N/2(N=1) neurons this is not a an issue because the neuron
output
has a 50% duty cycle.
However in multiple input or complex N/2 networks a minimum pulse width
must
to be guaranteed at both input and output to ensure predictable operation.
The input pulsewidth can be fixed by adding one more Bilateral switch
at the
input stage as shown in MONO N/2 NEURON in FIG 4 . This switch
isolates the
IN terminal from the Nv capacitor after the Nv is triggered by an active
low
transition and for the duration of the NvTC uses R1 to hold the IN
side of
the cap low. After the voltage across R2 is equal to Vcc/2, the 4066
switch
turns on to reconnect the IN to the cap after the Nv times out. Resistor
R1
provides a "low" impedance current path for charging CNv while the
IN
terminal is isolated. The voltage drop across R1 introduces a small
error in
the NvTC and the value of R2 should be at least 20 times the value
of R1 to
minimize this error. Note the use of "elementary" (non-digital)
components
for this non-retriggerable Nv monostable circuit. I am presently exploring
if an output pulse Nv is required for cascading Amplifying N/2 stages.
0V
Vcc
__
|
| _____ __|04 \___
|
| | |
|__ / |
[10K] [1M]
| |_
|
|R1
|R2 | .001| `--[1M]--|
|____||___|______/
=== R3 |____ OUT
| ||
| / 4066 | __
|
| .001 |
|_____|__/04 |___|
/_______|
\__ |
/
|
IN
FIG 4 - THE ELEMENTAL MONO N/2 NEURON WITH FIXED GATING PULSE
COMPLEX N/2 NEURAL NETWORKS
I have not yet investigated complex N/2 neural networks that simulate
spiky
neuron biological systems although there would appear to be the potential
for implementing processing functions using these simple N/2 networks.
While
not needed for N/2 in the N=0 to 2 modes, it appears that a network
of
AMPLIFYING (N>2) N/2 neurons require an output conditioning to generate
fixed width output pulses.
The design objective is that one pulse cascading through several linearly
connected (1 dimensional) stages of N/2 neurons in the
AMPLIFY mode would
produce a saturated pulse train with continuous equally spaced pulses
of
2NvTC period. If the saturated pulse train encounters an N/2 neuron
in the
ATTENUATE mode the pulse train would be divided by 2. Several stages
of
attenuation will increase the interval between pulses and an INHIBIT
mode
neuron would block any pulses. In 2 dimensional networks of N/2 neurons
in
the AMPLIFY mode, a hemispheric wave of pulses would propagate from
the
single initiating pulse with the wavefront washing around groups of
N/2
neurons in the ATTENUATE and INHIBIT mode.
NEURAL NETWORK SIMULATOR AND STATUS DISPLAY
I have just started to read about the Cellular Automata (CA) work of
TOFFOLI. Several CA synthesizers programs (including JC) are available
for
the PC and are apparently in the public domain. These CA are like arrays
of
virtual BEAM machines (reproduction by any electronic means prohibited?)
The
process of each cell is determined by simple rules and the new states
of the
cell are calculated at each tick of the clock.
It may be possible to program the rule table for these CA programs to
simulate N/2 neural networks. In any case an analog simulator would
be very
useful to test some of these ideas. I can't afford the specialized
CA
computing engines which are not the large scale arrays of silicon CA
I had
anticipated but instead seem to be RULE engines connected to memory
planes
with pipelines to video output. These CA engines like the CAM6 plug
into a
PC to generate 256x256 multicolor displays of CA using multi plane
neighbor
rule tables at ~60 frames/sec. ( I hope I got most of that right -
anyone
out there more familiar with the details?)
If a virtual MicroCore can be programmed into a PIC (which I'm sure
it can
be), it should be possible to write a program for the PC that simulates
one
, several, hundreds of photovore poppers, walkers, I wonder....
Wilf Rigter
From: Wilf Rigter <Wilf.Rigter@p...>
Date: Wed Feb 10, 1999 8:51 am
Subject: [alt-beam] Mono Nv Neuron
Someone asked me how sensitive the N/2 neuron is to high frequencies.
The
question should really be "How sensitive is a Nv to high frequencies?"
since
the Nv is the input element of the N/2.
A conventional Nv is very sensitive to high frequency noise on the input
when a "process" is active and at a point on the capacitor discharge
curve
when the voltage at the bias point is near the switching threshold.
Then
even a small noise spike can cause an early trigger disturbing the
time out.
In addition a conventional Nv gives a badly chopped up output,
when reset
and retriggered at every input +/- transistion shorter in duration
than
NvTC.
So here is a ruggedized Nv Neuron which I designed for the input of
a N/2
counting chain. This novel circuit has no restriction on input vs output
pulse width and is insensitive to input noise. It is a non-retriggerable
monostable Nv Neuron. Once a negative transistion occurs on IN,
then OUT
stays low for NvTC (RC) even if there are multiple transistions
at the
input during the period NvTC after the Nv is triggered. Since
the timing
element RC are not connected to the input, the time constant is stable
and
not affected by noise at the input. As you can see the input components
can
be made very small since they only required to trigger the main Nv
process
controlled by R and C. The ASCII version shows AND gate version with
active
low input and output. The GIF (1KB) shows a Mono Nv stage using the
HC32 and
a HC04 to provide the equivalent of a Nv microcore stage.
Vcc________________
|
|
|
[R] C
[10K]
|________||___
|
| __ || |
IN ____||_|___ +-|08 \_______|__ OUT to XOR
|| `------|__
/
.001
FIG 1
- Mono Nv NEURON
From: Wilf Rigter <Wilf.Rigter@p...>
Date: Sun Jan 31, 1999 8:54 pm
Subject: [alt-beam] BiCores (suspended, isolated, Schmitt)
Hello everyone,
Well, I was a tad confused in my earlier post but without that I wouldn't
have had as much fun discovering just what goes on under the hood of
Beam
Core Circuits!
The "pretty amazing, right?" bit, in my previous post should have alerted
you that there is more between Vcc and Ground than meets the eye!
However it make little sense to suggest a formula to calculate the time
constant of NvCore and "suspended" BiCores : it must be done by experiment
(like my first experience in electronics: probing the Galena cube in
my
crystal set with a "cat's wisker"- God, I must be old!)
Perhaps a guide line for calculating the time constant of a NvCore
is
useful:
The nominal lower threshold of a National and Philips 74HC14 Schmitt
trigger
is about 1.8V which makes the time constant of a NvCore stage T=R*C
.
(Rather easy to calculate) Because the voltage across the capacitor
is
referenced to V (via the output of the previous Nv), the cap charges
exponentially through R towards 0V. At 63% of the applied voltage across
the
cap, it crosses the lower threshold (Vt-=1.8V @ Vcc=5V) at which point
the
output of the Schmitt trigger goes high. I checked this with several
74HC14s
and it is correct to within 5%! In short, the process duration
for these
makes of 74HC14 NvCore is R*C seconds. ie 1M and 0.1ufd = 100ms pulse
duration. I understand that TI parts have different Vt- threshold and
will
have a longer timeconstant for the same R/C component values as a result.
Similarly the 74HCT14 would have a lower Vt- threshold and therefore
a
longer time constant. I will repeat the experiment when I get some
samples
and post some more guide lines. Also see
http://www.serve.com/heretics/discus/messages/223/45.html?FridayJanuary29199
The "suspended" BICORE however is a different engine:
The "suspended" BiCore is a remarkable circuit that at first glance
cannot
possibly work. It has 2 processes which are active at the same time
with the
shorter process always in control. The "suspended" BiCore circuit operation
bears little or no resemblance to the operation of a 74xx14 BiCore
despite
claims to the contrary! Since we use digital devices as linear
amplifiers
without a well defined voltage gain and since the trigger thresholds
are
dependent on the voltage gain, the pulse duration of a bicore is notoriously
difficult to predict and ranges from 0.2RC for a 74HC00 to 5RC for
a 74HC04
depending very much on gain, the level of supply ripple and spurious
oscillations. Even differences in manufacturers and families (I have
tested
this with 74HC04, HCT04 and AC04 devices) can result in a 4 to 1 variation
in time constants.
In digital electronics, we think of of an inverter as a device operating
with input and output voltages at discrete logic levels, usually 0V
and Vcc.
In analog electronics, we think of an inverter as a linear amplifier
with
the ratio of input to output voltage directly proportional to the gain
of
the circuit and the linear input range = Vcc/gain. When we think
"suspended" BiCore, we enter the world of mixed analog and digital
electronics.
In the "suspended" BiCore Oscillator circuit both upper and lower threshold
voltages are used and for a "standard" HC inverter input these are
the
points at which the inverter output voltage starts to change (the linear
region). The switching thresholds therefore are the upper and lower
edges of
the linear input region which depend on the gain of the linear inverter.
For
the high gain 74HC04 or 74HC240, it is a narrow region of ~100mV
close to
the center of Vcc. In the case of the low voltage gain 74HC00,
the linear
region is about 1V giving upper and lower thresholds of 3V and 2V compared
to the 2.65V and 2.45V of the 74HC04. I won't give the whole
description of
operation of a BiCore (the suspended kind of course, more on this later)
but
suffice it to say that the timing network consists of 2 (nominally
equal)
capacitors in series with a series resistor and that the initial charge
across both capacitors is (nominally) 0V and that the charge across
both
capacitors rises exponentially towards Vcc, while the voltage across
the
resistor decays exponentially towards 0V. In the case of the high gain
inverters (74HC04) the linear region is near the center of Vcc, so
the
voltage across the resistor must be close to 0V, ergo the charge across
the
capacitors must be nearly Vcc. The important difference between the
Schmitt
NvCore and the "suspended" BiCore is the fact that NvCore processes
are
independed sequential edge trigger time constants while in the "suspended"
BiCore both proceses are triggered simultaneously and only the shorter
of
the two time constants determines the combined "BiCore process"
timeconstant.
I think using the term BiCore for both circuits is a tad of a misnomer.
Here is some good news! A 74HC14 BiCore is indeed possible! (Forget
about
"crosstalk" 8^) Just use two capacitors with a ratio of values greater
than
1/2 for Schmitt triggers that have thresholds at 33% and 66%
ie National
74HC14 . Since the smaller capacitor (the shorter process) sets the
time
constant of the BiCore you can make the ratio arbitralily large (make
it 1
to 4 to be on the safe side given the variety of thresholds out there)
The
larger cap has no effect on timing other that to provide positive
feedback
during switching. Interestingly enough the larger cap transfers a larger
charge and this can be used in the next circuit to provide +/- 5V
powersupply. Amazing what you can do with the BiCore or maybe
this should
be called the SCore!
I tested an "isolated/suspended" BiCore which uses large resistors
in series
with the inverter inputs to avoid "diode clamping" of the input waveforms.
As a result, the time constant is roughly doubled and some interesting
characteristics were observed. The voltage across the resistor is now
initially 10V for a Vcc of 5V and the optional addition of some diodes
and
capacitors turn the bicore into a symmetric voltage doubler circuit.
Moreover the + and - timeconstants are dependent on the loading
of these
+7.5V and -2.5V supplies. This opens up a whole new way to provide
feedback
for an "isolated " BiCore circuit or maybe this should be called the
ICore!
The description of operation of the "suspended" and the "isolated" BiCore
is
shown below:
The 74HC14 "suspended" BiCore waveforms are a little bit complicated
and not
easy to do in ASCII so you will have to wait a bit for those details.
However, I will have the detailed description of operation of all these
circuits and GIFs up later today or tomorrow at my new website which
I will
open up despite the fact that it is just bare bones right now.
In the mean time:
enjoy
wilf
The "belt and suspenders" BiCore Circuits
by wilf rigter (c) Jan 1999
The suspended BiCore circuit consists of 2 inverters, typically from
a HC240
(or HC14 Schmitt triggers), 2 capacitors, and a resistor. In addition,
there
are 2 reverse biased input protection diodes between each inverter
input and
the chip supply pins. These diodes are not normally shown but they
play a
role in the operation of the circuit.
Here is a brief description of a suspended BiCore oscillator operation:
Given a +5V supply , a 74HC240 and equal capacitors C1 and C2, assume
that
the BiCore is oscillating with the input of A1 at +5V and the input
of A2 at
0V. Each inverter amplifies and inverts the input and therefore the
output
of A1 is 0V and the output of A2 is +5V.
Since each capacitor is connected between the output of one and the
input of
the other inverter and since these are at the same potential, the voltage
across each cap is 0V. However the 2 caps are also connected in series
with
the resistor across 0V and +5V (the two opposite outputs).
This initial +5V across the resistor causes an exponentially decaying
current which charges the caps so that the voltage approaches 0V across
the
resistor and 2.5V across each cap (and at each inverter input) As the
A1
input approaches 2.5V, the A1 output starts to switch state from 0V
to 5V.
This A1 output signal is coupled via C1 to the input of A2 which, already
at
2.5V, causes A2 output to switch rapidly from +5V to 0V. In turn, the
A2
output coupled via C2, now drives the input of A1 from 2.5V to 0V.
The high
gain of the two inverters and the positive feedback cause both outputs
to
flip to the opposite digital states.
Theoretically , the voltage at each input should swing between 7.5V
and
-2.5V, the sum of the input voltage (2.5V) and the coupled output signal
(+/-5V) at the moment of switching and this is the case in the "isolated"
BiCore. However in the "suspended" BiCore each input is protected internally
by the equivalent of 2 diodes connected in reverse bias from the input
to
each supply, so that the voltage at each input is clamped and swings
between
+5.6V and -0.6V respectively as shown below. The real waveform has
exponential slopes approximated here with diagonal lines. The A2 waveforms
A2 are identical but phase reversed (upside / down). The third waveform
shows sum of the 2 input voltage waveforms across the resistor which
is also
proportional to the capacitor charging currents.
Note that in the case of the isolated BiCore, the over and under voltage
generated by the capacitor charge pump can be put to good use: for
example
for a source side driver for MOSFETs or to overdrive the inputs of
a
saturated Emitter Follower bridge or as an +/- Opamp/Comparator powersupply,
greatly easing the problem of sensing signals near ground and Vcc.
5.6V _
_
A1 _
|\ |\ |\ |
_
input 2.5V _ | \ | \
| \ | _
__
_ / | / | / | /
_
__|A1 \___
-.6V _
|/ |/ |/ _
| |__ / |
| |
5.0V_ _
__ __ __ _
| ===
A1 _
| | | | | | | _
| | 0.1
output _ | |
| | | | | _
|---[1M]---|
_ | | | | | | |
_ 0.1|
|
0V_
|__| |__| |__| | _
=== |
| __ |
6.2V _
_
|___/ A2|__|
voltage _ |\ |\ |\ |\ |\ |\
| _
\ __|
across R _ | \| \| \| \| \| \|
_
_ | /| /| /| /| /| /| _
0V _
|/ |/ |/ |/ |/ |/ | _
| | | | | | | | |
Suspended BiCore switching waveforms Supended BiCore Circuit
7.5V_
_
_ |\ |\
|\ _
__
_ | \ | \ |
\ _
__|A1 \___
TP(A1) 2.5V_ | \ |
\ | \ _
| |__ / |
_ / | / | /
| _
| |
_ | / | /
| _
[10M] |0.1
-2.5V_
|/ |/ |/ _
| ===
TP(A1)--|---[1M]---|--TP(A2)
| | | | | |
=== |
5.0V_ _
___ ___ _ _
0.1| [10M]
A1 _
| | | | | |
_
| __ |
output _ |
| | | | | _
|___/ A2|__|
_ | | | | |
| _
\ __|
0V_
|___| |___| |___| _
Isolated BiCore waveforms
Isolated BiCore
+7.5V
+7.5V
|
|
|----|<-----+
+----->|---+----|<-----+
|+
|
| |+
|
=== 10uF |
| === 10uF
|
|
|
| |
|
Vcc
|
| Vcc
|
|---TP(A2) TP(A1)--|
|--TP(A2)
0V
|
| 0V
|
|+
|
| |+
|
=== 10uF |
| === 10uF
|
|
|
| |
|
|---->|-----+
+-----|<---+---->|-----+
|
|
-2.5V
-2.5V
Isolated Bicore Doubler
Isolated BiCore Bridge Doubler